
Superdome Servers - I/O Expansion Cabinet Guide, Fifth Edition

Chapter 6
Remove and Replace Procedures
Removing and Replacing the XPC
167
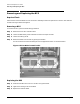
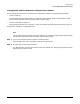
You must loosen and move the safety latch first one direction and then the other to remove both
BPSs.
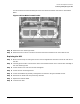
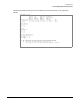
Figure 6-41Two BPSs located in XPC
Step 8. Remove the rear mounting bracket.
Step 9. Remove the four T-20 Torx screws on the front of the XPC and slide it out of the cabinet rack.
Replacing the XPC
Step 1. Make sure the snap-on locking nuts on the rack are aligned with the holes on the front and rear of
the XPC
Step 2. Carefully place the XPC into the front of the rack and slide it back until it is flush with the edge of
the rack mounting holes.
Step 3. Install the four front T-20 Torx screws and tighten.
Step 4. Install the rear mounting bracket.
Step 5. Install the two BPSs by carefully sliding them into the XPC using the handles on each.
Step 6. Reconnect all cables that were previously removed.
Step 7. Replace the cosmetic bezel.
Step 8. Close the rear door.