
Superdome Servers - I/O Expansion Cabinet Guide, Fifth Edition


Chapter 6
Remove and Replace Procedures
Removing and Replacing the BPS
168
Removing and Replacing the BPS
Required Tools
Tabs and slots minimize fastener count and aid in assembly and service operations. The XPC uses retained
and self-locking hardware throughout.
Removing a BPS
To remove the XPC, perform the following procedure:
Step 1. Remove the front XPC cosmetic bezel.
Step 2. Loosen the BPS safety latch located at the front and top of the XPC.
Step 3. Loosen the locking screw.
Step 4. Remove the BPS from the XPC by pulling the handle.
You must loosen and move the safety latch to the opposite direction to remove the BPS.
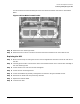
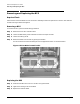
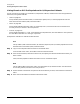
Figure 6-42Two BPSs located in XPC
Replacing the BPS
Step 1. Slide the new BPS into its slot in the XPC using the handle.
Step 2. Tighten the locking screw on the BPS.
Step 3. Replace the cosmetic bezel.