
Superdome Servers - I/O Expansion Cabinet Guide, Fifth Edition


Chapter 8
IOX Installation in the 10000 Series Rack
Installing the Superdome IOX
187
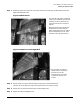
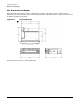
Step 1. Attach the spacer and right rail mount with three M-5 screws (part number 0515-0711). See
Figure 8-8 and Figure 8-9.
Figure 8-8 Rail Mount
Figure 8-9 Spacers on the Right Rail
Step 2. Attach the left rail mount with three M-5 screws (part number 0515-0711).
The left rail mount does not require the spacers but will use 4 M-5 screws.
Step 3. Attach the rails using screws with part number 0515-1142.
Step 4. Attach the cable management arm.
For the right rail mount, mounting
locations are added at the positions
noted by arrows to maintain the
front plane of the XUC chassis in
10KG2.
NOTE: These screw locations are
underneath the outer slide rail,
which requires that the rail mount
be pre-installed to the rack, then
the outer slide rail attached to it.
For the right rail mount, a
spacer block is required to
maintain the correct
spacing for the rail mount
in the rack (Two per rail
mount).