
HP Surestore Bridge FC 2/1 LV and FC 4/1 HV Installation and Operations Guide


130 Accessing the HTTP Interface Chapter 6
Accessing the HTTP Interface
1. Connect a 10baseT or 100baseT Ethernet cable to the back of the bridge.
2. Apply power to connected SCSI and Fibre Channel devices.
3. After all the devices have gone through their power up routines, boot up
the bridge.
4. Turn on the host computer.
5. If the IP address for the bridge is known, open the host computer’s web
browser and enter the IP address into the Address field. The factory default
for the IP address of the bridge is 1.1.1.1. See Appendix D, Enabling
DHCP.
If you do not know the IP address of the bridge (or need to change the IP
address), connect to the bridge using the RS-232, or serial, connection.
Current information can be seen and changed from the Network menu.
See Chapter 5 for more information on making changes to the IP address.
Note To access the Web Management Interface, the bridge must be
assigned an IP address. The factory default setting for the IP
address allows access on a local area network only. If the
factory default for the IP address is already used by another
device on the local network, the IP address must be changed.
For remote access from WAN or Internet locations, the IP
address must be changed to a valid IP address. Valid IP
addresses have the form x.x.x.x where each x is an integer in the
range of 0 to 255.
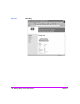
6. When selecting a menu item for the first time, the user will be prompted to
log in with a user name and password. The defaults are
[root] for user
name and
[password] for password. This information is required only
once per session.
7. After entering the user name and password, full access is gained to the
configuration menus for as long as a session lasts. A session ends when
the user exits the Web browser or navigates the browser to a new web
address. Log-in will be required again the next time a session is opened.