
HP Surestore Bridge FC 2/1 LV and FC 4/1 HV Installation and Operations Guide


242 HTTP Interface Appendix D
HTTP Interface
To access the HP Surestore Bridge FC 2/1 LV or 4/1 HV using HTTP, first look
up the current IP address within the Ethernet Configuration menu using the
Serial or Telnet interface. Next, type the IP address in the HTTP browser. See
“HTTP Troubleshooting” at the end of this Appendix if there are any HTTP
difficulties associated with user name and password.
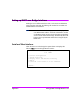
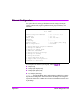
After entering the IP address, the user should see the Configuration menu.
Click on the [Configuration] link. This will access the Configuration menu
containing CURRENT/NEW readings for DHCP (“Use DHCP”). The following
3 DHCP-relevant options are also listed: Ethernet IP Address, Subnet Mask,
and Gateway IP Address.
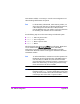
Tips for manipulating DHCP within the HTTP interface:
1. In the Configuration menu, the CURRENT column provides current values
while the NEW column displays user changes that have not been
implemented (submitted/rebooted).
2. To change the current state of DHCP, change its NEW status to [on] or
[off], submit the change and then reboot.
3. How to reboot: Return to the Main menu, click the [Diagnostics] link, click
the [Reboot] link, select [Yes], and then [submit].
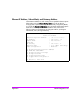
4. Null values: DHCP vs. non-DHCP.
DHCP. Null values under the NEW column are acceptable when
submitting a web page that enables DHCP.
For Non-DHCP: When the user wants to submit a web page disabling
DHCP, “null” values are not acceptable for Ethernet IP Address, Subnet
Mask, and Gateway. However, the HTTP interface effectively handles this
issue in the following manner. First, warnings are displayed for each
invalid entry with the following type message, “Invalid input! Replace
NEW Ethernet IP Address value with a valid IP address.” Second, at this
point if the user clicks on the link “Back to Configuration Menu”, any “null”
values will automatically be replaced with saved values from memory
within the bridge. However, if the factory default IP Address (1.1.1.1) is
the NEW value, manually replace this with an unused IP Address. Again,
at this point remember to re-submit web page, then [Reboot].
5. Under NEW column, null values (for IP Address, Subnet Mask, Gateway)
are fine when enabling DHCP.