
User's Manual


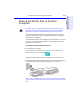


Table Of Contents
- Hewlett-Packard Limited Warranty Statement
- HP Software License Agreement
- Chapter 1: Connecting CD-Writer Plus and Installing Software
- Chapter 2: Using Your CD-Writer Plus
- Chapter 3: Problem Solving
- Chapter 4: Sharing Your CDs
- Chapter 5: Making Data CDs
- Chapter 6: Making Music CDs
- Chapter 7: making Inserts and Labels
- Chapter 8: Copying CDs
- Chapter 9: Find Files Fast with HP Simple Trax
- What Simple Trax Can Do for You
- Copying Files to CD
- Automatically Copying Files to CD
- Preparing a CD for Automatic Operations
- To Verify Your Schedule Settings
- To Change a Schedule
- Browsing Your Simple Trax CDs
- Finding Files On Your CD
- Copying Files and Folders Back to Your Hard Drive
- Retrieving an Earlier Version of a File
- Importing CDs into HP Simple Trax
- Event Logs
- Changing the Index Display
- Chapter 10: HP Disaster Recovery
- Appendix A: Technical Specifications
- Appendix B: Customer Support
- Index

1-12 Uninstalling the Software Programs
■ Make sure the CD-Writer Plus drive’s cables are connected properly.
■ See “Check for a conflict with the parallel port (some other device using the
same IRQ or I/O as the parallel port).” on page 1-10. For example, a
sound board or fax/modem board may be using the same IRQ. If you
discover a conflict(s), change the setting on the other device. Refer to
the manuals that came with your computer and other devices for
instructions.
■ The power supply should have a steady green light when connected
at both ends. If it is flashing, try a different power outlet. If it is still
flashing the power supply could be damaged.
Uninstalling the Software Programs
You can remove all of CD-Writer Plus’s programs or individual programs.
CAUTION: If you want to reinstall the CD-Writer Plus drive’s software, first be
sure to uninstall the original software.
1. Click the Start button.
■ Point to Programs.
■ Point to HP CD-Writer Plus.
■ Point to Tools & Information.
■ Point to Utilities.
■ Click Uninstall.
2. Select the CD-Writer Plus drive’s program(s) that you wish to remove.
3. Click the Finish button.
The software is removed, including all related entries in your system
registry.