HP SureStore DAT Internal Tape Drive Installation Guide Tape 5000i, DAT8i DAT24i, DAT40i
HP SureStore DAT Installation Overview (Internal Drives) Refer to: Before you start: page 1-2 Check the packing list inside this guide. Check system prerequisites. Step 1: Check the Drive’s SCSI ID page 1-6 Check the tape drive’s SCSI ID. If necessary change it from the default of 3 by setting jumpers on the back of the drive. Step 2: Set the Configuration Switches (UNIX Systems Only) page 1-10 Check the UNIX configuration switches on the bottom of the drive.
Dat-int.bk Page ii Wednesday, May 26, 1999 10:46 AM Copyright © 1998-1999 by Hewlett-Packard Limited. The information contained in this document is subject to change without notice. November 1999 Part Number: C1555-90909 Printed in the UK. This document contains proprietary information which is protected by copyright. All rights are reserved. No part of this document may be photocopied, reproduced or translated to another language without the prior written consent of Hewlett-Packard Limited.
Dat-int.
Dat-int.
Dat-int.
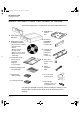
Dat-int.bk Page 2 Wednesday, May 26, 1999 10:46 AM HP SureStore DAT Installation Guide Before You Start: Check the Contents of the Box The following equipment is supplied with your HP SureStore DAT drive.
Dat-int.
Dat-int.bk Page 4 Wednesday, May 26, 1999 10:46 AM HP SureStore DAT Installation Guide The DAT 40 drive has a 68-pin wide, high-density SCSI connector. If your computer uses narrow SCSI, use a 68-to-50-pin adapter to connect the DAT40 drive (68 pins) into the narrow SCSI bus (50 pins). This adapter must be purchased separately (part number C7423A). See the electronic DAT Media and Orderable Accessories Guide on the HP SureStore Tape CD-ROM for ordering information.
Dat-int.bk Page 5 Wednesday, May 26, 1999 10:46 AM HP SureStore DAT Installation Guide Backup Software You need backup software that supports the drive. Applications usually recognize tape drives by their manufacturers’ internal identifiers rather than their model numbers, so check the table below for the appropriate reference for your model.
Dat-int.bk Page 6 Wednesday, May 26, 1999 10:46 AM HP SureStore DAT Installation Guide Step 1: Check the Drive’s SCSI ID Note Your HP SureStore DAT drive is shipped with a default SCSI ID of 3, but it can be assigned any unused ID between 0 and 6. Do not use SCSI ID 7, which is reserved for the SCSI controller, or SCSI ID 0, which is typically assigned to the boot disk. HP SureStore DAT40 drives can be assigned any unused ID between 0 and 15. Do not use SCSI ID 7 or SCSI ID 0.
Dat-int.bk Page 7 Wednesday, May 26, 1999 10:46 AM HP SureStore DAT Installation Guide Figure 1.
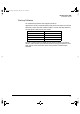
Dat-int.bk Page 8 Wednesday, May 26, 1999 10:46 AM HP SureStore DAT Installation Guide Figure 1.2 SCSI ID settings on back of HP SureStore DAT40i Example SCSI IDs 2 3 5 9 13 (Default) Installing and Using HP TapeAssure HP TapeAssure allows you to check your computer’s current SCSI configuration on a Windows or NetWare system. You cannot install HP TapeAssure on Unix systems. Installing HP TapeAssure 1 Select home.htm on the HP SureStore Tape CD-ROM and the required language.
Dat-int.bk Page 9 Wednesday, May 26, 1999 10:46 AM HP SureStore DAT Installation Guide Using HP TapeAssure Note If the program does not work correctly or hangs during processing, there may be a compatibility problem with the SCSI card. The current version of HP TapeAssure may not support Adaptec 1510 cards (6360 chip set) and Symbios cards. 1 Once it is installed, run TapeAssure from the Programs menu in the Windows Start menu.
Dat-int.bk Page 10 Wednesday, May 26, 1999 10:46 AM HP SureStore DAT Installation Guide Step 2: Set the Configuration Switches (UNIX Systems Only) 1 Check the “UNIX Configuration Instructions” in the electronic User’s Guide on the HP SureStore Tape CD-ROM for specific advice for your operating system. You will need web browser software to access the electronic User’s Guide. See page 1-22 for more information about using the HP SureStore Tape CD-ROM.
Dat-int.bk Page 11 Wednesday, May 26, 1999 10:46 AM HP SureStore DAT Installation Guide Step 3: Prepare the Mounting Bay Caution To avoid damaging the computer or tape drive, ensure that the computer is powered off while you install the drive. Static electricity can damage electronic components. After you have disconnected power from the computer and removed the cover, touch a bare metal part of the chassis. Similarly, touch a bare metal part of the drive before installing it.
Dat-int.bk Page 12 Wednesday, May 26, 1999 10:46 AM HP SureStore DAT Installation Guide Using the Conversion Kit 1 Unscrew the four screws and remove the rails from the tape drive. Figure 1.4 Removing the drive rails prior to installation in a 3½-inch bay 2 Use a screwdriver to release the 5¼-inch front panel from the tape drive and remove it. Fit the 3½-inch front panel and push firmly until the panel clicks into place. Figure 1.
Dat-int.bk Page 13 Wednesday, May 26, 1999 10:46 AM HP SureStore DAT Installation Guide 3 Fit the 3½-inch front panel and push firmly until the panel clicks into place. Figure 1.
Dat-int.bk Page 14 Wednesday, May 26, 1999 10:46 AM HP SureStore DAT Installation Guide Step 4: Attach Mounting Rails If your computer requires special rails or other hardware to install the tape drive, mount them on the tape drive in this step. If your computer does not require special mounting hardware, proceed to step 5 on page 1-16 now. 1 Attach the appropriate rails. • If you are installing in an HP NetServer L-series, place the tape drive in the mounting tray supplied, as shown in figure 1.7.
Dat-int.bk Page 15 Wednesday, May 26, 1999 10:46 AM HP SureStore DAT Installation Guide Figure 1.8 Attaching the HP NetServer E-series, Vectra, Kayak or Brio rails to the tape drive Use the four screws provided with the rail kit Figure 1.
Dat-int.bk Page 16 Wednesday, May 26, 1999 10:46 AM HP SureStore DAT Installation Guide Step 5: Install the Drive Note Write the model name, product number, serial number, and SCSI ID of your drive in the front of this guide for future reference. The model name is on the front of the drive and the product and serial numbers are on a label on the bottom of the drive. 1 Attach the power cable extension to the rear of the tape drive, as shown in figure 1.10. Figure 1.
Dat-int.bk Page 17 Wednesday, May 26, 1999 10:46 AM HP SureStore DAT Installation Guide Figure 1.11 Sliding the tape drive into the empty bay Step 6: Attach Power and SCSI Cables 1 Attach a spare power cable from the computer’s internal power supply to the power extension cable, as shown in figure 1.12. Figure 1.
Dat-int.bk Page 18 Wednesday, May 26, 1999 10:46 AM HP SureStore DAT Installation Guide 2 Attach a spare SCSI cable to the SCSI connector. If you are using an existing SCSI cable, simply attach the drive to a spare connector on the computer’s SCSI ribbon cable, as shown in figure 1.12. DAT8i and DAT24i drives only: If your computer has wide SCSI, use the supplied 50-to-68-pin adapter to connect the tape drive to the SCSI bus.
Dat-int.bk Page 19 Wednesday, May 26, 1999 10:46 AM HP SureStore DAT Installation Guide Step 7: Secure the Drive 1 Secure the tape drive into place with screws. If you used mounting hardware that screws to the front of the computer, use the screws you removed in step 3 to fix the drive in place.
Dat-int.bk Page 20 Wednesday, May 26, 1999 10:46 AM HP SureStore DAT Installation Guide On Completion Once you have completed the installation: • Make sure you have the correct media. • Power on and check that your new drive is operational. • Insert the HP SureStore Tape CD-ROM. It contains everything you will need to use your tape drive—drivers, backup software, utilities and user information. • Register your tape drive to ensure that you benefit from the full 3-year warranty period.
Dat-int.bk Page 21 Wednesday, May 26, 1999 10:46 AM HP SureStore DAT Installation Guide Check Drive Operation 1 Switch on the computer. The tape drive will run its hardware self-test, which takes about 5 seconds. At the end of the hardware self-test, both front panel lights should be off. Read more about the self-test and front panel lights in the electronic User’s Guide on the HP SureStore Tape CD-ROM. 2 Verify that the tape drive installation was successful.
Dat-int.bk Page 22 Wednesday, May 26, 1999 10:46 AM HP SureStore DAT Installation Guide Insert the HP SureStore Tape CD-ROM The HP SureStore Tape CD-ROM contains backup software, as well as drivers, useful utilities and information about using your tape drive. 1 Load the CD-ROM and select home.htm. Note If you do not have a web browser, see the Readme.txt file. 2 Select the required language to display the Welcome page.
Dat-int.bk Page 23 Wednesday, May 26, 1999 10:46 AM HP SureStore DAT Installation Guide Backup Software To use the tape drive, you will need a backup application or utility that supports your tape drive model. The HP SureStore Tape CD-ROM contains free backup software for use with Windows 95, Windows 98, Windows NT and Novell NetWare.
Dat-int.bk Page 24 Wednesday, May 26, 1999 10:46 AM HP SureStore DAT Installation Guide Refer to your backup application’s documentation for instructions on how to back up and restore data. Viewing the Electronic User’s Guides You can view the electronic User’s Guides with most current web browsers on any platform.
Dat-int.bk Page 25 Wednesday, May 26, 1999 10:46 AM HP SureStore DAT Installation Guide Register Your Tape Drive You must register with HP to ensure that you benefit from the full 3-year Express Exchange1 warranty period. The second and third years of warranty are subject to registration within 30 days. Please register via the web (http://www.hp.com/go/tapereg) or by using the reply card in the box. The first year of warranty is provided automatically.
Dat-int.bk Page 26 Wednesday, May 26, 1999 10:46 AM HP SureStore DAT Installation Guide 2 HP warrants to you that HP software will not fail to execute its programming instructions after the date of purchase, for the period specified above, due to defects in material and workmanship when properly installed and used. If HP receives notice of such defects during the warranty period, HP will replace software media which does not execute its programming instructions due to such defects.
Dat-int.
Dat-int.bk Page 2 Wednesday, May 26, 1999 10:46 AM HP SureStore DAT Installation Troubleshooting Save Yourself a Call The first step in problem-solving is establishing whether the problem lies with the cartridge, the tape drive, the host computer and its connections, or with the way the system is being operated. If none of the following advice helps you solve the problem, call for service.
Dat-int.bk Page 3 Wednesday, May 26, 1999 10:46 AM HP SureStore DAT Installation Troubleshooting Problems with Your Internal Tape Drive Problem Possible Cause The tape drive does not The power cable may not be power up. connected to the tape drive properly. TapeAssure does not The power cable or SCSI cable recognize the tape drive. may not be connected properly. You cannot back up or restore. The SCSI connection may be loose. Potential Solution Make sure that the power cable is firmly connected.
Dat-int.bk Page 4 Wednesday, May 26, 1999 10:46 AM HP SureStore DAT Installation Troubleshooting Other Sources of Information If you experience problems using your tape drive after installation, use HP Tape Tools to help you diagnose the problem. You will also find troubleshooting information on the HP SureStore Tape CD-ROM and the HP web site.
Index A accessories, ordering See electronic User’s Guide anti-static protection 1-6 applications, backup 1-5, 1-23 B backup applications drives supported 1-5 installing 1-23 backup fails 2-3 backup strategies See electronic User’s Guide boot-up fails 2-2 browsers 1-10, 1-24 C cables, SCSI See SCSI cables 1-3 capacity, tape See electronic User’s Guide cartridge choosing See electronic User’s Guide forcing ejection See electronic User’s Guide loading 1-21 ordering See electronic User’s Guide storing See el
Novell NetWare backup applications 1-23 TapeAssure 1-9 O operating instructions See electronic User’s Guide ordering parts and accessories See electronic User’s Guide P parts included 1-2 power cable, attaching 1-17 power-up failure 2-3 precautions against static 1-6, 111 problems SCSI termination 2-3 with computer 2-2 with tape drive 2-3 putting in a cartridge 1-21 R radio interference statements See back of book rails attaching 1-14 non-standard 1-4 supplied 1-4 read-write test 1-21 regulatory informa
Dat-int.