
Disk Array FC60 User's Guide (A5635A)
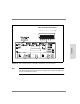
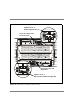
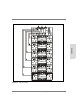
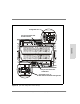
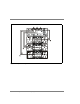
Table Of Contents
- 1 Product Description
- 2 Array Planning
- 3 Installation
- 4 Managing the Disk Array
- 5 Troubleshooting
- 6 Removal and Replacement
- 7 Reference / Legal / Regulatory
94$WWDFKLQJ6&6,&DEOHVDQG&RQILJXULQJWKH'LVN(QFORVXUH6ZLWFKHV
Attaching SCSI Cables and
Configuring the Disk Enclosure Switches
NOTE! It is critical that all SCSI cables be tightened securely. Use the
following steps to ensure the cable connectors are seated properly.
1. Connect the cable to the enclosure connector and tighten the
mounting screws finger tight.
2. Push on the connector and retighten the mounting screws. Repeat
once more.
3. Use a flat blade screwdriver to tighten the screw 1/4 turn. Do not
overtighten or you may strip the mounting screw.
7KHUHDUHWZRW\SHVRIFDEOLQJFRQILJXUDWLRQVIRUWKHDUUD\IXOOEXVDQGVSOLWEXV7KH
FRQILJXUDWLRQ\RXVHOHFWLVGHWHUPLQHGE\DQXPEHURIIDFWRUVZKLFKDUHGHVFULEHGLQ
&KDSWHU$UUD\3ODQQLQJ
:KHQ\RXKDYHGHWHUPLQHGZKLFKFRQILJXUDWLRQ\RXZLOOXVHUHIHUWR)XOO%XV&DEOLQJDQG
6ZLWFK&RQILJXUDWLRQRQSDJH ¨RU6SOLW%XV6ZLWFKDQG&DEOLQJ&RQILJXUDWLRQVRQ
SDJH ¨
$:RUG$ERXW6&6L7HUPLQDWRUV
7HUPLQDWRUVQHHGWREHLQVWDOOHGRQERWKWKHGLVNHQFORVXUHVDQGWKHFRQWUROOHUHQFORVXUH
2QWKHFRQWUROOHUHQFORVXUHDQ\XQXVHG6&6,FRQQHFWRUPXVWEHWHUPLQDWHG2QWKHGLVN
HQFORVXUHQRWHYHU\FRQQHFWRUUHTXLUHVWHUPLQDWLRQ,ID6&6,FDEOHLVFRQQHFWHGWRD%&&
FRQQHFWRUWKHRWKHUFRQQHFWRURQWKH%&&PXVWEHWHUPLQDWHG,IWKHUHLVQR6&6,FDEOH
FRQQHFWHGWRWKH%&&QRWHUPLQDWRULVUHTXLUHGRQHLWKHUFRQQHFWRU$%&&WKDWLV
RSHUDWLQJLQVSOLWEXVPRGHZLOOKDYHDFDEOHFRQQHFWHGWRHDFK%&&,QWKLVFDVHWKH
XQXVHGFRQQHFWRURQHDFK%&&PXVWEHWHUPLQDWHG6HH)LJXUHRU)LJXUH