HP SureStore DLT Removable Tape Drive User’s Guide DLT 80m
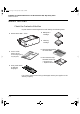
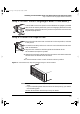
dlt-m.book Page i Thursday, May 4, 2000 3:52 PM HP SureStore DLT Installation Guide For further details, see: Before you start: page 1-2 ❑ Check the packing list inside this guide. ❑ Check system prerequisites. Step 1: Attach local language labels, if necessary page 1-3 Step 2: Install the tape drive page 1-3 1 Ensure the drive extractor lever is in the out position. 2 Slide the tape drive, locking lever at the bottom, into an empty bay of an HP SureStore H/A Tape Array 5500.
dlt-m.book Page ii Thursday, May 4, 2000 3:52 PM Copyright © 2000 Hewlett-Packard Limited. March 2000 The information contained in this document is subject to change without notice. Part Number: C7456-90902 This document contains proprietary information which is protected by copyright. All rights are reserved. No part of this document may be photocopied, reproduced or translated to another language without the prior written consent of Hewlett-Packard Limited.
dlt-m.
dlt-m.
dlt-m.book Page 1 Thursday, May 4, 2000 3:52 PM 1 Installing Your Removable Drive in an HP SureStore H/A Tape Array 5500 This chapter describes how to install a removable HP SureStore DLT 80m drive in an HP SureStore H/A Tape Array 5500. Note For an overview of the installation process, see inside the front cover.
dlt-m.
dlt-m.book Page 3 Thursday, May 4, 2000 3:52 PM Installing Your Removable Drive in an HP SureStore H/A Tape Array 5500 Step 1: Attach Local Language Labels if Necessary Step 1: Attach Local Language Labels if Necessary A set of labels for the front panel in several different languages is provided with the drive. Identify those with your local language, peel them from the backing paper and stick them firmly to the front panel of the drive over the English-language labels.
dlt-m.book Page 4 Thursday, May 4, 2000 3:52 PM Installing Your Removable Drive in an HP SureStore H/A Tape Array 5500 On Completion: On Completion: Verify the Installation Once you have installed the tape drive, you should verify that it is functioning properly before you store your valuable data.
dlt-m.book Page 5 Thursday, May 4, 2000 3:52 PM Installing Your Removable Drive in an HP SureStore H/A Tape Array 5500 Registering Your Tape Drive Registering Your Tape Drive You must register with HP to ensure that you benefit from the full 3-year warranty period. The second and third years of warranty are subject to registration within 30 days. You can register electronically on the internet or you can use the Warranty Registration card that is provided with your drive.
dlt-m.book Page 6 Thursday, May 4, 2000 3:52 PM Installing Your Removable Drive in an HP SureStore H/A Tape Array 5500 Replacing the Drive Replacing the Drive HP SureStore DLT 80m drives can be hot-swapped, that is they can be removed and replaced without powering down the HP SureStore H/A Tape Array 5500 and without interrupting operations to the other drives in the array.
dlt-m.
dlt-m.book Page 2 Thursday, May 4, 2000 3:52 PM Operating the Drive Front Panel Front Panel 6 4 1 7 8 2 9 5 10 3 1 Density and Compression Lights (yellow) • When a tape is loaded, these lights indicate the density at which the tape is written and whether compression is used. They indicate native (uncompressed) capacities of 10.0/15.0, 20.0, 35.0 and 40.0 GB. • They are also used if you need to write a tape at a density lower than its default density. See Chapter 4.
dlt-m.book Page 3 Thursday, May 4, 2000 3:52 PM Operating the Drive Front Panel 7 “Tape in Use” Light (yellow) • Steady: The tape is loaded and ready for use. • Flashing regularly: The cartridge is being loaded, unloaded or rewound. • Flashing irregularly: A calibration read or write is in progress. 8 “Use Cleaning Tape” Light (yellow) • Steady: The tape heads need cleaning. • Flashing: The tape may be damaged.
dlt-m.book Page 4 Thursday, May 4, 2000 3:52 PM Operating the Drive Operating the Drive Operating the Drive To switch on a drive: 1 Switch the drive on using the power button on the front panel of the rack. • The drive performs its self-test, which takes about 13 seconds. • At the end, assuming no tape cartridge is in the drive, only the green “Operate Handle” light will be lit. 2 You are now ready to load a tape cartridge.
dlt-m.book Page 5 Thursday, May 4, 2000 3:52 PM Operating the Drive Using the Cartridge Locking Handle To load a tape cartridge: 1 Wait until the green “Operate Handle” light is lit. 2 Pull the Cartridge Locking Handle so that it swings up. Caution Before you load a new tape cartridge into the drive, check that no blank labels or bits of plastic wrapper are stuck to the bottom of the cartridge. These could cause the cartridge to jam in the drive or damage the drive mechanism.
dlt-m.book Page 6 Thursday, May 4, 2000 3:52 PM Operating the Drive Using the Cartridge Locking Handle To unload a tape cartridge: 1 Press the Unload button. 2 The yellow “Tape in Use” light flashes while the tape is rewound. This could take up to 2 minutes, depending where on the tape the drive was last reading or writing. 3 Wait for the green “Operate Handle” light to be lit. 4 Pull the Cartridge Locking Handle so that it swings up. 5 Remove the cartridge and replace it in its plastic case.
dlt-m.book Page 7 Thursday, May 4, 2000 3:52 PM Operating the Drive The Power-On Self-Test The Power-On Self-Test When you power on the HP SureStore DLT drive, it performs a self-test to check that it is functioning correctly. The test takes about 13 seconds if no tape cartridge is loaded, and the pattern of front panel lights at the end tells you the results of the test.
dlt-m.
dlt-m.book Page 1 Thursday, May 4, 2000 3:52 PM 3 Care of the Drive and Tape Cartridges Apart from ensuring that the drive operates in a safe, clean environment, the only regular maintenance is to clean the tape heads. This chapter tells you how to do this and also describes how to look after and store cartridges so that your data is safe.
dlt-m.book Page 2 Thursday, May 4, 2000 3:52 PM Care of the Drive and Tape Cartridges Cleaning the Tape Heads Cleaning the Tape Heads When to Clean the Heads When the yellow “Use Cleaning Tape” light is lit, use a cleaning cartridge to clean the tape heads. Using a Cleaning Cartridge Note Each cleaning cartridge can only be used about 20 times.
dlt-m.book Page 3 Thursday, May 4, 2000 3:52 PM Care of the Drive and Tape Cartridges Types of Tape Cartridges 7 Return the cleaning cartridge to its plastic case. If the “Use Cleaning Tape” light still lights when you load a tape cartridge after using the cleaning cartridge: • Make sure that the cleaning cartridge had not expired when you tried to clean the heads. • The tape cartridge may be faulty. Try another cartridge and see if “Use Cleaning Tape” lights again.
dlt-m.book Page 4 Thursday, May 4, 2000 3:52 PM Care of the Drive and Tape Cartridges Write-Protecting a Cartridge Write-Protecting a Cartridge If you write-protect a cartridge, the drive can only read data from the tape, not write to it. Use this setting to protect data on the cartridge from being erased or overwritten, for example, when you are restoring files from tape. Note Only alter write-protection when the cartridge is out of the drive.
dlt-m.book Page 5 Thursday, May 4, 2000 3:52 PM Care of the Drive and Tape Cartridges Taking Care of Data Cartridges Taking Care of Data Cartridges Caution Using a damaged cartridge could put your data at risk and will damage the drive. Inserting a faulty cartridge into a drive will damage the tape drive. All faulty cartridges should be destroyed and must not be inserted into any other drive. A cartridge can become faulty for several reasons. The following are the most common: • Dropping the cartridge.
dlt-m.book Page 6 Thursday, May 4, 2000 3:52 PM Care of the Drive and Tape Cartridges Taking Care of Data Cartridges Figure 3.2 Checking a cartridge for damage. Reel lock lever Tape leader Release door lock by lifting the lock with your thumb Figure 3.3 Reel lock levers and the reel hub Cartridge door Reel lock lever Reel hub Reel lock lever 4 Check the two white reel lock levers. One is on the same surface as the cartridge door.
dlt-m.book Page 7 Thursday, May 4, 2000 3:52 PM Care of the Drive and Tape Cartridges Taking Care of Data Cartridges does not have to be attached to a computer for this to occur; it can just be powered on. A drive in this condition cannot be repaired on site. A cartridge with a lost leader must be discarded. Handling Tape Cartridges • Do not drop or bang cartridges. This can displace the tape leader, which can make the tape unusable and can damage the drive.
dlt-m.book Page 8 Thursday, May 4, 2000 3:52 PM Care of the Drive and Tape Cartridges Taking Care of Data Cartridges Operating Conditions Cartridges should be used in an environment within the following ranges: • Temperature: 10°C to 40°C (50°F to 104°F) • Relative Humidity: 20% to 80% (non-condensing) Conditioning Cartridges If a cartridge has been exposed to conditions outside the operating range, leave the cartridge in the operating environment for at least 24 hours before using it.
dlt-m.book Page 1 Thursday, May 4, 2000 3:52 PM 4 Tape Cartridge Densities and Compression This chapter describes how to read and write tape cartridges at different densities and with or without compression. For optimum performance, you should use the normal tape cartridge for your drive at its default setting with compression on. If you do this, you need not read this chapter.
dlt-m.book Page 2 Thursday, May 4, 2000 3:52 PM Tape Cartridge Densities and Compression Density Density Note A tape cartridge can only contain data at one density. Density, as used on the drive’s front panel, means a combination of native capacity (the capacity of the tape cartridge without using data compression) and whether data compression is on or off. The actual capacity using compression depends on the type of data being stored.
dlt-m.book Page 3 Thursday, May 4, 2000 3:52 PM Tape Cartridge Densities and Compression Changing the Density and Compression for Writing Density Setting 10.0/15.0 GB 20.0 GB 35.0 GB 40.0 GB Tape Native Type III 10.0 GB Compress’d Native Compress’d Native Compress’d Native Compress’d 20 GB* No No No No No No DLTtape IIIxt 15.0 GB 30 GB* No No No No No No DLTtape IV No No 20.0 GB 40 GB* 35.0 GB 70 GB* 40.
dlt-m.book Page 4 Thursday, May 4, 2000 3:52 PM Tape Cartridge Densities and Compression Changing the Density and Compression for Writing • With type III cartridges, you can only select a density of 10.0 GB. You can choose to have compression on or off. To select density and compression: 1 Load a tape cartridge in the drive. The “Tape in Use” light flashes while the tape loads and calibrates. 2 Wait until the yellow “Tape in Use” light stops flashing.
dlt-m.book Page 5 Thursday, May 4, 2000 3:52 PM Tape Cartridge Densities and Compression Changing the Density and Compression for Writing Example Suppose you have loaded a type III tape cartridge which has a prerecorded density of 2.6 GB, and you want to write at 10.0 GB with compression. When the loading sequence has finished, repeatedly press the Density Select button until both the 10.0 GB and “Compress” lights are lit. After about two seconds, the following happens: • The 2.6 GB light remains lit.
dlt-m.
dlt-m.book Page 1 Thursday, May 4, 2000 3:52 PM 5 Troubleshooting This chapter covers what you should do if you have problems with your drive or the backup process. For further help, try the Hewlett-Packard Information Service on the World Wide Web: http://www.hp.com/support/dlt and http://www.hp.
dlt-m.book Page 2 Thursday, May 4, 2000 3:52 PM Troubleshooting HP TapeAssure HP TapeAssure If your computer runs under Windows 95, Windows NT or Novell NetWare, you can use the HP TapeAssure software provided on the HP SureStore Tape CD-ROM as a diagnostic tool if your computer is running. Insert the HP SureStore Tape CD-ROM, double-click on Setup.exe, and choose the “Run TapeAssure” option from the main screen. No other backup software should be running at the same time.
dlt-m.book Page 3 Thursday, May 4, 2000 3:52 PM Troubleshooting Other Problems Other Problems If your system does not recognize the drive, perform the following checks: The host computer system only identifies which IDs are present on SCSI buses after power-on or a reset. If you powered up the drive or added the drive to the tape array after the host system was turned on, the host will not be aware that the drive is on the bus.
dlt-m.book Page 4 Thursday, May 4, 2000 3:52 PM Troubleshooting Other Problems If the drive will not accept a tape cartridge: • Was the drive powered down with the Cartridge Locking Handle up? If so, push the handle down and up again twice. The green Operate Handle light should then light and you can insert a cartridge. Are you having problems backing up or restoring files? • The problem may lie with the backup application. Look at the application’s documentation for help.
dlt-m.book Page 1 Thursday, May 4, 2000 3:52 PM Appendix A Product Specifications and Ordering Information This chapter gives the specifications of the drives and lists part numbers for cartridges and SCSI cables.
dlt-m.book Page 2 Thursday, May 4, 2000 3:52 PM Product Specifications and Ordering Information Product Specification Product Specification Physical Specification Height: 160 mm (6.30 in) Width 86 mm (3.39 in) Depth: 312 mm (12.28 in) Net Weight: 3.6 kg (7.93 lb) Performance Specification Linear Bit Density: 98,250 bpi per track (DLTtape IV) Capacity: 80 GB at 2:1 compression (DLTtape IV) Transfer Rates Native: 2:1 Compression: 6.0 MB/s 10.
dlt-m.book Page 3 Thursday, May 4, 2000 3:52 PM Product Specifications and Ordering Information Product Specification Environmental Specification See page 3-5 for advice on using and storing cartridges.
dlt-m.
dlt-m.book Page 1 Thursday, May 4, 2000 3:52 PM Appendix B Customer Support This appendix describes Hewlett-Packard’s service and support arrangements, warranty details, and how to contact HP Customer Support.
dlt-m.book Page 2 Thursday, May 4, 2000 3:52 PM Customer Support Warranty Warranty This product carries a 3 Year Express Exchange1 Warranty. You must register your product with HP within 30 days to ensure you benefit from the full three-year warranty period. Non-registration will result in the warranty resorting to 1 year. Please register via the web (http://www.hp.com/go/tapereg) or by using the reply card in the box. The warranty gives you specific legal rights.
dlt-m.book Page 3 Thursday, May 4, 2000 3:52 PM Customer Support Warranty such defects during the warranty period, HP will, at its option, either repair or replace products which prove to be defective. Replacement products may be either new or like-new. HP warrants to you that HP software will not fail to execute its programming instructions after the date of purchase, for the period specified above, due to defects in material and workmanship when properly installed and used.
dlt-m.book Page 4 Thursday, May 4, 2000 3:52 PM Customer Support Hewlett-Packard Year 2000 Warranty FOR CONSUMER TRANSACTIONS IN AUSTRALIA AND NEW ZEALAND: THE WARRANTY TERMS CONTAINED IN THIS STATEMENT, EXCEPT TO THE EXTENT LAWFULLY PERMITTED, DO NOT EXCLUDE, RESTRICT OR MODIFY AND ARE IN ADDITION TO THE MANDATORY STATUTORY RIGHTS APPLICABLE TO THE SALE OF THIS PRODUCT TO YOU.
dlt-m.book Page 5 Thursday, May 4, 2000 3:52 PM Customer Support Service and Support Obtaining Technical Support If you need help, your dealer has the latest information regarding HP products and services and can provide support under HP’s comprehensive menu of reseller services. If your dealer is not able to help, you can obtain support from HP directly either through online services or by telephone. Obtaining Service HP provides a free lifetime telephone support service.
dlt-m.book Page 6 Thursday, May 4, 2000 3:52 PM Customer Support Contacting Customer Support Worldwide Online Services HP offers electronic services that give you an interactive way to access information and help on set-up, configuration, installation and operation of your product. The online services are available on the World Wide Web and FTP, as well as the country-specific resources listed later in this section.
dlt-m.book Page 7 Thursday, May 4, 2000 3:52 PM Customer Support Contacting Customer Support America Online: Download software, firmware and support documents; discuss issues in user forums Keyword: hpstor QuickFAX Faxback Service: Automated system to request product information or technical support documents to be faxed to you. Telephone: +1 (800) 368-9673 or +1 (970) 635-1510 Fax Machine: Faxes are answered in 48 hours or less.
dlt-m.
dlt-m.book Page 9 Thursday, May 4, 2000 3:52 PM Customer Support Contacting Customer Support Australia Bulletin Board: Download software, firmware and support documents, and leave messages for technical support. Telephone: (03) 9890 0276 HP First Faxback Service: Automated system to request product information or technical support documents to be faxed to you free of charge. Available 24 hours a day. Telephone: (03) 9272 2627 Fax Machine: Faxes are answered within 24 hours.
dlt-m.book Page 10 Thursday, May 4, 2000 3:52 PM Customer Support Contacting Customer Support Hong Kong Fax Machine: Please include contact information, the name of your HP product, and the type of computer you have. Fax Number: +65 274 2033 (Singapore) Telephone Support: Telephone: 800 96 7729 India Mailing Address: Hewlett Packard India Ltd. HP Customer Support Centre Chandiwala Estate Maa Anandmai Marg Kalkaji Dehli -110 019 India E-mail: csc_india@hp.
dlt-m.book Page 11 Thursday, May 4, 2000 3:52 PM Customer Support Contacting Customer Support HP First Faxback Service: Automated system to request product information or technical support documents to be faxed to you free of charge. Available 24 hours a day. Telephone: +81 (3) 3335-8622 Fax Machine: Please include contact information, the name of your HP product, and the type of computer you have.
dlt-m.book Page 12 Thursday, May 4, 2000 3:52 PM Customer Support Contacting Customer Support Fax Machine: Faxes are answered in 48 hours or less. Fax Number: (02) 3270-0707 Telephone Support: Hours of Operation: Monday-Friday, 8:30-19:00 Telephone: (02) 3270-0700 080-999-0700 (Toll Free) Malaysia Fax Machine: Please include contact information, the name of your HP product, and the type of computer you have.
dlt-m.book Page 13 Thursday, May 4, 2000 3:52 PM Customer Support Contacting Customer Support Telephone Support: Telephone: +65 (02) 867-3551 Singapore Mailing Address: Hewlett-Packard Far East (Pte) Ltd. 438 Alexandra Road #07-01/04 Alexandra Point Singapore 119958 HP First Faxback Service: Automated system to request product information or technical support documents to be faxed to you free of charge. Available 24 hours a day. Telephone: +65 291-7951 Fax Machine: Faxes are answered in 48 hours or less.
dlt-m.book Page 14 Thursday, May 4, 2000 3:52 PM Customer Support Contacting Customer Support Fax Number: (02) 514-0276 Telephone Support: Hours of Operation: Monday – Friday, 8:30 – 17:30 Telephone: (02) 717-9609 Thailand Fax Machine: Please include contact information, the name of your HP product, and the type of computer you have.
dlt-m.book Page 1 Thursday, May 4, 2000 3:52 PM Index A E adapter, SCSI A-4 altitude limits A-3 electromagnetic emissions, specification A-4 E-mail address B-6 environmental specification A-3 Express Exchange warranty B-2, B-5 B backup software 1-4 BOT 4-2 buttons Density Select 4-4 Select 2-2, 4-4 Unload 2-3 F flashing lights 5-2 FTP site B-6 C H cables ordering A-4 care and maintenance Ch.
dlt-m.