St or ag eT ek
Printing History New editions of this guide incorporate all material updated since the previous edition. The manual printing date and part number indicate the current edition. The printing date changes when a new edition is printed. (Minor corrections and updates incorporated at reprint do not cause the date to change.) 1 November 1997 23 February 1998 15 May 1999 Edition 1 Edition 2 Edition 3 © 1997 through 1999 by Storage Technology Corporation and Hewlett-Packard Company. All rights reserved.
List of Pages Document Title: A4845A LSM Hardware Operator’s Guide Manufacturing Doc PN: A4845-96014 Customer Doc PN: A4845-90000 Vendor PN: 95762 Edition 1: 1 November 1997, EC 83907 Edition 2: 23 February 1998, EC 83963, KIT PN 80967 Edition 3: 15 May 1999, EC 53855, KIT PN 14691 This document contains 92 pages: Section Cover Blank Page Title Page Copyright iii through xxii 1-1 through 1-10 2-1 through 2-10 3-1 through 3-22 4-1 through 4-8 A-1 through A-10 Glossary-1 through Glossary-2 Index
List of Pages This page intentionally left blank.
Regulatory Statements Regulatory Statements ■ FCC Radio Frequency Interference Statement (USA) Note: This equipment generates, uses and can radiate radio frequency energy. If it is not installed and used in accordance with the instruction manual, it may cause interference to radio communications.
Regulatory Statements ■ Herstellerbescheinigung (Germany) Note: Diese Information steht im Zusammenhang mit den Anforderungen der Maschinenlärm information sverordnung vom 18 Januar 1991.
Regulatory Statements ■ Harmonics Conformance (Japan) This product conforms Power Line Harmonics guidelines for the User’s manual display. No product labeling required for JAPAN. ■ Taiwan Warning Label Statement The following is the warning label statement from Taiwan, R.O.C.
Regulatory Statements ■ European Compliance Statement The following is the compliance statement from Europe: DECLARATION OF CONFORMITY according to ISO/IEC Guide 22 and EN 45014 Manufacturer’s Name:Hewlett-Packard Company Enterprise Storage Solutions Division Manufacturer’s Address:8000 Foothills Blvd.
Contents List of Pages . . . . . . . . . . . . . . . . . . . . . . . . . . . . . . . . . . . . . . . . . . iii Regulatory Statements . . . . . . . . . . . . . . . . . . . . . . . . . . . . . . . . . . v FCC Radio Frequency Interference Statement (USA) . . . . . . . IEC Statement (Worldwide) . . . . . . . . . . . . . . . . . . . . . . . . . EMC Statement (Canada) . . . . . . . . . . . . . . . . . . . . . . . . . . . General Approval (U.K.) . . . . . . . . . . . . . . . . . . . . . . . . . . .
Contents Drives . . . . . . . . . . LSM Safety Features . . . Controlling Software . . Library Operating Modes Automated Mode . . Manual Mode . . . . . AUTO CLEAN Feature . . . . . . . . . .......... .......... .......... .......... .......... .......... .......... ......... ......... ......... ......... ......... ......... ......... .......... .......... .......... .......... .......... .......... .......... .......... .......... .......... .......... .......... .......... .......... . . . . 1-7 . .
Contents Maintaining Cartridges . . . . . . . . . . . . . . . . . . . . . . . . . . . . . . . . . . . . . . . . . . . . . .4-8 Storing Cartridges . . . . . . . . . . . . . . . . . . . . . . . . . . . . . . . . . . . . . . . . . . . . . .4-8 Cleaning the Cartridge Exterior . . . . . . . . . . . . . . . . . . . . . . . . . . . . . . . . . . . .4-8 Specifications . . . . . . . . . . . . . . . . . . . . . . . . . . . . . . . . . . . . . . . A-1 Supplies and Accessories ...............
Contents This page intentionally left blank.
Figures Figures Figure Figure Figure Figure Figure Figure Figure Figure Figure Figure Figure Figure Figure Figure Figure Figure Figure Figure Figure Figure Figure Figure Figure Figure Figure Figure Figure Figure 1-1. LSM Major External Components . . . . . . . . . . . . . . . . . . . . . . . . . . . . . . . .1-2 1-2. Robot Components . . . . . . . . . . . . . . . . . . . . . . . . . . . . . . . . . . . . . . . . . .1-3 1-3. Locating Cartridges—Top View . . . . . . . . . . . . . . . . . . . . . . . . . . .
Figures This page intentionally left blank.
Tables Table 1-1. LSM Capacity . . . . . . . . . . . . . . . . . . . . . . . . . . . . . . . . . . . . . . . . . . . . . . .1-4 Table A-1. Supplies and Accessories . . . . . . . . . . . . . . . . . . . . . . . . . . . . . . . . . . . . . . A-1 Table A-2. EDP DLT Cartridge Label Specifications . . . . . . . . . . . . . . . . . . . . . . . . . . . A-4 Table A-3. Basic Requirements for DLT Cartridges. . . . . . . . . . . . . . . . . . . . . . . . . . . . A-5 Table A-4. 9840 Cartridge Specifications . . . . . .
Tables This page intentionally left blank.
About This Guide This guide describes how to operate the A4845A Library Storage Module (LSM). Most of the information pertains to hardware. For LSM management software information and drive information, refer to the publications that pertain to these specific topics. This guide is intended primarily for data center operators who operate the LSM. System programmers and computer system administrators might also find the information in this guide useful.
About This Guide ■ Important Messages This guide contains important messages that must be read carefully and followed: Note A note calls attention to information that can be helpful in understanding the operation of the product. A note usually, but not always, follows the information to which it relates. CAUTION A caution calls attention to an operating procedure or practice that could result in damage to the product if not correctly performed.
About This Guide ■ Grounding The computer in which this product is installed is a safety class I product and has a protective earthing terminal. There must be an uninterruptible safety earth ground from the main power source to the product’s input wiring terminals, power cord or supplied power cord set. Whenever it is likely that the protection has been impaired, disconnect the power cord until the ground has been restored.
About This Guide ■ Internal Code License The following is the internal code license from StorageTek: xx
About This Guide xxi
About This Guide This page intentionally left blank.
General Information 1 This chapter describes the hardware components of the A4845A Library Storage Module (LSM). For LSM management software information and drive information, refer to the publications that pertain to these specific topics. The LSM is the hardware component in an automated cartridge system. An automated cartridge system is a removable media, robotic system that mounts cartridges into a storage cell or into a drive for read/write operations.
Library Storage Module Components Figure 1-1. LSM Major External Components OPERATOR PANEL CARTRIDGE ACCESS PORT (CAP) DOOR LATCHES DRIVES (INSIDE LSM) EXPANSION DOOR (OPTIONAL) RIGHT FRONT DOOR POWER SWITCH LOCATION An audit occurs when: • • • • 1-2 You You You You power on the LSM. open and close an LSM door. perform an initial program load (IPL) on the LSM. make a request using the LSM management software.
Library Storage Module Components Figure 1-2.
Library Storage Module Components Storage Cells The LSM is configured by panel, column, row, and cell, so that the LSM management software can locate a cartridge. The LSM contains storage cells for 224 to 588 cartridges, excluding the CAP cells. The number of cells is determined by the number of drives installed and whether the LSM has the standard left front door or the expansion door. The expansion door provides additional storage space for 168 cartridges.
Library Storage Module Components Figure 1-3.
1-6 41 41 42 T T 41 41 42 T T T T 0 42 0 EXPANSION 168 BASE 392 10 0 41 T T T 0 3 0 0 42 TOTAL 560 14 168 CELLS 42 41 T T T 0 0 41 T T T 42 41 T T T 42 42 168 CELLS 42 41 T T T 41 T T T 0 42 3 NOT A STORAGE CELL CLEANING CARTRIDGE CELL DIAGNOSTIC CARTRIDGE CELL EMPTY/DROPOFF CELL CAP CELLS 41 T T T 0 PANEL 1 COLUMNS 1 2 PANEL 0 COLUMNS 1 2 CAP CUSTOMER CARTRIDGE CAPACITY CHART 168 CELLS T T 42 T T T T 0 0 0 3 DRIVES 42 0 PANE
LSM Safety Features Cartridge Access Port A CAP is the location where you add cartridges to or remove cartridges from an LSM without interrupting normal cartridge mounts and dismounts by the robot assembly. The CAP is located on the right front door. The CAP array can remain in place so that you can insert cartridges into or remove cartridges from the individual cells. Or, you can remove the top screw from the array, lift the array out, load all the cells, and slide the array back into the CAP.
Library Operating Modes ■ Library Operating Modes An operating mode is the way in which an LSM and the controlling software (also referred to as the LSM management software) interact. An LSM can operate in either automated mode or manual mode, as described in the subsections below. Automated Mode Automated mode is the normal operating mode of the LSM. The controlling software instructs the robot to move the cartridge among the storage cells, drives, and CAP.
AUTO CLEAN Feature Refer to “Setting Cleaning Cartridge Count” in Chapter 2 and “Replacing the Cleaning Cartridge” in Chapter 3 for more information and procedures.
AUTO CLEAN Feature This page intentionally left blank.
Controls, Indicators, and Configuration 2 This chapter shows the locations and describes the functions of the library storage module (LSM) operator panel and the power switch. It also shows how to set the Small Computer Systems Interface (SCSI) address and the maximum usage count of the cleaning cartridges. Refer to the drive publications for information about operating the drives. ■ LSM Operator Panel The LSM operator panel is on the right front door of the LSM.
LSM Operator Panel Figure 2-1.
Setting the SCSI Address ■ Setting the SCSI Address You set the SCSI robotic address from the LSM operator panel. You might need to get the address from your systems administrator. Refer to Figure 2-2 and Figure 2-3 to set the SCSI address. Note: You cannot set the SCSI drive addresses from the LSM operator panel. For DLT drives, your customer representative uses the switches on the drive to set the SCSI drive addresses, as described in the installation manual.
Setting the SCSI Address Figure 2-2.
Setting the SCSI Address Refer to Figure 2-2 to make sure that you understand how to read the block diagrams. Usually, pressing Execute means “yes,” that you want to perform the activity in the block, and pressing Menu means “no,” that you want to continue through the choices until your activity appears in the block. Usually, when you are at the end of the activity, you press Execute. Press Menu if you make a mistake and need to go through the choices again.
Setting the SCSI Address Figure 2-3.
Setting Cleaning Cartridge Count ■ Setting Cleaning Cartridge Count Drives might occasionally need to be cleaned to prevent read/write errors. The drives are cleaned with a special cleaning cartridge. After a specified number of uses, the cartridge must be replaced. If your LSM was configured during installation to have the AUTO CLEAN feature enabled, you can use the LSM operator panel to set the maximum number of times a cartridge can be used.
Setting Cleaning Cartridge Count Figure 2-4.
Power Switch ■ Power Switch The power switch is a circuit breaker located in the lower right corner of the right front door of the LSM. Lift the switch to supply power to the robot and the drives. Make sure that all jobs being performed by the drives and robot are complete, then push down on the switch to remove power to the drives and the robot. Figure 2-5 shows the power switch location. Figure 2-5.
Power Switch This page intentionally left blank.
Operating the LSM 3 This chapter contains the procedures for: • • • • • Powering on the LSM Powering off the LSM IPLing the LSM Operating in automated mode Operating in manual mode Note: When the LSM is controlled by the host, refer to your software publications and enter the command using the LSM management software to perform the desired activity.
Powering On or IPLing the LSM Figure 3-1.
Powering Off the LSM ■ Powering Off the LSM To power off the LSM: 1. Make sure that no jobs are being run by the drives or robot and that no tapes are in the drives. 2. Push down the power switch on the bottom right corner of the right front door of the LSM. ■ Operating in Automated Mode Automated mode is the normal operating mode of the LSM. When the LSM is online and the robot is mounting and dismounting cartridges, monitor the LSM operator panel for messages and respond appropriately.
Operating in Automated Mode CAUTION: Do not slam the CAP. Cartridges could become unseated and be extended out into the path of the robotics, causing severe damage to the robot hand. 4. Close the CAP. The lock automatically engages. Note: The LSM management software determines what happens when you enter a cartridge upside down or with an unreadable label. Under normal conditions, the camera on the hand audits the CAP and recognizes that a cartridge is present, but the hand does not move it.
Operating in Automated Mode Ejecting Cartridges through the CAP When you want the robot to eject cartridges from the LSM through the CAP, use the LSM management software to enter the of the cartridges you require. The robot will retrieve them and place them into the CAP. If the LSM operator panel displays “ONLINE CAP UNLK DISABLD,” the CAP is locked by the LSM management software. Issue the command using the LSM management software that puts the LSM in the “ONLINE - PRESS EXE TO UNLK CAP” mode.
Operating in Automated Mode Note: The DLT Tape Drive Product Manual recommends using a cleaning cartridge about 20 times. The 9840 Tape Drive User’s Reference Manual recommends using the cleaning cartridge 100 times. Cleaning cartridges have a unique 3-character alphanumeric prefix in their VOLSER (default is “CLN”). Cleaning cartridges cannot be used as scratch cartridges or initialized by software utilities. Note: Make sure that the CAP has an empty cell so that the hand can place the cartridge into it.
Operating in Manual Mode 6. Insert one new cleaning cartridge into a CAP cell. CAUTION: Do not slam the CAP. Cartridges could become unseated and be extended out into the path of the robotics, causing severe damage to the robot hand. 7. Close the CAP. The lock automatically engages. a. The robot performs a brief audit. b. The operator panel displays “MOVING CLEANING CART TO CELL.” c. The hand inserts the cartridge into its cell. d.
Operating in Manual Mode Figure 3-3.
Operating in Manual Mode Moving the Robot After you open the LSM doors, you might need to move the robot to make it easier to access the stored cartridges or the drives. Read and observe the following caution before you attempt to move any portion of the robot. CAUTION: To prevent damaging the hand or Z carriage, make sure that the reach mechanism on the hand is fully retracted before moving any part of the robot. Turn the hand pulley to retract the reach mechanism (refer to Figure 3-9).
Operating in Manual Mode Raising and Lowering the Z Carriage If you need to raise or lower the hand, slowly and carefully move it by placing your fingers on the Z carriage as shown in Figure 3-4. Figure 3-4.
Operating in Manual Mode Rotating the Z Column If you need to rotate the Z column, grasp it and carefully rotate it, as shown in Figure 3-5. The Z column does not rotate the full 360 degrees. If the Z column meets resistance and stops before the desired position is reached, it has contacted a stopping mechanism. Do not force it. Rotate the column in the opposite direction. Figure 3-5.
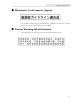
Operating in Manual Mode Locating a Cartridge in the Storage Cells Figure 3-6 and Figure 3-7 show the locations of the panels, rows, and columns of the cartridge storage cells when the expansion door and 10 drives are installed. The decal at the top of each column also provides location information. Figure 3-8 shows the locations of reserved storage cells.
41 41 41 41 42 T T T T 0 42 0 EXPANSION 168 BASE 392 10 0 41 T T T 0 3 0 0 41 42 TOTAL 560 14 168 CELLS 42 T T T 0 0 41 T T T 42 41 T T T 42 41 42 168 CELLS 42 T T T 41 T T T 0 42 3 NOT A STORAGE CELL CLEANING CARTRIDGE CELL DIAGNOSTIC CARTRIDGE CELL EMPTY/DROPOFF CELL CAP CELLS 41 T T T 0 PANEL 1 COLUMNS 1 2 PANEL 0 COLUMNS 1 2 CAP CUSTOMER CARTRIDGE CAPACITY CHART 168 CELLS T T 42 T T 42 T T T T 0 0 0 3 DRIVES 42 0 PANEL 3 (
Operating in Manual Mode Figure 3-8. Diagnostic and Cleaning Cartridge Cell Locations Removing a Cartridge from the Hand If the LSM experiences a power failure and the empty/dropoff cell is full, a cartridge might be left in the hand. You can remove it from the hand and manually mount it into a drive for a read/write operation. CAUTION: Follow the procedures described in “Moving the Robot” above. Failing to do so could damage the hand. Make sure that you do not touch the TWH card on the hand assembly.
Operating in Manual Mode 2. Rotate the hand pulley (refer to Figure 3-9) until the gripper mechanism is extended to its full position (refer to Figure 3-10). Figure 3-9. Extending the Gripper Mechanism TWH CARD HAND PULLEY TAPE CARTRIDGE (SHOWN RETRACTED) H_C60037 3. Hold the hand pulley with one hand and grasp the cartridge with the other. Pull gently on the cartridge until it is released from the gripper mechanism, as shown in Figure 3-10. 4.
Operating in Manual Mode Figure 3-10.
Operating in Manual Mode Mounting a DLT Cartridge into a Drive CAUTION: Before you mount a cartridge into the drive, you must make sure that power is on, and that the Operate Handle indicator is on. Use the drive shuttle to operate, not the drive handle. A safety mechanism protects the drive if you try to operate it in an incorrect state. The shuttle will not operate if this mechanism is activated. To reset the safety mechanism, wait for the Operate Handle indicator to turn on.
Operating in Manual Mode Figure 3-11.
Operating in Manual Mode Figure 3-12.
Operating in Manual Mode Mounting a Cartridge into a 9840 Drive To mount the cartridge in a 9840 drive: 1. Insert the cartridge into the 9840 drive using the direction shown in Figure 3-13. 2. Wait for one of the following messages to display and take the appropriate action, if necessary: • • • • 3-20 The “Ready F” (File Protected) message displays when a write-protected cartridge loads successfully.
Operating in Manual Mode Figure 3-13. Mounting a Cartridge into the 9840 Drive H C60489 Dismounting a Cartridge from a DLT Drive To dismount a cartridge from a drive: 1. Obtain the drive number using the LSM management software and place the drive offline. 2. Open the LSM right front door by using a latch key to unlock the top and bottom latches. Refer to Figure 3-3. 3. Open the LSM left front door. For the standard door, pull gently from the top right corner.
Operating in Manual Mode Note: If the cartridge does not come out of the drive, remount the cartridge by releasing it from the shuttle latch under the right side of the cartridge. Then push the cartridge into the drive and lower the handle. If this fails, the tape leader might be dislodged and require rethreading. 8. Remove the cartridge from the drive. 9. Properly store the cartridge outside the LSM (refer to “Storing Cartridges” in Chapter 4).
Cartridges 4 The chapter describes how to prepare and maintain cartridges. ■ Preparing Cartridges The following pages describe how to prepare a cartridge for use in the LSM. Handling a Cartridge Generally observe the following protocols when handling cartridges: • • • • • • • • Keep cartridges clean. Inspect a cartridge before each use. Do not put a damaged cartridge into a drive or LSM. Do not open a cartridge. Do not release a leader block and pull tape from a cartridge.
Preparing Cartridges Figure 4-1. Inspecting a DLT Cartridge Figure 4-2.
Preparing Cartridges Applying DLT Cartridge Labels The LSM uses DLTtape IV or IIIXT cartridges for data, plus diagnostic and cleaning cartridges. Different types of data cartridges are distinguished by a small “E” or “D” next to the last number in the VOLSER. Cleaning and diagnostic cartridges are distinguished by “CLN” or “DG” in the prefix in the VOLSER. The correct labeling follows: • • • • DLTtape IV data cartridges should be labeled with a “D” label.
Preparing Cartridges Applying 9840 Cartridge Labels Figure 4-4. Applying 9840 Cartridge labels Cartridge labels reflect the cartridge media and usage. Cleaning cartridges have DG CLN in the VOLSER and a “U” beneath the VOLSER. Diagnostic cartridges have DG 000 in the VOLSER and an “R” beneath the VOLSER. Refer to Figure 4-4 and insert the label into the recessed area provided on each cartridge. 1. Make sure that the cartridge has been at room temperature for at least 24 hours. 2.
Preparing Cartridges 3. Use labels that do not leave a residue when removed. 4. Make sure that the label contains a VOLSER.
Preparing Cartridges Setting the DLT Write-Protect Switch Refer to Figure 4-5 to see the location of the write protect switch. To set the cartridge to write-protected, slide the switch to the left so the orange indicator is visible. In this position, the drive can only read data from the tape and cannot write data to the tape. To set the cartridge to write-enabled, slide the switch to the right so the orange indicator is not visible. In this position, the drive can write as well as read data. Figure 4-5.
Preparing Cartridges Setting the 9840 Write-Protect Switch To write-protect a cartridge, follow these steps: 1. Hold the cartridge with the customer label side up and the rear VOLSER label toward you. (Refer to Figure 4-6 on page 4-7.) 2. Locate the write-protect switch on the right side of the cartridge. 3. Move the write-protect switch to the front of the cartridge (away from you) to the write-protect position. Figure 4-6.
Maintaining Cartridges ■ Maintaining Cartridges The following sections describe how to store and clean cartridges. Storing Cartridges When you store a cartridge: • Do not take a cartridge out of its protective wrapping until you are ready to use it. • Store cartridges in a clean environment that duplicates the conditions of the room in which they are used. • Before using a cartridge, make sure that it has been in its operating environment for at least 24 hours.
A Specifications This appendix lists the supplies and accessories, specifications, and agency certifications. ■ Supplies and Accessories Table A-1 lists supplies and accessories: Table A-1.
Supplies and Accessories Table A-1. Supplies and Accessories 2.5m SCSI cable; high-density with thumb screws to highdensity with thumb screws, m-m C2924A A1658-62020 5.0 SCSI cable; high-density with thumb screws to highdensity with thumb screws, m-m C6510A A1658-62021 10m SCSI cable; high-density with thumb screws to highdensity with thumb screws, m-m C2925A A1658-62022 20m SCSI cable; high-density with thumb screws to highdensity with thumb screws, m-m C2926A A1658-62023 5.
Ordering DLT Cartridge Labels Table A-1. Supplies and Accessories 5m SCSI cable; high-density with thumb screws to highdensity with thumb screws, m-m C2907A 5181-7708 Single-ended SCSI Terminator C6511A 5063-5324 Wide Differential Terminator C2905A A1658-62024 SCSI Terminators (68-pin) ■ Ordering DLT Cartridge Labels Each LSM is supplied with a sufficient quantity of data cartridge labels (with the “D” designation) to match a fully populated library (588 cartridges).
Ordering 9840 Tape Cartridge and Bar ■ Ordering 9840 Tape Cartridge and Bar Code Labels To order 9840 tape cartrdiges and bar code labels, contact StorageTek Media Department.
Basic Requirements for Cartridges ■ Basic Requirements for Cartridges LSM cartridges must meet specifications defined in, American National Standard Magnetic Tape & Cartridge for Information Interchange, ACS X3B5. Cartridges must meet the following requirements: Table A-3. Basic Requirements for DLT Cartridges Cartridges 10.16 cm x 12.7 cm x 2.54 cm (4 in. x 5 in. x 1 in.) Integrated thumbwheel Media Chromium dioxide 1.27 cm (0.5 in.
Basic Requirements for Cartridges DLT Cartridge Environmental Specifications The following specifications refer to the operating and storage environments for DLT cartridges, according to international standard ECMA-209. Table A-5. DLT Cartridge Environmental Specifications Operating environment Temperature Relative humidity Wet bulb temperature 10º to 40ºC (50º to 104ºF) 20% to 80% noncondensing 25ºC (77ºF) maximum CAUTION: Tape temperatures above 49ºC (120ºF) might damage the tapes.
Basic Requirements for Cartridges 9840 Cartridge Environmental Specifications The following specifications refer to the operating and storage environments for 9840 cartridges. Table A-6. 9840 Cartridge Environmental Specifications Operating environment * Temperature Relative humidity Wet bulb temperature 15.6°–32.2° C (60°–90° F) 20%–80% 26° C (78.8° F) maximum Cartridge storage environment (nonarchive) Temperature Relative humidity Wet bulb temperature 5°–32.2° C (41°–90° F) 5%–80% 26° C (78.
LSM Specifications ■ LSM Specifications Table A-7. LSM Dimensions and Weights Specification Two Drives** Ten Drives Height 183 cm (72 in.) 183 cm (72 in.) Width with covers 148 cm (58 in.) 148 cm (58 in.) Depth with standard door and covers 79 cm (31 in.) 79 cm (31 in.) Depth with expansion door and covers 102 cm (40 in.) 102 cm (40 in.
LSM Specifications Table A-9. LSM Second Power Distribuition Unit Requirements Power configuration US/Canada 100 to 120 VAC UL/CSA power cable Europe 200 to 240 VAC HAR power cable Input voltage rangeNominal voltage 100 to 120/200 to 240 VAC 120 to 230 VAC Input current US/Canada: Single phase 120 VAC 47 to 63 Hz 6 A Service 3 wire International: Single phase 200 to 240 VAC 47 to 63 Hz 3 A Service 3 wire Table A-10.
Agency Certifications ■ Agency Certifications Table A-11. Agency Certifications Category Certification Safety CSA standard CAN/CSA-C22.2 no. 950-M93 UL standard 1950, Third Edition EN60950 Emissions FCC #47, Part 15, Subpart B, Class A EMC Framework AS/NZS 3598: 1995 (Australia, N.Z.) VCCI Class A European Union CE emissions standards Canadian EMC Law; ICES-003 Korean EMC Law BCIQ EMC Law CNS 13438 (Taiwan) Immunity European Union CE immunity standards AS/NZS 4252.
Glossary The following terms are used in this guide or apply to this product. preloaded array into the CAP. The CAP is located on the right front door of the LSM. Numeric cartridge tape Magnetic tape enclosed in a plastic housing. 9840 A device that reads from or writes to a magnetic tape. A audit A part of the LSM’s IPL sequence that catalogs all cartridge locations within the LSM cells and retains the data in the memory.
Glossary used to indicate the field replaceable unit (FRU) that is probably causing the error. S FSC See fault symptom code. SCSI See Small Computer Systems Interface. I Small Computer Systems Interface A data interface between the drives and host. ID Identifier or identification. initial program load A process that activates a machine reset and loads system programs to prepare a computer system for operation. Processors with diagnostic routines activate these routines at IPL execution.
Index Numerics 9840 cartridge labels 4-4 relative humidity specs A-7 wet bulb maximum A-7 A A4845A LSM LSM (library storage module) 1-1 accessories A-1 address, setting SCSI 2-3 applying cartridge labels 9840 4-4 applying labels 4-3 auto clean 1-8 automated mode 1-8 operations 3-3 C CAP (cartridge access port) described 1-7 ejecting cartridges 3-5 entering cartridges 3-3 location 1-2 capacity of cartridge A-5 cartridge capacity A-5 data compression A-5 data error rates A-5 dimensions A-5 media life A-5 we
Index H hand description 1-1 location 1-3 removing cartridge manually 3-14 hand pulley location 3-15 I indicators, LSM operator panel 2-1 initial program load 3-1 IPL procedure 3-1 L labels applying 4-3 ordering A-3 labels, applying 9840 4-4 life, media (cartridge) A-5 locating cartridge manually 3-12 locations camera 1-3 cartridge access port (CAP) 1-2 DLT leader block 4-2 doors 1-2 drives 1-2 gripper mechanism 3-16, 3-21 hand 1-3 hand pulley 3-15 operator panel 1-2 power switch 1-2 switches and indicat
Index S safety 1-7 SCSI setting robotic address 2-3 service xviii setting 9840 write-protect switch 4-7 cleaning cartridge count 2-7 SCSI address 2-3 write protect switch 4-6 specifications A-8 DLT cartridge environment A-6 storing cartridges 4-8 supplies A-1 switches operator panel 2-1 power 2-9 write-enabled, 9840 4-7 write-enabled, DLT 4-6 write-protect, 9840 4-7 write-protect, DLT 4-6 T Taiwan warning label statement vii V VOLSER label 9840 cartridge 4-4 W warranty xviii weight cartridge A-5 Z Z ca
Index Index-4
Reader Comment Sheet A4845A Library Storage Module: Hardware Operator’s Guide We welcome your evaluation of this manual. Your comments and suggestions will help us improve our publications. Remove this page and mail or FAX it to 916-785-2875. Use and attach additional pages if necessary. Agree Disagree N/A The manual is well organized. ❍ ❍ ❍ ❍ ❍ ❍ The information is technically accurate. ❍ ❍ ❍ ❍ ❍ ❍ Information is easy to find. ❍ ❍ ❍ ❍ ❍ ❍ Step-by-step procedures are easy to perform.
TO COMPLY WITH POSTAL REGULATIONS, FOLD EXACTLY ON DOTTED LINES AND TAPE (DO NOT STAPLE) NO POSTAGE NECESSARY IF MAILED IN THE UNITED STATES BUSINESS REPLY CARD FIRST CLASS MAIL PERMIT NO.