
Cartridge Array Installation Instructions


62106 2
■ Cartridge Array Install
1. Acquire the tape library from the customer and have the operator take the library and all
drives off-line.
2. Acquire the tape library key. Open the right front door and power OFF the tape library.
Unlock the left door and open.
3. Move the robotic hand to top of the tape library and rotate it towards Panel 0, Drive Col-
umn 0.
Note: Array labels, designating the location, appear directly above the
arrays.
CAUTION: Before beginning the installation procedure please note the bracket on
the ceiling of the library so you don’t hit your head.
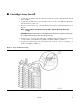
4. Acquire the box of arrays and retainer clips. Install the arrays from the bottom to the top
of each column; start with Panel 2, Column 1 and finish at Panel 2, Column 4.
5. Acquire four retainer clips; hook and snap them into position to the top of all array col-
umns just installed (see Figure 1).
Figure 1. Array and Retainer Clips