
DLT Tape Drive Installation Instructions


62114 8
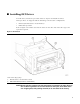
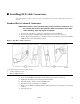
6. Look inside the drive column area and determine the slot you wish to use for each drive.
Following the lifting procedures described in Chapter 2 “Safety and ESD”, of the Instal-
lation Manual firmly grasp the drive at the rear with one hand and place the other hand
under the drive mounting plate.
7. Carefully guide the drive into its slot. Push it in as far as it will go and firmly seat the
drive.
NOTE:In the following step, do not over tighten the thumbscrew.
8. Refer to Figure 4 and turn the thumbscrew clockwise until it is secure.
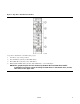
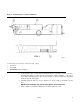
Figure 3. Terminating Power Jumper DLT Drive
Terminating Power Jumper—DLT Drive (H_65116)
1. DLT drive
2. Load latch
3. TERMPWR jumper (enabled)