Deploying HP SIM 6.x on MSCS Clusters on Windows 2008 with SQL Server 2005 White Paper Subtitle Table of Contents Abstract.............................................................................................................................................. 2 Introduction......................................................................................................................................... 2 Installing HP SIM on Windows 2008 failover cluster with SQL Server 2005 ....................
Abstract This white paper is intended to assist IT professionals in installing HP Systems Insight Manager (HP SIM) 6.x in a Microsoft® Cluster Server configuration. Microsoft Windows® 2008 Enterprise Server with HP SIM 6.x can be used to obtain redundancy and failover capability from this powerful management software. Introduction HP SIM 6.
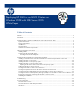
Figure 1: The relationship between HP SIM 6.x, SQL Server 2005, and the cluster disks Installing HP SIM on Windows 2008 failover cluster with SQL Server 2005 If you are installing HP SIM 6.x into an environment without a Microsoft SQL Server 2005 Enterprise Edition instance already installed, go to for steps to install a clustered named instance of Microsoft SQL Server 2005 Enterprise Edition. This named instance can host the HP SIM 6.
Storage configuration Figure 1 displays the relationship between Microsoft SQL Server 2005 Enterprise Edition instances and HP SIM 6.x. At least two logical drives must be available in the shared storage if your infrastructure does not have Microsoft SQL Server installed to which you can attach the HP SIM 6.x database. The first shared disk contains the Microsoft SQL Server 2005 Enterprise Edition data file s. For the examples discussed in this paper, the drive is I:.
Target audience This white paper is intended for users who have an excellent understanding of the following concepts and services: Basic clustering concepts Basic Windows 2003 services Basic Windows 2008 services Advanced TCP/IP and Domain Name System (DNS) network concepts In addition, readers must be familiar with installing and administering these products: Microsoft Windows 2003 Enterprise Server and MSCS Microsoft SQL Server 2005 Enterprise Edition, particularly named instances Microsoft
Note: SNMP Services must be installed for Windows 2008. 1. Insert the Microsoft Windows 2008 Enterprise Server CD into the target server. 2. Select Start>SettingsControl Panel. 3. Click Add/Remove Programs. 4. Click Add/Remove Windows Components. 5. Select Management and Monitoring Tools in the Windows Component Wizard window. 6. Click Details. If not selected by default, select Simple Network Management Protocol. 7. Click OK. The Windows Component Wizard window appears. 8. Click Next.
Installing the Microsoft SQL Server 2005 Enterprise Edition The Microsoft SQL Server 2005 Enterprise Edition is required for the installation of HP SIM 6.x to be highly available. If you already have an instance of Microsoft SQL Server Enterprise Edition installed, then you can create the HP SIM 6.x database and attach it to the existing server.
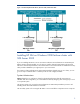
Figure 3: Required components installed successfully 5. After Prerequisites is installed, click Next for SQL server 2005 installation.
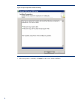
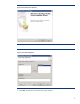
Figure 4: Microsoft SQL Server 2005 Setup Figure 5: Cluster Node Configuration 6. Click Next. The Remote Account Information page appears.
Figure 6: Remote Account Information 7. After the configuration check is complete on all systems, a summary appears. Review any warning or error messages, and correct any issues until there are no messages in the Summary window.
Figure 7: System Configuration Check 8. Click Next. The Microsoft SQL server installation window appears. 9. Click Next. 10. Enter registration information, and then enter a valid product ID. 11. Select components to install in the Components to install window. Available components include Database services, Create SQL server Failover Cluster, Workstation components, books Online, and development tools.
Figure 8: Components to Install 12. Click Advanced to ensure that Management Tools is selected. Note: The Management Tools option is not installed by default and must be selected. 13. Select Management Tools from client tools in the Feature selection window.
Figure 9: Feature selection 14. Click Next. The Instance name window appears. 15. Select Name Instance, and then enter one instance name. Note: Common instance name is required to install HP SIM and fail over for HP SIM. 16. Click Next. 17. Enter the Virtual Server name (SQL-SRV).
Figure 10: Virtual Server Name 18. Click Next. The Virtual Server Configuration window appears. 19. Enter the Virtual Server IP address.
Figure 11: Virtual server information Note: If the system you are installing on is a two node MSCS box with a private and public network, you must select public when assigning a new public IP address to the SQL 2005 Virtual Server IP address. This can be selected in the Network to use field on the Virtual Server Configuration window. 20. After you have entered the Client Access Point (CAP) information, click Next. The Cluster Group Selection window appears. 21.
Figure 12: Cluster Group Configuration 22. Click Next. The Cluster Node Configuration window appears. By default the installation program assumes that all nodes are part of the cluster. In this example, we have two nodes that must have SQL Server 2005 installed and participate as part of the SQL clustered instance. Note: Be sure that in the selected nodes section, the second node of the cluster and in required node with localhost (current system) is displayed. 23. Click Next.
Figure 13: Service Account Note: Do not select the Customize for each service account information checkbox. 25. Enter the group names to run different services in the Domain Groups for Clustered Services window. Note: You must complete the remaining steps to enter the group names for services. Follow the steps and create one group in the domain and use the same group for all the services. 26. Under the Administrators group, create one group named sqlaccts in the domain. 27.
Figure 14: Domain groups for clustered services 28. Click Next. The Authentication mode page appears. 29. Select Windows authentication mode. 30. Click Next. The Collation settings window appears. 31. By default Case-sensitive, for use with 1252 Character set is selected. If not, be sure to select the options.
Figure 15: Collation settings 32. Click Next in the Error and send Report Settings window. The Ready to Install window appears. 33. Verify that all selected components are displayed and then click Install. The Set Progress window appears where you can monitor the installation progress of each component on any of the nodes in the cluster by selecting the node from the dropdown list. After setup is complete, all of the components should have a green check beside them and show a status of Set Up Finished.
Figure 16: Program Compatibility Assistant Note: If a reboot is required, it will be noted on the screen. Reboot the nodes one by one. SQL 2005 Service pack 2 should be installed for proper working of failover clustering in windows 2008 for better performance Installing HP SIM 6.
Note: Be sure to log in with the same user name that you used to install the Microsoft SQL Server 2005 Enterprise Edition instance. Download the latest version of System Management Homepage (SMH) from http://h20000.www2.hp.com/bizsupport/TechSupport/SoftwareDescription.jsp?lang=en&cc=us&prodTypeId= 15351&prodSeriesId=1121486&prodNameId=3288144&swEnvOID=1005&swLang=8&mode=2&taskId=135 &swItem=MTX-84b4161b7cd3455fb34ac57586.
d.Enter the name of the Microsoft SQL Server 2005 Enterprise Edition instance that you created. For this paper, HP-SIM-SQLSVR\HP_SIM_INSTANCE is used. Note: If the credentials specified cannot be validated, a message appears, stating You are not able to continue with the installation until the account information is validated.
iv Click Next. The Ready to Install window appears. v. Click Install. The Installing window appears. Note: A progress bar indicating files are being coped appears during the installation of this service. At the end, the Completing the OpenSSH Services Manager Setup Wizard window appears vi. Click Finish to close the Setup – OpenSSH Services for HP Systems Insight Manager wizard window. b.A new Welcome to the Pegasus WMI Mapper V2.7.x Setup Wizard window appears. i. Click Next.
d.A new Remote Support Pack Installation window appears. i. Click Agree. ii. Click Next to proceed with the default path (c:\Program Files\hp) on the Please specify where you would like the Remote Support Pack component to be installed page. iii. Click Yes in the Confirmation installation directory window. iv. Select the privacy settings that are appropriate for your environment, and then click Next. Figure 17: Remote Support Software Manager Initialization e.
i. Click Install to proceed to the Repository Directory window. From a separate Windows Explorer window, create the desired directory in the desired shared drive that is part of your cluster. For this paper, we are using F:\VCRM. ii. Return to the Repository Directory window. iii. Click Browse. The Browse for Folder window appears. iv. Select the previously created directory in the desired shared drive that is part of your cluster. For this paper, we are using F:\VCRM. v.
To install the system: 1. At your secondary system, repeat steps 1-20 in the Installing HP SIM 6.x on the primary system section. 2. Select No, will reboot later. In the Installation complete window, click Finish. 3. Open ~\HP Systems Insight Manager\config\databaseprops file and note the database name specified against the keyword hp.Database.databaseName. 4. Shutdown the secondary system. Adjusting the HP SIM 6.x data source name on the primary system 1. Start the primary system. 2.
Figure 18: Server DSN Configuration 8. Select the database, which is created by the secondary system. Use the database name indicated in the Installing HP SIM 6.x on the secondary system section. 9. Click Next. 10. Click Finish to complete the configuration. A Summary window appears. 11. Click OK. The ODBC Data Source Administrator window appears. 12. Click OK. to close the ODBC Data Source Administrator window appears. Adding the HP SIM 6.x cluster resources To complete the installation of HP SIM 6.
Figure 19: Failover Cluster Management 4. Under the High Availability Wizard Page, the Before you begin page appears. Click Next. 5. The Select Service or Application Page appears. Choose Generic Service from the menu, and then click Next.
Figure 20: Generic Service 6. The Select Service page appears. Select the HP System Insight Manager from the given services, and then click Next.
Figure 21: Select the service you want to use from the list 7. The Client Access Protocol window appears. Give the name of the HP SIM service as HPSIM_2008 (in this example)_and IP address of the HP SIM Service of the cluster, and then click Next.
Figure 22: Client Access Point 8. The Select Storage window appears. Select the storage on which HP SIM is installed and then click Next.
Figure 23: Select Storage 9. The Confirmation Page appears, detailing the selections you made in the previous windows. Click Next.
Figure 24:Confirmation window 10. The Configure High Availability window appears with the progress bar for configuring the service, and then the Summary Page appears.
Figure 25: Configure High Availability 11. Click Finish. The HP SIM service appears under Services and Applications.
Figure 26: Services and Applications Summary Creating the OpenSSH Services for HP SIM 6.x Generic Service Resource 1. Right click on HP SIM Service under Services and Application. Click Add a resource Generic service in the left pane of the Failover Cluster Management window.
Figure 27: Generic Service 2. The Select Service Page appears. Select Open SSH Service from the list, and then click Next.
Figure 28: Select the service you want to use from the list 3. The Confirmation Page appears and displays the default service name as Open SSHd service and parameters. Click Next.
Figure 29: You are ready to make a Generic Service 4. The Summary Page appears. Click Finish. Open SSH service appears under hpsim_sql2005.
Figure 30: The new resource was successfully created and configured Creating the Pegasus WMI Mapper Services for HP SIM 6.x Generic Service Resource 1. Right-click HP SIM Service under Services and Application. Click Add a resource Generic service in the left pane of the Failover Cluster Management window.
Figure 31: Generic Service 2. The Select Service Page appears. Select Pegasus WMIMapper from the list, and then click Next.
Figure 32: Select Service 3. The Confirmation Page appears. It displays the default service name as Pegasus WMIMapper (WMIMapper) service and parameters. Click Next.
Figure 33: Confirmation 4. The Summary Page appears. Click Finish. Pegasus WMIMapper service appears under hpsim_sql2005.
Figure 34: Summary 1. Right click the resource Pegasus WMI Mapper under the HP SIM Generic Service Resource and select Properties. 2. Select the General tab and delete the contents of the Startup Parameters that was added during the creation of the WMI Mapper Resource. Leave Startup Parameters blank. Creating the Version Control Repository Manager (VCRM) 6.x for HP SIM 6.
Figure 35: Generic Service 2. The Select Service page appears. Select HP Version Control Repository Manager service from the list, and then click Next.
Figure 36: Select Service 3. The Confirmation Page appears. It displays the default service name as HP Version Control Repository Manager (cpqsrhmo) service and parameters. Click Next.
Figure 37: Summary 4. The Summary Page appears. Click Finish. Hp Version Control Repository Manager service is appears under hpsim_sql2005.
Figure 38:Service 5. Right-click HP Version Control Repository Manager service, and then click the Properties link.
Figure 39: Summary of hpsim_sql2005 6. The HP Version Control Repository Manager Properties page appears. 7. Click the dependencies tab, and then insert the dependency as the disk, which was chosen for HP SIM installation. Click Apply, and then click OK.
Figure 40: HP Version Control Repository Manager Properties Bringing the virtual group containing the HP SIM 6.x resources online 1. Right-click the HPSIM Service under Services and Applications in the left pane, and then select the Bring this service and application online from the menu. If configured properly, all resources come online.
Figure 41: Bring this service or application online 2. All services (HP System Insight Manager, Open SSH Server, Pegasus WMI Mapper (WMI Mapper), HP Version Control Repository Manager) come online automatically.
Figure 42: Summary of hpsim_sql2005 3. The installation of HP SIM 6.x is complete. Validating the installation To be sure that the HP SIM 6.x service can be moved between both systems, perform the following steps from either one of the cluster systems: 1. Open the Cluster Administrator, and then connect to the cluster. 2. In the Cluster Administrator window, on the left pane, right-click the disk group containing the HP SIM 6.x program files. For example, HP SIM Disk Group is used in this paper.
Note: You must specify the port 280 in the URL of your Web browser to connect to the HP SIM 6.x service. To learn more about connecting to HP SIM 6.x, refer to the HP Systems Insight Manager 6.x Technical Reference Guide. Note: The HP SIM 6.x icon on the Windows desktop of each system was created by the installation of HP SIM 6.x as a handy shortcut for a regular standalone server only. This icon is no longer applicable at this point because the HP SIM 6.x is clustered.
name and IP address specific to the HP SIM 6.x service, clients can connect to the service without knowing which system currently owns the virtual group. When browsing to the virtual name for HP SIM 6.x rather than the name of the server that owns the virtual group, a security certificate for HP SIM 6.x is sent to your browser. If your browser is configured to warn about invalid site certificates, a security alert displays when connecting to the HP SIM 6.
Figure 44: HP SIM 6.x home page Important: Navigate to the OptionsProtocol SettingsWMI Mapper Proxy. Check the Host list and ensure that the cluster virtual name is used instead of any of the system names (delete the system name, if it is used, and add the cluster virtual name). Note: Navigate to OptionsDiscovery. Select System Automatic Discovery task and click Edit. The Edit Discovery page appears.
Note: These steps are to ensure HPSIM is working after failover. 10. You can use the active system name to establish a command-line session to the cluster HP Systems Insight Manager service from a client system that has an OpenSSH client installed, using SSH. Note: The only exception is when the disk group containing the HP SIM program files (HP SIM Disk Group in this paper) has failed-over to the other system.
For more information Refer to the following for more information regarding the topics referenced in this paper. Microsoft cluster services Clustering basics www.microsoft.com/windows2000/technologies/clustering/default.asp Steps to setting up a Microsoft cluster www.microsoft.com/windows2000/techinfo/planning/server/clustersteps.asp HP ProLiant clusters http://h18000.www1.hp.com/solutions/enterprise/highavailability/microsoft/index.