Backing up and restoring HP Systems Insight Manager 6.0 or greater data files in a Windows environment White Paper Table of Contents Abstract .......................................................................................................................................... 2 Introduction ......................................................................................................................................... 2 Saving and restoring data files ...........................................
Abstract HP Systems Insight Manager is a flexible management utility for an enterprise environment employing HP ProLiant, HP BladeSystem Integrated Manager in HP Insight Control, HP StorageWorks, and HP Integrity solutions. The system database and configuration files used by Systems Insight Manager should be backed up regularly to allow recovery from a catastrophic system failure or an instance of corrupted files.
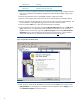
Oracle® database Microsoft SQL Server 2005 Microsoft SQL Server 2008 Saving and restoring files where Systems Insight Manager is installed using a Microsoft SQL database This section describes saving (backing up) and restoring files used with a Microsoft SQL database. Saving HP SIM configuration files and SQL server data files Microsoft SQL Enterprise Manager has built-in utilities for backing up the database, including an automated procedure.
\swmaint (if Existing) \output (optional) Contains job result output 2. Save any existing user-supplied (custom) files contained in the Systems Insight Manager directory tree such as tool definition files (TDEFs), Management Information Bases (MIBs), login prompt, and actions. 3. Save the OpenSSH Keys from the \etc folder. 4. Save any custom support packs used by the HP Version Control Repository Manager (VCRM). 5.
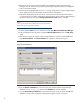
Figure 2: SQL Server Backup window 9. In the Destination field, click Add, select a location (such as disk or tape) for storing the backup copy of database, and then click OK to initiate the backup Restoring Systems Insight Manager configuration files and SQL server data files from a backup 1. If reinstalling Systems Insight Manager, for instructions refer to the HP Systems Insight Manager 6.3 Installation and Configuration Guide for Microsoft Windows, available at the following URL: http://h18013.www1.
4. Reinstall any plug-in utilities (and associated files and databases) used with Systems Insight Manager. You can reinstall using Systems Insight Manager integrated installer, the management DVD, or stand alone installer. 5. Stop the Systems Insight Manager Service if it is running, along with any Systems Insight Manager plug-in applications such as HP Insight Control performance management. 6. Using the file management tool of your choice, restore the directories and files listed in Table 1.
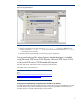
Figure 4: Restoring the backup set 12. Open the command line window and type mxconfigrepo –c to check for database errors. Use the command mxconfigrepo –f to fix any errors, and run the command mxconfigrepo –c once again as a final check. 13. Start the Systems Insight Manager service and any plug-in application. Saving and restoring files where Systems Insight Manager is installed using Microsoft SQL Server 2005 Express, Microsoft SQL Server 2005, or Microsoft SQL server 2008 Standard/Enterprise.
Note: HP recommends stopping the Systems Insight Manager service to ensure that the discovery and data collection processes do not occur during the save; however, you can leave the HP SIM service running during the save process if desired. Saving Systems Insight Manager configuration and Systems Insight Manager database using Microsoft SQL Enterprise Manager 1. Using the file management tool of your choice, save the directories and files listed in Table 1.
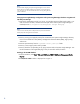
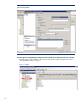
Figure 5: SQL Server 2005 3. Click Connect. 4. Click Database , select the database named Insight_v* right click on Insight_v*tasks backup and a window pops up as in figure 6. 5. In the destination field, click Add, select a location (such as disk or tape) for storing the backup copy of database, and then click OK to initiate the backup. 6. Let us call this SIMDB1, the backup would be SIMDB1.bak.
Figure 6: Backup database Restoring Systems Insight Manager configuration files and SQL server 2005 data files from a backup 1. Uninstall Systems Insight Manager. This would uninstall Systems Insight Manager but will leave behind SIMDB1as shown in Figure 7.
2. Reinstall Systems Insight Manager. This would create a new blank database with a new name, let us call this SIMDB2as shown in figure 8. Figure 8: SIMDB2 for instructions refer to the HP Systems Insight Manager 6.3 Installation and Configuration Guide for Microsoft Windows, available at the following URL: http://h18013.www1.hp.com/cpqproducts/servers/management/hpsim/infolibrary.html. If not performing a reinstallation of Systems Insight Manager, then proceed to step 6.
Figure 9: Stop SIM services 7. Using the file management tool of your choice, restore the directories and files listed in Table 1. For each occurrence of , substitute the actual path name where Systems Insight Manager is installed. If offered, be sure that the Always replace the file on disk option is selected. Note: You must use a tool that preserves file permissions (such as the Windows Backup tool) while restoring directories and files. 8.
. Restore the backed up file created from SIMDB1. For example, SIMDB1.bak, to the new database that Systems Insight Manager created in step 2. For example, SIMDB2. 14. Expand the Database tree, select the SIMDB2 database created in step 13, and right click on tasksrestoredatabase as shown in figure 11. Figure 11: Restore database 15. In the Restore window, select Options. 16.
Note: We need to change these manually to be SIMDB2.mdf and SIMDB2_log.ldf explicitly for Database to get restore successfully. 18. Now do the restore by clicking on OK button. This should be completed successfully without any warnings or errors as shown in figure 13.
Figure 13: Restoring database 19. Open the command line window and enter mxconfigrepo –c to check for database errors. Use the command mxconfigrepo –f to fix any errors. 20. Run the command mxconfigrepo –c again as a final check. 21. Start the HP SIM service and any plug-in application. 22. Verify that the data is restored successful.
1. Using the file management utility of your choice, save the configuration files listed in Table 1. For each occurrence of , substitute the actual path name where Systems Insight Manager is installed (such as C:\Program Files\HP\Systems Insight Manager). Note: You must use a tool that preserves file permissions (such as the Windows Backup tool) while saving directories and files. 2. Open the /config/database.props file and check the property value for hp.database.username.
The query would look like: exec dbms_stats.gather_schema_stats(‘HPSIM’,dbms_stats.auto_sample_size) ; 12. After making sure statistics is up to date, run the query to locate empty tables: Select table_name from dba_tables where owner=’’ and num_rows=0; Note that in the query, you should use dbuser in uppercase. For example, if the dbuser is ‘hpsim’, use ‘HPSIM’ in the query above, as that is how it is stored in the database.
16. The output of the above script is spooled to the file fix_empty_tables.sql in the current directory where you executed sqlplus from. If you want this file to be spooled to a different location, specify in the spool statement above the location where you want it to be spooled to. For example, C:\temp. The statement above would change in this case, to: spool ‘C:\temp\fix_empty_tables.sql’ 17.
Figure 9: Set Oracle database name 2. Enter the exp command and press Enter to accept the database backup. Table 2 lists the Oracle parameters that are listed and the recommended action. Table 2: Oracle Database parameters for Backup Parameter Action Username Enter the username of database and click Enter. (The Database user name used to install HP SIM). Password Enter the password of the database user and click Enter. Array fetch Buffer size Click Enter to select default of 4096.
Figure 10: Export 3. After selecting the default parameters, the database backup is initialized and a backup.dmp file is created at the specified location.
Figure 11: Database backup.dmp Restoring data files for use with Oracle 1. If necessary, reinstall Systems Insight Manager as directed in the HP Systems Insight Manager 6.3 Installation and Configuration Guide for Microsoft Windows systems available at the following URL: http://h18013.www1.hp.com/cpq-products/servers/management/hpsim/infolibrary.html. If not performing a reinstallation of HP SIM, then proceed to step 5.
5. If it is running, stop the Systems Insight Manager Service, along with any Systems Insight Manager plug-in applications such as performance management. 6. Reinstall Oracle as directed in Oracle documentation. For more information, see http://download-west.oracle.com/docs/cd/B19306_01/backup.102/b14192/toc/htm. 7. Using the file management tool of your choice, restore the directories and files listed in Table 2.
Figure 12: Set database name 2. Type the command imp and press Enter. Table 4 lists the Oracle database parameters that are offered and the recommended action to take. Table 4: Oracle Database parameters for Restoration Parameter Username Action Enter the username of database and click Enter. (The Database user name used to install HP SIM). Password Enter the password of the database user and click Enter. Export file BACKUP.DMP Enter the file name and the path to dump the database
Figure 13: Import database 24
3. Start the Systems Insight Manager service and any plug-in. 4. Verify that the data is restored successfully.
For more information For additional information about HP SIM, visit www.hp.com/go/hpsim. Technology for better business outcomes © Copyright 2010 ,2011 Hewlett-Packard Development Company, L.P. The information contained herein is subject to change without notice. The only warranties for HP products and services are set forth in the express warranty statements accompanying such products and services. Nothing herein should be construed as constituting an additional warranty.