
HP Systems Insight Manager 5.3 Installation and Configuration Guide for Windows HP Part Number: 418812-005

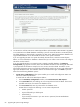

Custom installationTypical installationAvailable components for install
IncludedIncludedHP Systems Insight Manager
OptionalIncludedHP Version Control Repository Manager
OptionalIncludedRemote Support Software Manager
NOTE: If a component is listed as not available for installation on the CMS, then the HP SIM install
shell has determined one of the following:
• The installation prerequisites for the component have not been met.
• The same or a newer version of the component is currently installed.
If the component that is present on the CMS is an older version than what is bundled with the HP SIM
install shell and it supports an in-place upgrade, it appears in the component list.
Typical upgrade
1. Typical upgrades all the components which are marked included under the Available Components for
Install. Click Next, the Service Account Credentials window appears. You must use credentials for
an administrative account.
2. Enter the password for this account. Click Next, the Summary window appears with the components
that are to be installed.
3. Click Install to initiate the installation process. This process installs all the products listed in the Selected
Components table. The Status window appears. As each component is being installed, it states "In
Progress" beside the component's name. After the component has installed, it states Installed
Successfully.
4. After all of the components are installed, click Next, the Install Complete window appears. You are
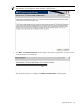
given the option to reboot. The following message appears: For this upgrade install, HP
recommends that you configure the HP System Management Homepage to use
operating system authentication for HP Version Control Agent access to
Version Control Repository Manager, and then re-configure the servers
running HP Version Control Agent to use the new account. If these actions
are not taken, pre-7.20 Version Control Agents will access your upgraded
Version Control Repository via legacy HTTP Server account access. For more
information, see the
Version Control Installation Guide
at
http://h18013.www1.hp.com/products/servers/management/agents/documentation.html.
5. Click Finish to allow the system to reboot. This completes the typical upgrade process. See "Next steps"
for more information.
NOTE: For more information regarding where the HP System Management Homepage default settings
are stored during a Typical installation and how to change them, see the
System Management Homepage
Installation Guide
at http://h18013.www1.hp.com/products/servers/management/agents/
documentation.html.
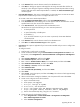
Custom upgrade
1. Click Next, the Software Selection window appears. This window displays the complete list of the
available components with a checkbox next to each one. If the checkbox is selected and disabled, the
component is deemed a mandatory component and cannot be cleared. The amount of required disk
space is also listed for each component. Select the components you wish to install.
2. Click Next to verify that enough disk space exists for the selected components. If enough space exists,
the Service Account Credentials window appears. The Domain and User name fields will default to
the installing account credentials. Enter the password for this account. You can also provide the credentials
for a different administrative account.
3. Click Next. The Summary window appears.
Typical upgrade 87