
HP Systems Insight Manager 5.3 with SP1 Installation and Configuration Guide for Microsoft Windows

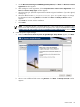
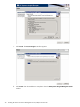
Table Of Contents
- HP Systems Insight Manager 5.3 with SP1 Installation and Configuration Guide for Microsoft Windows
- Table of Contents
- 1 Product overview
- 2 Installation overview and requirements
- 3 Installing HP SIM on the Central Management Server (CMS) for the first time
- 4 Configuring HP SIM using the First Time Wizard
- Using the First Time Wizard
- Configuring the managed environment
- Enabling automatic system discovery
- Configuring System Automatic Discovery task sign in credentials
- Configuring managed systems
- Configuring the WMI Mapper Proxy
- Configuring privilege elevation
- Configuring e-mail settings
- First Time Wizard summary
- Finishing the First Time Wizard
- Operating-system-specific collections, reports, and tools
- 5 Configuring HP SIM using the Options menu
- 6 Setting up and configuring managed systems
- 7 Initializing the Remote Support Software Manager
- 8 Upgrading HP Systems Insight Manager
- 9 Uninstalling HP Systems Insight Manager
- 10 Using the graphical user interface
- 11 Using the command line interface
- 12 Configuration options
- 13 Troubleshooting
- glossary
- Index

4. Click Install to initiate the installation process. This process installs all the products listed in the Selected
Components table. The Status window appears. As you install each component, it states
In Progress
next to the component's name. After the component installs, it states
Installed Successfully
.
5. Install the HP System Management Homepage:
a. The HP System Management Homepage Setup window appears. The InstallShield Wizard
guides you through the install of HP System Management Homepage. Click Next. The Operating
Systems Groups window appears.
NOTE: If at any time during the install of HP System Management Homepage you click Cancel,
the installation and setup of the HP System Management Homepage ends.
b. Select Administrator, Operator, or User from the Operating Systems Group Name field.
c. Enter the group name of an operating systems group in the Group Name field. Click Add. The
group name is added. A maximum of five entries can be added for each group level. Click Next
to continue.
NOTE: To delete a group name, select the group name, and click Delete.
d. From the User Access window, configure the
HP System Management Homepage
for the following
access types:
• Select Anonymous Access to enable anonymous access to unsecured pages.
• Select Local Access Anonymous or Local Access Administrator to set up the HP System
Management Homepage to automatically grant local IP addresses at the selected access level.
CAUTION: Selecting Local Access with Administrator privileges provides any
users
with
access to the local console full access without prompting them for a user name or password.
e. Click Next. The Trust Mode window appears.
Custom install 35