
HP Systems Insight Manager 5.3 with SP1 Installation and Configuration Guide for Microsoft Windows
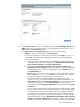
Table Of Contents
- HP Systems Insight Manager 5.3 with SP1 Installation and Configuration Guide for Microsoft Windows
- Table of Contents
- 1 Product overview
- 2 Installation overview and requirements
- 3 Installing HP SIM on the Central Management Server (CMS) for the first time
- 4 Configuring HP SIM using the First Time Wizard
- Using the First Time Wizard
- Configuring the managed environment
- Enabling automatic system discovery
- Configuring System Automatic Discovery task sign in credentials
- Configuring managed systems
- Configuring the WMI Mapper Proxy
- Configuring privilege elevation
- Configuring e-mail settings
- First Time Wizard summary
- Finishing the First Time Wizard
- Operating-system-specific collections, reports, and tools
- 5 Configuring HP SIM using the Options menu
- 6 Setting up and configuring managed systems
- 7 Initializing the Remote Support Software Manager
- 8 Upgrading HP Systems Insight Manager
- 9 Uninstalling HP Systems Insight Manager
- 10 Using the graphical user interface
- 11 Using the command line interface
- 12 Configuration options
- 13 Troubleshooting
- glossary
- Index
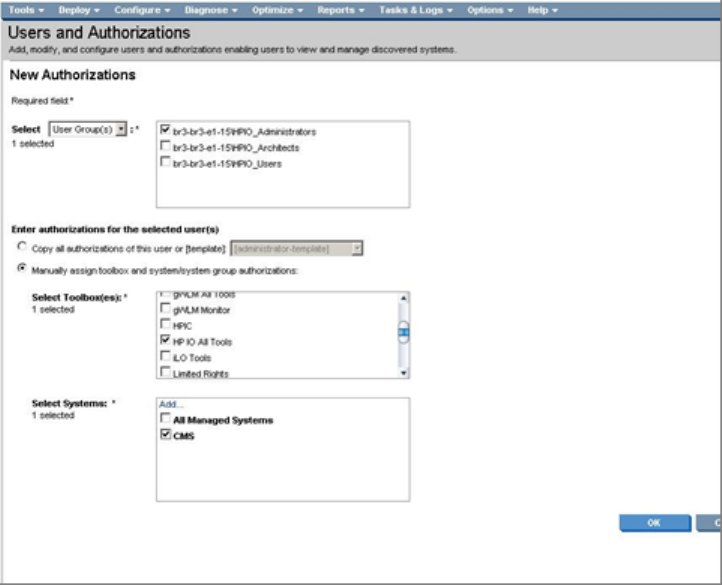
b. In the Select Systems list box, the two default system groups (All Managed Systems and
CMS) appear. Select one of these groups, or to select systems for the authorization, click
Add to display the Add Systems section.
c. In the Add systems by selecting from section, select one of the following:
i. Collection Select a collection and click View contents.
If you want to use the entire collection as your selection, select Select "collection
name" itself. This option creates a system group based on the currently displayed
contents of the collection.
a. (Optional) To enable the authorization to automatically be updated, without user
intervention when a collection is changed, select Automatically track changes.
If this collection changes, so does the authorization.
b. (Optional) Select Do not track changes. If this collection changes, the
authorization will not change. If this option is selected, you must manually update
the authorization after a collection has changed by using the Update button on
the Authorizations tab.
Note: These two selections are only available if a collection of systems is selected
and the Select "collection name" itself option is selected. You must select
one option or the other. The default selection is based on the
DynamicAuthorizations_AutoUpdateDefaultValue
property setting in the
globalsettings.props file. The default is set to Yes. This is reflected in the
Select Systems list box in the New Authorizations section with [Auto] appended
to the entry. For example, if you selected All Systems and chose to have it
automatically updated, All Systems 001 [Auto] would be displayed in the Select
Systems box.
You can continue to add systems and collections and can enable automatic updates
for each selected collection. Since automatic updates for any authorization apply
to all authorizations using the same selected collection, changing the setting for
one affects any other authorization using the same collection. Therefore, during
system selections, if you select a group already associated with an automatically
updating authorization, the option A utomatically track changes. If this collection
changes, so does the authorization is preselected. Likewise, if an authorization
that does not automatically update is associated with a collection, the option Do
Users and authorizations 57