Deploying HP SIM 6.x on MSCS clusters on Windows 2003 with SQL Server 2005 SP3 White Paper Table of Contents Abstract.............................................................................................................................................. 3 Introduction......................................................................................................................................... 3 Installing HP SIM on Windows 2008 failover cluster with SQL Server 2005 .........................
Creating the Virtual Machine Management Pack generic service resource ......................................... 45 Creating the Virtual Machine Management Webservice generic service resource .............................. 45 Bringing the virtual group containing the HP SIM 6.x resources online .............................................. 46 Validating the installation................................................................................................................ 47 Troubleshooting ........
Abstract This white paper is intended to assist IT professionals in installing HP Systems Insight Manager (HP SIM) 6.x in a Microsoft® Cluster Server configuration. Microsoft Windows® 2008 Enterprise Server with HP SIM 6.x can be used to obtain redundancy and failover capability from this powerful management software. Introduction HP SIM 6.
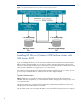
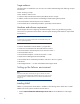
Figure 1: The relationship between HP SIM 6.x, SQL Server 2005, and the cluster disks Installing HP SIM on Windows 2008 failover cluster with SQL Server 2005 If you are installing HP SIM 6.x into an environment without a Microsoft SQL Server 20 05 Enterprise Edition instance already installed, go to for steps to install a clustered named instance of Microsoft SQL Server 2005 Enterprise Edition. This named instance can host the HP SIM 6.
Storage configuration Figure 1 displays the relationship between Microsoft SQL Server 2005 Enterprise Edition instances and HP SIM 6.x. At least two logical drives must be available in the shared storage if your infrastructure does not have Microsoft SQL Server installed to which you can attach the HP SIM 6.x database. The first shared disk contains the Microsoft SQL Server 2005 Enterprise Edition data files. For the examples discussed in this paper, the drive is I:.
Target audience This white paper is intended for users who have an excellent understanding of the following concepts and services: Basic clustering concepts Basic Windows 2003 services Advanced TCP/IP and Domain Name System (DNS) network concepts In addition, readers must be familiar with installing and administering these products: Microsoft Windows 2003 Enterprise Server and MSCS Microsoft SQL Server 2005 Enterprise Edition, particularly named instances Hardware and software requirements This w
2. Select Start>SettingsControl Panel. 3. Click Add/Remove Programs. 4. Click Add/Remove Windows Components. 5. Select Management and Monitoring Tools in the Windows Component Wizard window. 6. Click Details. If not selected by default, select Simple Network Management Protocol. 7. Click OK. The Windows Component Wizard window appears. 8. Click Next. Wait for the file copying to complete. 9. Click Finish. 10. Remove the CD.
Note: This section assumes that you already have a working two-system cluster with at least two free logical drives, one for the Microsoft SQL Server 2005 data files and another for the HP SIM 6.x program files. Note: Before installing SQL Server 2005on a failover cluster, Microsoft strongly recommends that you install and configure Microsoft Distributed Transaction Coordinator (MS DTC) on Windows 2000 and Windows Server 2003 operating systems.
Figure 3: Possible Owners 6. Double-click all the available nodes to change them to preferable owners. Figure 4: Dependencies 7. In the Dependencies dialog box, press and hold the CTRL key on the keyboard. Select both the Physical Disk and Network Name of the Primary Cluster Node, and then click the Add button. 8. Click Finish, and then click OK to confirm that the resource has been created.
Figure 5: Cluster Administrator 9. Right-click the MS DTC Resource, and then click Bring Online. Installing a clustered instance of the Microsoft SQL Server 2005 SP3 Enterprise Edition 1. Insert the Microsoft SQL 2005 Extended Edition CD into your CD-ROM drive. This paper assumes that the SQL Server 2005 Installation setup window opens automatically. 2. Click Install. The installation begins. The user license agreement appears. 3. Accept the license agreement and then click Next. 4.
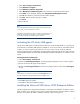
Figure 6: Microsoft SQL Server 2005 Setup 9. Click Advanced to ensure that Management Tools is selected. Note: The Management Tools option is not installed by default and must be selected. 10. Select Management Tools from client tools in the Feature selection window.
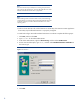
Figure 7: Feature selection 11. Click Next. The Instance name window appears. 12. Select Name Instance and enter one instance name. Note: Common instance name is required to install HP SIM and fail over for HP SIM. 13. Click Next. 14. Enter the Virtual Server name (SQL-SRV).
Figure 8: Domain groups for clustered services 15. Click Next. The Virtual Server Configuration window appears. 16. Enter the Virtual Server IP address. Note: If the system you are installing on is a two node MSCS box with a private and public network, you must select public when assigning a new public IP address to the SQL 2005 Virtual Server IP address. This can be selected in the Network to use field on the Virtual Server Configuration window. 17.
Note: Be sure that in the selected nodes section, the second node of the cluster and in required node with localhost (current system) is displayed. 20. Click Next. The In Service account window appears. 21. Enter the user name and password for an account with permission to run the service. For example, the domain administrator account. Note: Do not select the Customize for each service account information checkbox. 22.
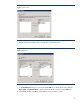
Figure 9: Domain groups for clustered services 25. Click Next. The Authentication mode page appears. 26. Select Windows authentication mode. 27. Click Next. The Collation settings window appears. 28. By default Dictionary order, case-sensitive, for use with 1252 Character set is selected. If not, be sure to select the options.
Figure10: Collation settings 29. Click Next in the Error and send Report Settings window. The Ready to Install window appears. 30. Verify that all selected components are displayed and then click Install. The Set Progress window appears where you can monitor the installation progress of each component on any of the nodes in the cluster by selecting the node from the dropdown list. After setup is complete, all of the components should have a green check beside them and show a status of Set Up Finished.
1. Ensure that both systems are up and running cluster services before installation. Also, be sure that the SQL server instance, to which you are installing the HP SIM 6.x database, is runn ing. 2. Ensure that the cluster system that is to be installed with HP SIM 6.x owns the clustered disks. 3. Read the HP Systems Insight Manager 6.x Installation and Configuration guides to be sure that you have the right prerequisites for installation. 4. Read the HP Systems Insight Manager 6.x Release Notes.
system, go to D:\autorun.exe. If this is the first time you are installing from this version of the management CD, you must accept the license agreement for the CD. 12. Select Products. 13. Click the HP SIM 6.x- Windows Install link. The HP Systems Insight Manager Set up window appears. 14. Click Install. The Welcome to the HP Systems Insight Manager Installer window appears. 15. After completing the system inspection, the Database Configuration window appears. a.
18. Click Next. The Service Account Credentials window appears. The Username field displays the user name that is logged in. Enter the password in the Password field. The Domain field displays the user domain used to log in to the system. 19. Click Next. The Custom Install-Summary window appears. 20. Click Install. The installation of HP SIM 6.x and its dependent services is initiated. a, A new Welcome to the OpenSSH Services for HP Systems Insight Manager Setup Wizard window appears.
i. Click Next. The Select Destination Directory window appears. ii. Specify the desired directory to be in the desired shared disk. For example, we are using F:\HPSIM in this paper. iii. Click Next. The Select Start Menu Folder window appears. iv. Specify the desired Start Menu Folder name or stay with the default setting. For example, we are using HP Systems Insight Manager in this paper. v. Click Next. The Ready to Install window appears. vi. Click Install. The Installing window appears.
iv. Select the previously created directory in the desired shared drive that is part of your cluster. For this paper, we are using F:\VCRM. v. Click OK. To close the Browser for Folder window and return to the Repository Directory window. Note: Click Perform an initial repository population, if you have ProLiant Support Packs available. Alternatively, the repository can be populated later by copying the files to the repository directory. vi. Click Next. The Automatic Update window appears. vii.
Note: After the copy process is complete, if your system does not have the Webbased agents installed, the Web-based Management Setup Wizard appears. You must enter a non-blank password and a confirmation password. This password becomes the administrator account password for all Web-based agents installed on your system. Click Next. Note: A progress bar indication Creating PMP database appears.
i. The Welcome to the HP Server Migration Pack Setup Wizard window appears. Click Next to continue. ii. SMP is installed at this time. The Completing the HP Server Migration Pack setup wizard page appears after the installation. Click Finish to complete the installation. iii. The HP Systems Insight Manager Installation Information window appears. Click OK. 21. Click Next from the Custom Install – Status window on the HP Systems Insight Manager Installer window to close the window. 22.
5. Open ~\HP Systems Insight Manager\config\databaseprops file and note the database name specified against the keyword hp.Database.databaseName. 6. Shutdown the secondary system. Adjusting the HP SIM 6.x data source name on the primary system 1. Start the primary system. 2. Click Control PanelAdministrative ToolsData Sources (ODBC). 3. Select System DSN. 4. Select Insight_v50_0 and click Configure. Figure 11: ODBC Data Source Administrator 5.
Figure 12: Adjusting the HP SIM 6.x data source name on the primary system 13. Go to the Adding the HP SIM 6.x cluster resources section. To complete the installation of HP SIM 6.x to the cluster, several cluster resources must be created using Cluster Administrator. Creating the HP SIM 6.x Generic Service Resource 1. In the Cluster Administrator window, select the HP SIM Disk Group from the left pane. Click anywhere in the right pane, and then select NewResource from the menu. 2.
Figure 13: Creating the HP SIM 6.x service Upgrading HP SIM 5.1 to HP SIM 5.3 in a cluster environment For this upgrade, HP SIM 5.0 must be running in the failover mode in a two system Microsoft Windows 2003 Enterprise Server cluster environment, and these servers meet the pre requisites detailed in the Hardware and Software Requirements section. For more details, see HP Systems Insight Manager 5.3 Installation and Configuration guides and the HP Systems Insight Manager 5.
5. Take a copy of the existing HP SIM 5.0, HP PMP, HP VMM, and HP SMP folders from the shared disk on which HP SIM and PMP are installed. 6. Start the HP SIM 5.0, PMP, VMM, and VCRM services manually. 7. Upgrade SMH. See Installing HP SIM 6.x on the primary system 8. On the primary system, log in to Microsoft Windows as a user with administrator rights. Note: Be sure to log in with the same user name that you used to install the Microsoft SQL Server 2005 Enterprise Edition instance. 9.
15. Click Custom. The Custom Install – Software Selection window appears. Note: Be sure to close any running applications, such as Microsoft SQL Server Enterprise Manager, that connect to the Microsoft SQL Server 2005 Enterprise Edition instance being referenced (HP-SIMSQLSVR\HP_SIM_INSTANCE in this paper). Otherwise, this step might hang. 16. Click Next. The Service Account Credentials window appears. The Username field displays the user name that is logged in a.
Note: A progress bar indicating files are being copied appears during the installation, which might take a few minutes. Note: It might take a few more minutes when the Initializing HP Systems Insight Manager window appears. After initialization is complete, the Completing the HP Insight Manager Setup Wizard window appears. v. Click Finish to close the Setup HP Systems Insight Manager Wizard window. c. A new Remote Support Pack Installation window appears. i.
Note: Upgrading VMM is not supported from VMM 1.1 to 3.1. You must uninstall the older version and then install VMM 3.1. e. From the Management CD, select Products and then click HP Virtual Management Pack Install. A warning message appears, stating as part of the VMM installation, the HP SIM service must be stopped and restarted. Click OK. i. A warning message appears, stating An older version of HP Virtual Machine Management Pack is installed. Click OK to uninstall the older version. ii.
Note: Be sure to log in with the same user name that you used to install the Microsoft SQL Server 2005 Enterprise Edition. 23. Select StartRun. 24. Enter Regedit and then click OK. The Registry Editor window appears. 25. Expand HKEY_LOCAL_MACHINE\SOFTWARE\Hewlett-Packard and then open Export Registry file from the Registry menu. 26. Enter a file name and then click Save. Save the file to a shared disk. For example, in F:\Hewlett. This saves the HP SIM and VCRM registries. 27.
Note: Be sure to log in with the same user name that you used to install the Microsoft SQL Server 2005 Enterprise Edition instance. 13. Go to Adding the HP SIM 6.x cluster resources. Upgrading HP SIM 5.x to HP SIM 6.x in a cluster environment For this upgrade, HP SIM 5.x must be running in the failover mode in a two system Microsoft Windows 2003 Enterprise Server cluster environment, and these servers meet the prerequisites detailed in the Hardware and Software Requirements section.
enabled on the primary system, go to D:\autorun.exe. If this is the first time you are installing from this version of the HP Management CD, you must first accept the license agreement for the HP Management CD. 12. Select the Products tab. 13. Click HP SIM 6.x Windows Install. The HP Systems Insight Manager Setup window appears. 14. After completing the system inspection, the Database Configuration window appears stating “Incompatible plug-in versions detected”. Click Close.
b. Enter the password in the Password field. c. The Domain field displays the user domain used to log into the system. 18. Click Next. The Custom Install – Summary window appears. Note: The Incompatible HP SIM Plug-in Version Detected window appears. PMP and VMM are not bundled with HP SIM 5.2. This window displays the version of the plug-in that must be manually updated. 19. Click Install. The installation of HP SIM 5.2 and its dependent services are initiated. a.
d. A new HP Package Setup: Version Control Repository Manager window appears. Note: If the latest Version Repository Manager is already installed on your system, this window does not appear. i. Click Install to continue. Note: If you do not want to install the Version Control Repository Manager, click Close to skip this component. You can move to step 16e. ii. Click Install to proceed to the Repository Directory window.
3. The Domain field is already populated with the user domain used to log in. The Database server name field displays the database name used during the HP SIM installation. 4. The Database server field is populated with the name of the Microsoft SQL Server 2005 Enterprise Edition instance that you created. See SQL Server Installation steps in this paper, Installing a clustered instance of the Microsoft SQL Server 2005 Enterprise Edition. (HP-SIM-SQLSVR\HP_SIM_INSTANCE in this paper). iii. Click Next.
A message appears asking if you are sure you want to remove HP SMP and all of its components. Click Yes. ii. The HP Server Migration Pack Uninstall window appears. Note: A progress bar appears indicating that HP SMP is being uninstalled. This might take a few minutes. iii. A message appears stating that HP SMP was removed successfully. Click OK. iv. The Welcome to the HP Virtual Machine Management Pack Setup Wizard window appears. Click Next. v. The Database configuration window appears.
Upgrading the secondary system 1. Start the secondary system and log in to Windows as a user with administrator rights. Note: Be sure to log in with the same user name that you used to install the Microsoft SQL Server 2005 Enterprise Edition instance. 2. Be sure that the secondary system owns all the cluster resources. 3. Select Start>Run. 4. Enter Regedit and then click OK. The Registry Editor page appears. 5.
Figure 24: The Cluster Administrator window Note: If it is an upgrade from HP SIM 4.2 to HP SIM 5.2, an upgrade from HP SIM 5.0 to 5.2, or upgrade from 5.1 to 5.52, disregard the following two steps and go to Creating the HP SIM 6.x IP address resource. a. Rename the group containing your Microsoft SQL Server 2005 instance program files to an appropriate name. In the examples discussed in this paper, it is called HP SIM SQL Disk Group. b. Rename the group containing your HP SIM 6.
3. In the Name field, enter SIM IP Address, and select IP Address from the Resource type menu, as shown in Figure . 4. Click Next. Figure 15: The New Resource window 5. The Possible Owners window appears. Be sure that the two systems in your cluster are listed in the Possible Owners pane. 6. Click Next. The Dependencies window appears. 7. Specify the other resources in this disk group that a new resource depends on. An IP address in cluster services is not required to establish any dependencies. 8.
11. Click OK. Upgrading the HP SIM 6.x network name resource 1. In the Cluster Administrator window, select the HP SIM Disk Group from the left pane. Click anywhere in the right pane and select New>Resource from the menu. 2. The New Resource window appears. 3. In the Name field, enter HP SIM IP Address, and then select Network Name from the Resource type menu. 4. Click Next. The Possible Owners window appears. 5. Be sure the two systems in your cluster are listed in the Possible Owners pane. 6.
Figure 16: Creating the HP SIM 6.x service Creating the OpenSSH Services for HP SIM 6.x generic service resource 1. In the Cluster Administrator window, select the HP SIM Disk Group from the left pane. Click anywhere in the right pane and select NewResource from the dropdown menu. 2. In the Name field, enter OpenSSH Service and select Generic Service from the Resource type dropdown menu. 3. Click Next. The Possible Owners window appears. Be sure that both systems in your cluster are selected. 4.
Figure 17: Creating the OpenSSH Service Creating the Pegasus WMI Mapper generic service resource 1. In the Cluster Administrator window, select the HP SIM Disk Group from the left pane. Click anywhere in the right pane and select NewResource from the dropdown menu. 2. In the Name field, enter WMI Mapper Service, and select Generic Service from the Resource type dropdown menu. 3. Click Next. The Possible Owners window appears. Be sure that both systems in your cluster are selected. 4. Click Next.
Figure 18: Creating the WMI Mapper Service Creating the PMP services for HP SIM 6.x generic service resource Note: This section is applicable only if PMP has been installed manually. 1. In the Cluster Administrator window, select the HP SIM Disk Group from the left pane. Click anywhere in the right pane and select NewResource from the menu. 2. In the Name field, enter PMP Service, and then select Generic Service from the Resource type menu. 3. Click Next. The Possible Owners window appears.
Essentials\Licensing\4 and SOFTWARE\HP\Performance Management Pack\4.0. 10. Click OK. Creating the PMP tools services for HP SIM 6.x generic service resources 1. In the Cluster Administrator window, select the HP SIM Disk Group from the left pane. In the right pane, right-click anywhere, and then select NewResource from the menu. 2. From the New Resource window, in the Name field, enter PMP Tools, and then select Generic Service from the Resource type menu. 3. Click Next.
7. Click Next. The Generic Service Parameters window appears. 8. In the Service name filed enter cpqsrhmo which is the service name for VCRM as shown in Figure . Parameters are not required. 9. Click Next. The Registry Replication window appears. 10. Click Finish. A Resource Creation Confirmation appears. 11. Click OK. Figure 19: Creating the VCRM service Creating the Virtual Machine Management Pack generic service resource Note: This section is applicable only if VMM has been installed manually. 1.
9. Click Next. The Registry Replication window appears. 10. Click Finish. A Resource Creation Confirmation window appears. 11. Click OK. Creating the Virtual Machine Management Webservice generic service resource 1. In the Cluster Administrator window, select the HP SIM Disk Group from the left pane. In the right pane, right-click anywhere, and select NewResource from the menu. 2.
Figure 20: Cluster Administrator The installation of HP SIM 6.x is now complete. The following section discusses how to validate your installation of HP SIM 6.x. Validating the installation To be sure that the HP SIM 6.x service can be moved between both systems, perform the following steps from either one of the cluster systems: 1. Open the Cluster Administrator and connect to the cluster. 2. In the Cluster Administrator window, on the left pane, right-click the disk group containing the HP SIM 6.
Note: You must always specify the port 280 in the URL of your Web browser to connect to the HP SIM 6.x service. To learn more about connecting to HP SIM 6.x, refer to the HP Systems Insight Manager 6.x Technical Reference Guide. Note: The HP SIM 6.x icon on the Windows desktop of each system was created by the installation of HP SIM 6.x as a handy shortcut for a regular standalone server only. This icon is no longer applicable at this point because the HP SIM 6.x is clustered.
Figure 21: The HP SIM 6.x home page Note: Navigate to OptionsDiscovery. Select System Automatic Discovery task and click Edit. The Edit Discovery page appears. Take a look at the Ping inclusion ranges list box (on the left side of the right frame, near the bottom of the screen). Note that HP SIM 6.x automatically generates a range for each of the IP addresses the current system has. Because one of these ranges is based on the cluster heartbeat IP address (generally of the form 10.0.0.
Note: These steps are to ensure HPSIM is working after failover. 10. You should be able to use the active system name to establish a command-line session to the cluster HP Systems Insight Manager service from a client system that has an OpenSSH client installed, using SSH. Note: The only exception is when the disk group containing the HP SIM program files (HP SIM Disk Group in this paper) has failed-over to the other system.
For more information Refer to the following for more information regarding the topics referenced in this paper. Microsoft cluster services Clustering basics www.microsoft.com/windows2000/technologies/clustering/default.asp Steps to setting up a Microsoft cluster www.microsoft.com/windows2000/techinfo/planning/server/clustersteps.asp HP ProLiant clusters http://h18000.www1.hp.com/solutions/enterprise/highavailability/microsoft/index.html Microsoft SQL Server 2005 Enterprise Edition System requirements www.