
HP Systems Insight Manager 5.3 Technical Reference Guide


Discovery filters
Discovery filters
prevent or enable certain
system types
from being added to the
database
through
automatic
discovery
. When you want to discover systems of a certain type, using filters is much easier than specifying
the IP addresses of each individual system. Discovery filters do not apply to manually added systems.
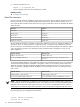
You can access discovery filters in one of the following ways:
• From the Discovery page, select Options→Discovery. From the Automatic tab, click Configure
general settings, and then select Enable discovery filters.
• From the Home page, in the Manage section, click discovery. The Discovery page appears. From
the Automatic tab, click Configure general settings, and then select Enable discovery filters.
• From the introductory page, in the Do this now to complete the installation section, click Automatic.
The Discovery page appears. From the Automatic tab, click Configure general settings, and then
select Enable discovery filters.
To disable filters, clear the Enable discovery filters checkbox. To enable filters, select the Enable discovery
filters checkbox, and then select the system types that you want to discover.
To access and modify discovery filters, you must have
administrative rights
. If discovery filters are enabled,
only systems of the selected types are added to the database through automatic discovery. Because all
tasks
operate on systems that exist in the database, tasks do not run on any system until the filter criteria has been
met and that system has been added to the database. Filters do not affect any systems already discovered,
even if the systems change to a type that no longer matches the current filter. If discovery filters are disabled,
automatic discovery discovers systems according to the General Settings for All Discoveries section on
the Discovery page in the Automatic tab. See “Configuring automatic discovery general settings” for more
information about configuring discovery filters.
If you do not discover the HP systems that you expect to find, ensure that the
HP Insight Management Agent
s
are installed and running correctly on the target systems. In addition, verify that the SNMP Community Strings
settings and WBEM user name and passwords in HP SIM and on the agents for systems that are not discovered
or configured correctly. See “Setting global protocols” for more information.
Related procedure
▲ Configuring automatic discovery general settings
Related topic
▲ Discovery and identification
Managing hosts files
Hosts files
are used to manually add multiple
systems
to the HP SIM
database
and are generally used only
one time to import systems.
To use a hosts file to specify systems for an automatic discovery, add the hosts file name to the Ping inclusion
ranges, system (hosts) names, templates, and/or hosts files section of the Discovery page under the
Configure general settings section. Enter the following statement:
$Hosts_filename
where
Hosts_filename
is the name of the hosts file that you want to use.
See the "Hosts files" section in the “Discovery and identification” section for more information about hosts
files.
From the Hosts Files section, you can:
• Create new hosts files Click New. The New Hosts File section appears. See “Creating a new hosts
file” for more information.
• Edit a hosts file Select the hosts file to edit, and then click Edit. The Edit Hosts File section appears.
See “Editing a hosts file” for more information.
• Delete a hosts file Select the hosts file to delete, and then click Delete. A confirmation box appears.
See “Deleting a hosts file” for more information.
• Add a hosts file to the HP SIM database Select the hosts file to add, and then click Add Systems
Now. See “Adding systems in a hosts file to the HP SIM database” for more information.
Managing hosts files 111