How to Move an HP Systems Insight Manager SQL 2008 Database from a Local to a Remote Server White Paper Table of Contents Introduction ......................................................................................................................................... 2 Enabling Remote Connection to SQL Server 2008 R2 .............................................................................. 2 Enabling SQL Server and Windows Authentication mode ......................................................
Introduction This white paper describes how to move an HP Systems Insight Manager SQL Server 2008 R2 database from a local server to a remote server. Enabling Remote Connection to SQL Server 2008 R2 Enabling SQL Server and Windows Authentication mode 1. Log in to SQL Server using SQL Server Management Studio on local SQL Server with Windows® Authentication user. The Windows account authenticates SQL Server.
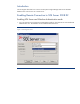
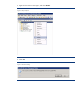
2. In Object Explorer, right-click the instance name and select Properties.
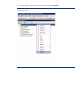
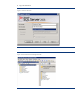
3. On the left side, select Security, and change Server authentication to SQL Server and Windows Authentication mode. If this setting is already selected, then SQL Server authentication is enabled. Figure 3: Server Properties 4. Restart the SQL Server so that the changes can take effect.
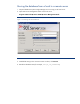
. Right-click the instance name again, and select Restart. Figure 4: Object Explorer 6. Select Yes.
7. Wait for the service to stop and start. Figure 6: Attempting to stop service 8. Both SQL Server and Windows authentication have been enabled. You can now log in to SQL Server with your current Windows account or your created account. NOTE: If SQL Server 2008 Express R2 is installed locally, SQL authentication fails with Microsoft SQL Server error 18456. Use one of the following procedures to authenticate the SQL login. • Enable the sa login using Transact-SQL. 1.
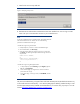
Enabling remote connection on SQL Server Surface Area Configuration 1. Open SQL Server Surface Area Configuration. 2. Right-click the server and click Facets.
3. Select Surface Area Configuration in the Facet box. All services should be set to False.
4. Log in to SQL Server.
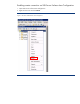
Moving the database from a local to a remote server 1. Stop and disable the Systems Insight Manager service running on the local server. 2. Open SQL Server Management Studio on the local server: ProgramsMicrosoft SQL Server 2008 SQL Server Management Studio Figure 11: Connecting to the remote SQL Server 3. With default settings in the Connect to Server window, click Connect. 4. Record the database name (for example, Insight_v50_xxxxxxxxx).
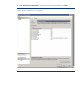
5. Create a new SQL Server 2008 database on the target database server. a. Open SQL Server Management Studio on the target database server: ProgramsMicrosoft SQL server 2008SQL Server Management Studio. b. Right-click Database, and then select New Database. Figure 12: Creating a database c. Enter the name of the database recorded in step 4, and then click OK with the default settings selected. 6.
7. Select TasksExport data.
8. In the Welcome to SQL Server Import and Export Wizard window, click Next.
9. In the Choose a Data Source window, use the default settings of Windows Authentication, or choose the authentication method you used for your database. Click Next.
10. In the Choose a Destination window, select the target database server from the list. Select the database created in Step 5 from the Database list at the bottom of the window.
11. In the Specify Table Copy or Query dialog window, select Copy data from one or more tables or views, and then click Next. If there is any error while connecting to the remote server of the Export Wizard such as Named pipes provider could not open a connection to sql server, verify the following steps: a. Click Start All Programs Microsoft SQL Server 2008 R2 Configuration tools SQL Configuration Manager SQL Native Client 10.0. b.
12. In the Select Source Tables and Views window, select the “select all” check box, and then click Next. A window appears.
13. Click Yes. 14. In the Run Package window, the Run immediately box is checked with an information box at the bottom of the window. Keep this default setting and click Next.
NOTE: The Save and Execute Package window appears if the SQL Server chosen is Standard or Enterprise. It is not applicable to SQL Server 2008 Express (installed locally) or SQL Server 2008 Express R2 (bundled with HPSIM).
Figure 21: Complete the Wizard
15. After the tasks have completed, stop and disable the SQL Service. Data is successfully migrated from the source database server to the target database server.
Systems Insight Manager Installation Directory Manually re-registering a new database by altering the HPSIM configuration files 1. Create a backup of the database.props, database.admin, databaseadminupd.tpl and databaseupdate.tpl files located in \HP\Systems Insight Manager\config. 2. You must modify some settings for the new database changes in Systems Insight Manager in each of the following property files: database.props, database.admin, databaseadminupd.tpl and databaseupdate.
Automated re-registration of a database by executing the mxreconfig command mxreconfig -m sqlredirect -s dbserver -b dbname -a dbuserDomain\dbuser -p dbport The path for executing the mxreconfig command is as follows: \HP\System Insight Manager\mxreconfig\bin -m (mode option – specifies reconfiguration mode) -s (dbserver parameter - name of the new database server) -b (dbname parameter - name of the new database) -a (dbuser parameter - name of the database user with administrative pr
For more information For more information on Systems Insight Manager, visit the HP website (http://www.hp.com/go/hpsim). Technology for better business outcomes © Copyright 2010, 2012 Hewlett-Packard Development Company, L.P. The information contained herein is subject to change without notice. The only warranties for HP products and services are set forth in the express warranty statements accompanying such products and services. Nothing herein should be construed as constituting an additional warranty.