
HP Systems Insight Manager 5.3 with SP1 Installation and Configuration Guide for Microsoft Windows
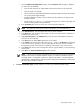
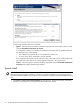
Table Of Contents
- HP Systems Insight Manager 5.3 with SP1 Installation and Configuration Guide for Microsoft Windows
- Table of Contents
- 1 Product overview
- 2 Installation overview and requirements
- 3 Installing HP SIM on the Central Management Server (CMS) for the first time
- 4 Configuring HP SIM using the First Time Wizard
- Using the First Time Wizard
- Configuring the managed environment
- Enabling automatic system discovery
- Configuring System Automatic Discovery task sign in credentials
- Configuring managed systems
- Configuring the WMI Mapper Proxy
- Configuring privilege elevation
- Configuring e-mail settings
- First Time Wizard summary
- Finishing the First Time Wizard
- Operating-system-specific collections, reports, and tools
- 5 Configuring HP SIM using the Options menu
- 6 Setting up and configuring managed systems
- 7 Initializing the Remote Support Software Manager
- 8 Upgrading HP Systems Insight Manager
- 9 Uninstalling HP Systems Insight Manager
- 10 Using the graphical user interface
- 11 Using the command line interface
- 12 Configuration options
- 13 Troubleshooting
- glossary
- Index

1. From the Database Configuration window, select Use Oracle. Before using the database
you must ensure the database:
• Uses Unicode character set of AL32UTF8 and national character set of AL16UTF16.
• The NLS Length is set to BYTE.
• Has an Oracle user with Database Administrator (DBA) privileges created for the exclusive
use by HP Systems Insight Manager.
• The Oracle database schema is empty. HP SIM must be installed in an empty Oracle
database schema.
• The thin client .jar (ojdbc14.jar) is copied to the system at C:\oracle\ora92\jdbc\lib,
and the location specified during installation.
2. In the Username field, enter the Oracle user name assigned the DBA role.
NOTE: An Oracle user name cannot contain a backslash (\) or a forward slash (/).
3. In the Password field, enter the password for the user name specified.
4. In the Host field, enter the name of the remote or local server where Oracle is installed. An
IP address may also be used.
5. Under Instance name in the Database field, enter the name of the database created on
Oracle for the use of HP SIM.
6. In the Port field, the default 1521 appears but can be edited.
7. In the JarFile field, enter the full path to theojdbc14.jarfile or click Browse and navigate
to the correct location, typically C:\oracle\ora92\jdbc\lib. This path must be accessible
through the file system on the CMS. The installation copies the file to the correct location.
8. In the Host field, the local host name appears and can only be edited if you are performing
a fresh install.
9. Click Next. The Select Installation Type window appears.
NOTE: If an HP ProLiant Essentials Vulnerability and Patch Management Pack (VPM) MSDE
database exists (within the HP SIM database instance or located on a database instance
created by VPM), it is upgraded to SQL Server 2005 Express Edition. If the VPM database
upgrade fails, a message displays indicating
Failed to Upgrade VPM Database to SQL Express
,
but the HP SIM installation continues.
9. The Select Installation Type window enables you to select your preferred installation type.
Preparing the system 29