
PCoIP Zero Client and Host Administrator Guide (Issue 5)

Note: For more information about configuring VMware View servers, please refer to
VMware View documentation.
1. On the View Connection Server:
l Install View Agent on the host workstation.
l Create a manual pool that is configured to support PCoIP hardware, and then add
the workstation to the pool.
l Define the pairing password (and pairing timeout) that will be used to pair the
View Connection Server and View Security Server.
2. On the View Security Server:
l Pair the View Security Server with the View Connection Server.
l Enable the Use Secure Tunnel connection to desktop and Use PCoIP Secure
Gateway for PCoIP connections to desktop checkboxes.
l Enter the View Security Server's IP address for the External URL (e.g.,
https://12.50.16.151:443) and for the PCoIP External URL
(e.g.,12.50.16.151:4172). This is the WAN-facing address that remote clients can
resolve. Only the port number is different for the two addresses.
3. On your firewall or router:
l Allow both TCP and UDP traffic on port 4172 and TCP traffic on port 443.
4. From the zero client's AWI:
l Configure the View Connection Server session connection type, and enter the DNS
name or external IP address of the View Security Server.
5. Start a PCoIP session.
6. If necessary, adjust bandwidth and image parameters on both the host and client to
optimize performance.
For information on optimizing networks for VMware View connections, see the following
Knowledge Base topics on the Teradici support site:
l PCoIP session variable settings: 15134-276
l Windows desktop experience optimization: 15134-242, 15134-880
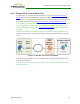
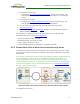
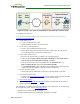
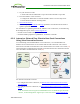
6.5.6 Remote Zero Client to Virtual Desktop via View Security Server
The figure below shows a PCoIP session between a zero client and a virtual desktop over a
WAN using a View Security Server and View Connection Server pair to authenticate and
connect the endpoints.
TER1206003 Issue 5 76
PCoIP® Zero Client and Host Administrator Guide