
Using PCoIP Host Cards with VMware View (Issue 3)


Using PCoIP Host Cards with VMware View
TER0911004 Issue 3 27
6. Click Continue.
You are now ready to connect to the View environment.
6.1.4 Connecting a PCoIP Zero Client to the View Environment
This section provides a brief outline of how to connect a client to a physical PC utilizing a
host card through VMware View. See Using PCoIP Zero Clients with VMware View
(TER0904005) from the Teradici Support site for details not covered in this section.
1. Ensure the host card, zero client and host PC are powered up, connected and
configured correctly for the View network.
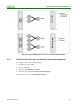
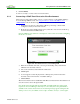
2. From the zero client’s OSD Connect screen, select the correct server form the drop
down list and click the Connect button.
Note the VMware View banner is now displayed on the connect screen after configuring
the client to use View.
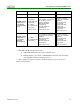
Figure 6-4: Zero Client Connect Screen Using View
3. Enter the credentials of the user you set up for the desktop entry created in the
VMware View Connection Server.
4. Choose the domain associated with the entitled user.
5. Click Logon.
6. A screen appears. Select the physical PC’s desktop entry created in the View
Connection Server from the list of available desktops.
7. Click Connect.
The View Connection Server establishes a PCoIP session between the client and the host
card. You can now access the physical PC.
Note: If this is the first time that the physical PC is installed with View Agent 5 and
registered to the View Manager, there may be a short delay before the physical PC is
available in the View Connection Server. If a warning message appears stating that the
desktop source is not yet available, wait a couple of minutes, and try to connect again.