hp server tc2120 Operations and Maintenance Guide Troubleshooting Chapter January 2003
6 Troubleshooting If you are having problems installing your HP Server tc2120, there are a number of tools available for troubleshooting, including the information provided in this chapter. HP’s web site at http://www.hp.com to access the most comprehensive support material: Latest support news – Product and support information on HP Servers. · Drivers and software downloads for HP Servers.
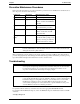
Chapter 6 Troubleshooting Preventive Maintenance Procedures Refer to the following table for preventive maintenance procedures used for the HP Server tc2120. Be sure to turn off power to the server when cleaning it. Component Time Frame Maintenance Procedure Keyboard Regularly Dust with damp, lint-free cloth. Monitor screen Regularly Use “HP Video Screen Cleaning Solution” found in 92193M Master Clean Kit. Mouse Regularly Refer to the mouse’s manual for mouse maintenance procedures.
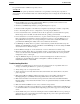
Chapter 6 Troubleshooting For general information on HP Server products, refer to: www.hp.com and search for the specific product. These instructions do not generally cover third-party components or devices. Refer to the documentation that comes with the third-party device for diagnostic and troubleshooting information. CAUTION Always wear an antistatic wrist guard when working inside the HP Server. · Ensure the HP Server is properly configured.
Chapter 6 Troubleshooting 9. Verify that all cables and boards are securely plugged into their appropriate connectors and slots. If the problem still persists: 10. Simplify the HP Server’s configuration. The minimum required: o Monitor o Keyboard o Mouse o 1 hard drive (may need to disconnect for hardware troubleshooting) o CD-ROM and Flexible disk drive (may need to disconnect for hardware troubleshooting). 11. Reconnect the power cords and power on the HP Server.
Chapter 6 Troubleshooting troubleshoot the problem. If the problem persists, contact your HP Customer Support provider or your reseller. If there is no error message, follow these steps: 1. If you are an experienced user, verify the server is configured correctly in the (BIOS) Setup Utility. To start the (BIOS) Setup Utility, boot or reboot the system and press F10 when prompted. 2. If the server still does not work: a.
Chapter 6 Troubleshooting 9. Setup Utility and save the BIOS changes. 10. Label, date, and save this flexible diskette for use as a BIOS Recovery diskette. NOTE If you do not have convenient access to the Internet, you can create a BIOS Update/Recovery diskette from the HP Startup CD-ROM. Please note that the Startup CD-ROM may not provide the most recent BIOS.
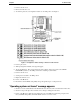
Chapter 6 Troubleshooting 1. Power down the server. 2. Remove the left side cover. 3. To clear the password, set configuration switch 3 to the ON position. See Figure 1. Figure 1: Configuration Switch Settings - Switch 3 Password Clear 4. Power up the server. 5. When pressing F10 on POST, a message will appear: 6. “Power-On Password - The password has been cleared. Power off the Server and set the CLEAR PASSWORD (switch 3) to the OFF position before restarting. System halted.” 7. Power down the server.
Chapter 6 Troubleshooting 4. If a disk array controller is being used and the NOS is installed on a hardware array/container, verify that the array/container is in an optimal state by accessing and checking the disk array controller’s setup utility during startup. 5. Boot to a DOS disk and check the partitions to make sure the primary partition is active. If the problem persists, contact the HP Customer Support Center for further troubleshooting assistance.
Chapter 6 Troubleshooting c. Remove all the accessory boards, including any hard disk drive controller board or video board. Disconnect all mass storage power cords and cables. d. Plug the power cord/s back in and turn on the HP Server. Video/Monitor Problems Symptoms: · The monitor’s power indicator LED is on, but the monitor is blank. · The wrong size characters appear on the monitor. · Colors are wrong or there are no colors on the monitor. Action: 1.
Chapter 6 Troubleshooting f. Verify the new monitor is operating properly and then reinstall the original monitor and duplicate the error. 9. Verify the monitor is working by plugging it into a known-good server or computer. 10. If you are using a video screen saver utility and the screen goes blank while using the keyboard, you may be using an application that turns off the screen even when you are using the keyboard. Refer to the manual provided with the screen saver utility. 11.
Chapter 6 Troubleshooting 16. Reinstall remaining components one at a time once video returns. One of the removed components may have been causing the no video problem. After all the components are reinstalled, reset the HP Server’s BIOS configuration switch back to the appropriate setting. Configuration Problems Symptom: · The configuration cannot be saved and the battery loses power.
Chapter 6 Troubleshooting 5. Verify the correct cables are being used and that the cables are connected properly. Make sure the cable pins are not bent. 6. Try a known good cable. 7. If the printer’s parallel date cable is plugged into the HP Server after the server is on, reboot the HP Server. 8. Examine the printer for a paper jam. 9. Run the printer self-test. Refer to the printer’s manual for instructions. 10. Ensure the correct port setting when configuring the printer. 11.
Chapter 6 Troubleshooting 4. In (BIOS) Setup Utility, ensure mouse’s port does not have a resource conflict.To start the (BIOS) Setup Utility, boot or reboot the system and press F10 when prompted. 5. Ensure correct mouse driver has been installed onto the boot drive. Refer to the mouse installation manual or the operating system manual. 6. Replace the mouse with a known-good unit. 7. Try using a USB mouse. If the problem persists, contact your HP Support Service Center before replacing the system board.
Chapter 6 Troubleshooting Action: If the CD-ROM drawer fails to open when you press the Eject Button or with software commands, do the following: 1. Turn off all power to the server. To open the drawer, insert a pointed object, such as a paper clip, into the emergency eject hole and push in about 1.75 inches (40 mm). 2. Remove the disk and close the drawer. 3. After you remove the disk, start the server and try to open the drawer again with the Eject Button or software commands. 4.
Chapter 6 Troubleshooting Action: Use the (BIOS) Setup Utility to ensure the CD-ROM drive is bootable: 1. Place a known, bootable CD-ROM in the drive. 2. Review the Troubleshooting Checklist and Boot Device Priority. 3. Reboot the server and run the (BIOS) Setup Utility (press F10 during the boot process). 4. Select the Boot menu and the Boot Device Priority submenu. 5. If necessary, move the CD-ROM up the boot list. This ensures the CD-ROM will boot before any of the hard disk drives (IDE or SCSI) 6.
Chapter 6 Troubleshooting 4. Check for any recent changes or upgrades to the software. For example, has anyone moved, removed, or changed the configuration files or drivers? Refer to the software documentation for more information. 5. If you suspect hardware failure and there are no system error messages, check each component associated with the failure. Equipment failure is probably the most unlikely reason for a SCSI device failure.
Chapter 6 Troubleshooting 1. If using a single channel SCSI controller for external devices, make sure not internal devices are connected on the internal channel of the SCSI controller. HP does not support using both internal and external connections on a single-channel controller, and a second SCSI controller board must be purchased for use with the external SCSI device. Refer to the documentation provided with the SCSI device for any specific information regarding installation. 2.
Chapter 6 Troubleshooting 6. Also, if you have changed the options on an existing board, there may be a resource conflict: o Remove the new board and restart the Server. o If this corrects the problem, the board is either defective or it is trying to use a system resource used by the IDE controller board. o Check if the board is using memory, I/O addresses, or interrupt lines that are also used by the IDE controller board. 7. Check for any recent changes or upgrades to the software.
Chapter 6 Troubleshooting 1. Power off the server and unplug the power cord for the power source. 2. Remove all but one DIMM. 3. Plug the power cord back into the power source and power on the HP Server. 4. If the error is not present, power off and unplug the server then add another DIMM, continuing this process until all the DIMMS are installed or a failure occurs. 5. Verify the failure by reinstalling the DIMM by itself and attempt to duplicate the error. 6.
Chapter 6 Troubleshooting 2. Power off the HP Server and unplug the power cord/s from the power source. Remove the covers. a. Locate the NIC and reseat it in its slot. b. Replace the covers; plug in the power cord/s to a power source, and power on the HP Server. c. If the problem persists, perform previous step 2 but move the NIC to another slot. d. Replace the covers; plug in the power cord/s to a power source, and power on the HP Server.