HP Server Ultra3 SCSI Host Bus Adapter Installation and Configuration Guide Printed in November 2002
Notice The information contained in this document is subject to change without notice. Hewlett-Packard makes no warranty of any kind with regard to this material, including, but not limited to, the implied warranties of merchantability and fitness for a particular purpose. Hewlett-Packard shall not be liable for errors contained herein or for incidental or consequential damages in connection with the furnishing, performance, or use of this material.
Contents 1 Installation and Setup . . . . . . . . . . . . . . . . . . . . . . . . . . . . . . . . . . . . . . . . . 1 Where to Obtain Installation Instructions . . . . . . Bus Segments on the HP Ultra3 SCSI Host Adapter Installing the HP Ultra3 SCSI Host Bus Adapter. . . Setting Up SCSI Devices . . . . . . . . . . . . . Connecting SCSI Devices . . . . . . . . . . . . HP Ultra3 SCSI Host Adapter Driver Software . . . Preloaded Ultra3 Drivers . . . . . . . . . . . . . Embedded Ultra3 Drivers . . . . . . . . .
Contents Removing a Host Adapter . . . . . . . . . . . Removing a Host Adapter in Windows NT 4.0 . Troubleshooting . . . . . . . . . . . . . . . . . Problems and Solutions . . . . . . . . . . . . Error Messages . . . . . . . . . . . . . . . . adpu160m.sys Error Messages . . . . . . . . . . . . . . . . . . . . . . . . . . . . . . . . . . . . . . . . . . . . . . . . . . . . . . . . . . . . . . . . . . . . . . . . . . . . . . . . . . . . . .
Contents Troubleshooting . . . . . . . . . . . . . . . . . . . . . . . . . . . . . . . 52 Error Messages . . . . . . . . . . . . . . . . . . . . . . . . . . . . . . 52 6 Linux Support. . . . . . . . . . . . . . . . . . . . . . . . . . . . . . . . . . . . . . . . . . . . . . . 57 A Product Specifications . . . . . . . . . . . . . . . . . . . . . . . . . . . . . . . . . . . . . . . 59 B Troubleshooting. . . . . . . . . . . . . . . . . . . . . . . . . . . . . . . . . . . . . . . . . . . . .
Contents vi
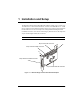
1 Installation and Setup The HP Ultra3 Single Channel SCSI Host Bus Adapter enables you to connect up to 15 SCSI devices—such as hard disk drives, scanners, and CD-ROM drives—to HP Servers with 32-bit or 64-bit PCI expansion slots. You can connect newer Ultra3 and Ultra2 SCSI devices to the two 68-pin Low Voltage Differential/Single-Ended (LVD/SE) connectors. You can also connect legacy SCSI devices to the 68-pin and 50-pin internal Single-Ended (SE) connectors.
Chapter 1 Installation and Setup Although the HP Ultra3 SCSI Host Bus Adapter is a 64-bit PCI host bus adapter, it also works in a 32-bit PCI slot. When installed in a 32-bit PCI slot, the host bus adapter automatically runs in the slower 32-bit mode.
Chapter 1 Installation and Setup Primary LVD/SE Segment Secondary LVD/SE Segment Figure 1-2. Primary and Secondary Bus Segments NOTE If you attach Wide Ultra or Ultra SCSI devices to the LVD/SE connector(s), the data transfer rate for all attached Ultra3 and Ultra2 SCSI devices will drop to Ultra SCSI performance levels.
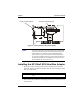
Chapter 1 Installation and Setup 32-bit PCI Slot 64-bit PCI Slot Figure 1-3. 32-bit and 64-bit Expansion Slots 3. Locate an unused 64-bit PCI expansion slot and remove the expansion slot cover. If the HP Server does not have a 64-bit slot, you can install the host adapter in a 32-bit PCI slot. (The expansion slot must be compliant with PCI Rev. 2.1 or higher and must support bus mastering.
Chapter 1 Installation and Setup Figure 1-4. Host Bus Adapter Installed in 64-bit Slot HP Servers may have vertical or horizontal expansion slots. Refer to your HP Server manual to locate the PCI slots. NOTE Be careful when inserting the HP Ultra3 SCSI host bus adapter in a PCI slot. Some 32-bit slots will not accommodate it, and the host adapter may break if you force it into the slot. 4.
Chapter 1 Installation and Setup Setting Up SCSI Devices There are several things you may need to do to your SCSI devices before you connect them to the HP Ultra3 SCSI host bus adapter: • Check the SCSI IDs • Set the termination • Connect the power cables Since setup can vary from device to device, always refer to the device’s documentation for specific instructions. Below are some guidelines for setting SCSI IDs and termination on your devices.
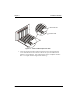
Chapter 1 Installation and Setup LVD SCSI Twisted-Pair Cable Figure 1-5. LVD SCSI Twisted-Pair Cable 3. Plug the internal Ultra3 SCSI devices to the other cable connectors, starting with the connector at the terminated end of the cable (Figure 1-6). Terminated LVD SCSI Twisted-Pair Cable Terminator Figure 1-6.
Chapter 1 Installation and Setup Connecting External SCSI Devices Connect external Ultra3 SCSI devices to the 68-pin external LVD/SE SCSI connector. Each external device will require a high density 68-pin external LVD SCSI cable. Follow these steps to connect the external devices: 1. Connect one end of the external LVD SCSI cable to the external LVD/SE connector on the HP Ultra3 SCSI host bus adapter. Figure 1-7. Connecting External SCSI Devices 2.
Chapter 1 Installation and Setup Figure 1-8. Terminating the Last External SCSI Device 4. Terminate only the device at the end of the chain. (Use of an external multi-mode SCSI terminator is required.) 5. Connect power cables to all external devices and to the HP Server. HP Ultra3 SCSI Host Adapter Driver Software NOTE To use the HP Ultra3 SCSI host bus adapter, driver software must be installed for your operating system.
Chapter 1 Installation and Setup Troubleshooting If you have any problems while installing the HP Ultra3 SCSI host bus adapter, check the following items first: • Are all SCSI devices powered on? • Are all SCSI cables and power cables properly connected? • Does each device on the SCSI bus have a unique SCSI ID? • Does the total SCSI cable length exceed the maximum allowable length? (The maximum cable length for the Ultra3 SCSI host adapter cannot exceed 12 meters.
2 Configuration with SCSISelect SCSISelect, included with the HP Ultra3 SCSI Host Bus Adapter, enables you to change SCSI settings without opening the computer or handling the host bus adapter. SCSISelect also enables you to low-level format or verify the disk media of your SCSI hard disk drives. The following table lists the available and default settings for each SCSISelect option. NOTE The default settings are appropriate for most systems.
Chapter 2 Configuration with SCSISelect Table 2-1.
Chapter 2 Configuration with SCSISelect Starting SCSISelect Follow these steps to start SCSISelect: 1. Turn on or restart your system. During the startup process, pay careful attention to the messages that appear on your screen. 2. When the following message appears on your screen, press the Ctrl-A keys simultaneously (this message appears for only a few seconds): Press for SCSISelect (TM) Utility! 3.
Chapter 2 Configuration with SCSISelect SCSI Bus Interface Definitions • Host Adapter SCSI ID—(Default: 7) Sets the SCSI ID for the SCSI host bus adapter. The Ultra3 SCSI Host Bus Adapter is set at 7, which gives it the highest priority on the SCSI bus. We recommend that you do not change this setting. • SCSI Parity Checking—(Default: Enabled) When set to Enabled, verifies the accuracy of data transfer on the SCSI bus.
Chapter 2 • Configuration with SCSISelect Initiate Wide Negotiation—(Default: Yes) When set to Yes, the SCSI host bus adapter attempts 16-bit data transfer (wide negotiation). When set to No, the SCSI host bus adapter uses 8-bit data transfer unless the SCSI device requests wide negotiation. NOTE Set Initiate Wide Negotiation to No if you are using an 8-bit SCSI device that hangs or exhibits other performance problems with 16-bit data transfer rate enabled.
Chapter 2 Configuration with SCSISelect Advanced Configuration Options NOTE Do not change the Advanced Configuration Options unless absolutely necessary. • Reset SCSI Bus at IC Initialization—(Default: Enabled) When set to Enabled, the SCSI host bus adapter generates a SCSI bus reset during its power-on initialization and after a hard reset.
Chapter 2 Configuration with SCSISelect o Set to Disabled: Not scan if the devices on the SCSI bus (for example, CD-ROM drives) are controlled by software drivers and do not need the BIOS, and you do not want the BIOS to scan the SCSI bus. o Set to Disabled: Scan Bus if you do not need the BIOS, but you want it to scan the SCSI devices on the bus. The following four options have no effect when the SCSI host bus adapter BIOS is disabled. (The SCSI host bus adapter BIOS is normally enabled by default.
Chapter 2 Configuration with SCSISelect Using SCSI Disk Utilities To access the SCSI disk utilities, follow these steps: 1. Select the SCSI Disk Utilities option from the menu that appears after starting SCSISelect. SCSISelect scans the SCSI bus (to determine the devices installed) and displays a list of all SCSI IDs and the devices assigned to each ID. 2. Use the arrow keys to move the cursor to a specific ID and device, then press Enter. 3.
3 Microsoft Windows NT Installation This chapter explains how to install the HP Ultra3 Family Manager Set driver adpu160m.sys for Windows NT. NOTE the tc2120 does not support NT4.0. If you are performing a first time Windows NT installation, see “Installing the Driver When Windows NT is Already Installed” in the next section. If Windows NT is already installed in your system, see “Installing the Driver When Windows NT is Already Installed” on page 20.
Chapter 3 Microsoft Windows NT Installation Completing a Fresh Windows NT 4.0 Installation From CD-ROM 1. Insert the Windows NT 4.0 CD into the CD-ROM drive. 2. Start your system. Press the F6 key when you see the following message: "Setup is inspecting your computer’s hardware configuration..." 3. If you do not see this message, your system may not be setup to boot from a CDROM. You will need to install from floppy disks. See “Completing a Fresh Windows NT 4.0 Installation From Floppy Disk” on page 19.
Chapter 3 Microsoft Windows NT Installation 7. Insert the HP Ultra3 Family Manager Set disk for Windows NT into drive A. 8. From the Copy Manufacturer’s File From text box, type a:\nt4, and click OK. 9. In the Install Driver window, Click OK. 10. Click the New button when asked if you want to use the currently installed driver(s) or install new one(s). 11. Type a:\nt4 again, and click Continue. The driver is now installed. 12. You must restart your computer for the changes to take effect.
Chapter 3 Microsoft Windows NT Installation • DisableSynchronousTransfers — A nonzero value indicates that the SCSI host adapter is not to initiate synchronous negotiations (but it may still accept negotiations initiated by a SCSI target). The data type for this value is REG_SZ. • DisableDisconnects — A nonzero value indicates that targets are not permitted to disconnect during the execution of a SCSI command. The data type for this value is REG_DWORD.
Chapter 3 Microsoft Windows NT Installation 9. Click on the Device key. 10. Select Add Value from the Edit menu. In the Value Name edit box, enter one of the valid parameter values. Make sure to enter the appropriate data type for the value. To enter additional values, repeat Step 8 through Step 9. NOTE Changes made with the Registry Editor do not take effect until you shut down and then restart your system. Using Driver-specific Parameters To use the Registry Editor to enter adpu160m.
Chapter 3 Microsoft Windows NT Installation \HKEY_LOCAL_MACHINE\System\CurrentControlSet\ Services\adpu160m\Parameters\Device\DriverParameters If the Parameters, Device, and Driver Parameters keys already exist, skip to Step 10 below to begin entering parameters. If the keys do not yet exist, you will need to create them by continuing with Step 4. 4. Click on the adpu160m key. 5. Select Add Key from the Edit menu; Type Parameters in the Key Name edit box. Leave the Class edit box blank. 6.
Chapter 3 Microsoft Windows NT Installation 3. Type a:\nt4\hotp160m.reg and press Enter. 4. Click OK. 5. Reboot the system. 6. See the note following these instructions. NOTE The file hotp160m.reg adds Hot-Plug related entries into the NT Registry, including the driver-specific registry value / HOTPLUG. Running hotp160m.
Chapter 3 Microsoft Windows NT Installation Removing a Host Adapter in Windows NT 4.0 1. From the Control Panel, double-click the SCSI Adapters icon. 2. Click the Drivers tab. 3. Using the arrow keys select the following driver: Adaptec 29160(N), 29160, 39160, AHA-3960D, AIC-7892/ 7899 Ultra160 PCI SCSI Controller (NT 4.0) 4. Click the Remove button. 5. If you are sure you are removing the correct host adapter type, click Yes. 6. Click Yes to restart the computer and initialize changes.
Chapter 3 Microsoft Windows NT Installation 3. Once your server is operational again, check all of the hardware and software configuration changes you want to make. Look specifically for conflicts with parts of the existing system configuration that are not being changed. Error Messages Error messages generated by the adpu160m.sys driver can be viewed by opening the Windows NT Event Viewer error logs. To view events generated by the driver, follow these steps: 1.
Chapter 3 Microsoft Windows NT Installation [xxxxx004] Command completed with error [xxxxx005] Command completed with error [xxxxx006] Command completed with error A request issued to a target device completed with indication that there is an error. In most cases, the error is recovered and normal operations continues. [xxxxx010] Error issuing command An error has occurred while the driver was setting up its internal data structures.
Chapter 3 Microsoft Windows NT Installation [xxxxx032] Target device busy The target device reports a Busy status. Another program may already be using this device. [xxxxx050] Host adapter failure [xxxxxx9A] Host adapter failure Your host adapter may not be properly installed or is defective. Try resetting the adapter in the PCI slot, or try installing it a different PCI slot.
Chapter 3 Microsoft Windows NT Installation [xxxxx0ce] Scatter/gather limit exceeded An I/O request packet from the system contained a Scatter/Gather element list that contained more elements than are supported by the miniport. Scatter/Gather is a list of data segments that define the entire data transfer. Scatter/Gather is a means to improve total data throughput. This error might be caused by a component external to the miniport driver, such as the operating system or an ASPI application.
4 Microsoft Windows 2000 Installation This chapter explains how to install the HP Ultra3 Family Manager Set driver for Windows 2000. If you are performing a first-time Windows 2000 installation, see “Installing the Driver When Installing Windows 2000” . If Windows 2000 is already installed in your system, see “Installing the Driver When Windows 2000 is Already Installed” on page 32.) Installing the Driver When Installing Windows 2000 1.
Chapter 4 Microsoft Windows 2000 Installation Installing the Driver When Windows 2000 is Already Installed To update or install the driver if Windows 2000 is already installed, follow these instructions: 1. Start Windows 2000. 2. Click the Start button on the Windows 2000 task bar, and then point to Settings. 3. Click the Control Panel. 4. Double-click the System icon. 5. Select the Hardware tab and click the Device Manager button. 6. Under SCSI and RAID Controllers, click on the + sign to the left.
Chapter 4 Microsoft Windows 2000 Installation Upgrading an Existing Windows NT Version 4 Installation to Windows 2000 1. With your operating system started, insert your Windows 2000 CD-ROM and choose to upgrade your system. Your system will reboot. 2. The Windows 2000 Setup program will start. Press F6 when this message is displayed: Press F6 if you need to install a third party SCSI or RAID driver... 3. Follow the directions from “Installing the Driver When Installing Windows 2000” on page 31.
Chapter 4 Microsoft Windows 2000 Installation • DisableTaggedQueuing — A nonzero value indicates that the SCSI host adapter disables tagged queueing for SCSI devices. The data type for this value is REG_SZ. • DisableDisconnects — A nonzero value indicates that targets are not allowed to disconnect during the execution of a SCSI command. The data type for this value is REG_DWORD. • DisableMultipleRequests— This limits the number of commands to each logical device to one.
Chapter 4 Microsoft Windows 2000 Installation 8. To specify a certain host adapter, append Device with the number of the host adapter. For example, type Device0 for the first host adapter, Device1 for the second, etc. If you omit the host adapter number, the configuration information applies to all Ultra3 host adapters. 9. Click on the Device key. 10. Select Add Value from the Edit menu. In the Value Name edit box, enter one of the valid parameter values.
Chapter 4 Microsoft Windows 2000 Installation 2. Type regedt32 and press Enter. 3. Open the registry list to the following location: \HKEY_LOCAL_MACHINE\System\CurrentControlSet\ Services\adpu160m\Parameters\Device If the Parameters\Device keys already exist, skip to Step 10 below to begin entering parameters. If the keys do not yet exist, you will need to create them by continuing with Step 4. 4. Click on the adpu160m key. 5. Select Add Key from the Edit menu; Type Parameters in the Key Name edit box.
Chapter 4 Microsoft Windows 2000 Installation Problems and Solutions I made changes to the host adapter configuration and Windows 2000 no longer boots! The boot manager for Windows 2000 contains recovery logic to allow you to return to the last known good configuration. If you have changed your host adapter configuration and Windows 2000 no longer boots, follow these steps to recover: 1. Undo any hardware changes you have made to the server since it was last operational. 2. Reboot the server.
Chapter 4 Microsoft Windows 2000 Installation In the Data section of the dialog box, the entry in the second row and second column (to the right of the 0010: entry) lists the error message generated by the driver. The common error messages for the driver are described below. NOTE The entry in the third row of the last column identifies the SCSI ID of the device originating the error.
Chapter 4 Microsoft Windows 2000 Installation [xxxxx021] Target device protocol error An unexpected event occurred during data transfer between the adapter and target device. Normally, this indicates a faulty or non-compliant target device. [xxxxx022] Adapter or target device protocol error The adapter or target device has broken the communication protocol. A badly behaving device could cause this message to appear. Normally this is not a serious problem.
Chapter 4 Microsoft Windows 2000 Installation [xxxxx089] Unable to allocate memory This indicates that there may be a problem with the amount of memory installed in your system. Verify that your system has at least the minimum amount of memory required by your operating system. [xxxxx096] Adapter hardware initialization failure—possible resource conflict The driver has attempted to initialize the adapter hardware but failed.
5 Novell NetWare Installation This chapter explains how to install the HP Ultra3 Family Manager Set driver adpt160m.ham for Novell NetWare— NetWare 5.0, 5.1, and 6.0. If you are performing a first time NetWare installation, see “Installing the Driver When Installing NetWare” in the next section. If NetWare is already installed in your system, see “Installing the Driver When NetWare is Already Installed” on page 44. Installing the Driver When Installing NetWare To install the adpt160m.
Chapter 5 Novell NetWare Installation DOS Drivers for CD-ROM Access The CD-ROM drivers need to be installed only if DOS access to a CD-ROM drive attached to a SCSI host adapter is required. If NetWare is already installed, or if the CD-ROM drive is not connected to a SCSI adapter, these drivers do not need to be copied or installed. However, you may choose to install these drivers if you are having trouble accessing your CD-ROM from NetWare. NOTE You do not need these drivers for Windows NT or UNIX.
Chapter 5 Novell NetWare Installation c:\dos\mscdex.exe /d:aspicd0 /m:12 NOTE This will assign the CD-ROM to the next available drive letter, typically D:\ if there is only one DOS drive. If you are using MS-DOS 5.0 and do not already have mscdex.exe, you will need to either upgrade to MS-DOS 6.0 or above, or download mscdex.exe from Microsoft BBS or CompuServe forum. 4. Reboot your system. You are now able to access your CD-ROM drive from the command line and from Windows.
Chapter 5 Novell NetWare Installation Installing the Driver When NetWare is Already Installed To update or install the adpt160m.ham driver when NetWare is already installed, follow the instructions in this section. The procedures are similar for all versions of NetWare. Procedures that are specific to a NetWare version are noted when necessary. 1. Make a backup copy of the old driver (if it exists) before installing the new driver. 2. Copy the adpt160m.
Chapter 5 Novell NetWare Installation load [pathname]adpt160m.ham [options] For example, the command line to load the driver from the c:\nwserver directory, with the verbose= option on is: load c:\nwserver\adpt160m verbose=y Command line options are not case sensitive. Placing commas between command line options is optional. See “Using the Load Command Line Options” for possible values. To modify the startup.ncf file, follow these steps: NOTE You can also use your DOS text editor to modify the startup.
Chapter 5 Novell NetWare Installation adpt160m.ham Command Line Options Table 5-1. adpt160m.ham Command Line Options 46 Option Values Default Description auto_disable_tagq= on, off off Enables/disables auto disable tagged queuing algorithm. dev_enable= 0-FFFF FFFF Allows you to enable the driver's registration of SCSI devices on a per target basis. By default, all targets are scanned. A bit value of 0 causes the target not to register under the operating system.
Chapter 5 Novell NetWare Installation Table 5-1. adpt160m.ham Command Line Options Option Values Default Description multlun_targets= 0-FFFF FFFF A bit mask to enable LUNs on selected targets. By default, LUNs on all targets are enabled. This bit mask is entered in hex (see “Bit Mask Options” on page 47). slot= 0-xxxx2 0 Defines a physical slot number for the host adapter. If 0 is specified, or if this option is not specified, then the driver loads for all Ultra3 host adapters.
Chapter 5 Novell NetWare Installation Figure 5-1. Bit Mask Options Table 5-2. Binary-Hex Conversion Binary Hex Binary Hex 0000 0 1000 8 0001 1 1001 9 0010 2 1010 A 0011 3 1011 B 0100 4 1100 C 0101 5 1101 D 0110 6 1110 E 0111 7 1111 F Sample Load Commands Here is a simple load command with no option switches (if loaded from drive A): load a:\netware\adpt160m.ham If an error message appears when attempting to load the driver, refer to “Troubleshooting” on page 52.
Chapter 5 Novell NetWare Installation Using NetWare and the Host Adapter This section contains useful information on using NetWare and your host adapter. Using Removable Media The adpt160m.ham driver module fully supports removable-media disk drives, including magneto-optical drives. Removable media is treated as a standard SCSI hard disk, with some exceptions: • The driver only recognizes and registers media with 512 bytes/sector.
Chapter 5 Novell NetWare Installation Before you eject your current media, you should first Dismount it (menu choice 5). When the media status is Dismounted, you can eject the media. However, NetWare does not allow you to dismount it if the media is locked. To insert your new media, wait for the drive to spin-up, and then select the Drive Mount option. Lock Status If your removable-media device supports the Lock/Unlock feature, you can lock the media (menu choice 6).
Chapter 5 Novell NetWare Installation 2. The scsicd.cdm driver will auto-load if the device(s) are detected. NOTE For multiple LUN CDs, enable multiple LUN scanning with the lun_enable switch (e.g., load adpt160m lun_enable=FF). The lun_enable switch is needed for adpt160m.ham. Enter the following line at the prompt: scan all luns 3. Enter the following line at the prompt and then note the number and name of the CD: :cd device list 4.
Chapter 5 Novell NetWare Installation Troubleshooting Error Messages The error messages listed below are the messages associated with the adpt160m.ham driver. Messages are listed sequentially according to the last three digits of the error code. For example, [xxxxx080], [xxxxx081], [xxxxx082], etc. NOTE When reporting problems to HP Customer Support, be sure to include the complete error code in your problem description.
Chapter 5 Novell NetWare Installation [xxxxx085] Unable to allocate memory This indicates that there may be a problem with the amount of memory installed in your system. Verify that your system has at least the minimum amount of memory required by your operating system. [xxxxx087] Internal driver error An error has occurred while the driver was setting up its internal data structures. Try installing the most up-to-date version of the driver available from the HP Web site located at: http://www.hp.
Chapter 5 Novell NetWare Installation [xxxxx0ab] Driver already loaded for this host bus adapter The driver is already loaded for this adapter. Verify that the correct adapter is specified in your command line or startup file. [xxxxx0ac] Driver already loaded for all host bus adapters The driver is already loaded for all the supported adapters in this system. [xxxxx0a4] SCSI bus reset by third party hardware Hardware such as an array enclosure may have reset the SCSI bus.
Chapter 5 Novell NetWare Installation [xxxxx07f] Unable to allocate memory This indicates that there may be a problem with the amount of memory installed in your system. Verify that your system has at least the minimum amount of memory required by your operating system.
Chapter 5 56 Novell NetWare Installation
6 Linux Support The HP Ultra3 SCSI host bus adapter supports the following Linux Operating Systems: Table 6-1. Linux Operating System Support Linux Operating System World Wide Web URL RedHat Linux 7.3 www.redhat.com SuSE Linux 7.3 www.suse.com Installation Guides are available at the web sites listed above. Refer to your HP Server User Guide for additional information on Linux support for your system. NOTE HP recommends that you use the drivers provided on your tc2120 series Startup CD.
Chapter 6 58 Linux Support
A Product Specifications These specifications list the operating conditions for the Ultra3 SCSI adapter. Check the User Guide for the server containing the adapter, and ensure that the target operating environment is suitable for both the server and adapter. Table A-1. Electrical Spectifications Description Specification Power Requirements 5.0V +/- 5% @ 1.2A maximum Power Consumption 6 W maximum Bus Type PCI 2.
Appendix A Product Specifications Table A-1. Electrical Spectifications Cable Length 25m for a single LVD SCSI device Up to 12m for 15 LVD devices Electrical Termination Automatic active, programmable via SCSISelect Table A-2. Physical Specifications Description Specification Dimensions 6.875 x 3.725 x 0.44 inches 174.63 x 94.62 x 11.18 millimeters Internal Connector One 68-pin LVD SCSI One 68-pin Ultra Wide SCSI One 50-pin Ultra SCSI External Connector One 68-pin LVD SCSI Table A-3.
Appendix A Product Specifications Table A-4. Regulatory Specifications Description Specification Meets electromagnetic compliance requirements of: USA: CFR 47 part 15, Class B, C63.4 - 1992 Canada: Industry Canada, ICES-003, CISPR 22, Class B Europe: EN50081, EN 55022, Class B Japan: VCCI, CISPR 22 Class B ITE South Korea: Min.
Appendix A 62 Product Specifications
B Troubleshooting Troubleshooting Checklist Most problems that occur with your host adapter result from errors in preparing and connecting devices on the SCSI bus.
Appendix B Troubleshooting Start unit request failed The BIOS was unable to send a Start Unit Command to the device. Run the SCSISelect utility and disable Send Start Unit Command for the device. Time-out failure during … An unexpected time-out occurred. Check SCSI bus termination. Try disconnecting the SCSI peripheral cables from the host adapter and then starting the HP Server. If the HP Server successfully restarts, check SCSI bus termination and cable connections.
C Regulatory Information Regulatory Notices - Electromagnetic Compliance Electromagnetic Compatibility (EMC) requirements have been established in many countries to regulate the radio frequency energy generated by Information Technology Equipment (ITE). This energy is generated during the normal and intended use of this equipment and so it is limited by country regulations to levels intended to minimize potential interference to other electrical equipment, including public safety services.
Appendix C Regulatory Information harmful interference to radio or television reception, which can be determined by turning the equipment off and on, correct the interference by one or more of the following measures: • Reorient or relocate the receiving antenna. • Increase the separation between the equipment and the receiver. • Connect the equipment into an outlet on a power circuit different from that to which the receiver is connected.
Appendix C Regulatory Information DECLARATION OF CONFORMITY (US and EU) according to ISO/IEC Guide 22 and EN 45014 Manufacturer's Name: Manufacturer's Address: Hewlett-Packard Company 10955 Tantau Avenue Cupertino, California, 95014 , USA declares, that the product Product Name: The HP Server Ultra3 SCSI Host Bus Adapter Model Number: All Product Options: All conforms to the following Product Specifications: Safety: IEC 60950:1991+A1+A2+A3+A4 / EN 60950:1992+A1+A2+A3+A4+A11 EMC: CISPR 22:1997 /
Appendix C 68 Regulatory Information
D Warranty and Support The hardware warranty below applies to components purchased as accessories. If your component was factory installed as part of an HP Server model, refer to the HP Server Warranty and Service/Support Booklet for the warranty limitations, customer responsibilities, and other terms and conditions.
Appendix D Warranty and Support The customer may be required to run HP-supplied configuration and diagnostic programs before a replacement will be dispatched or an on-site visit is authorized. Third-Party Hardware Products HP does not warrant third-party hardware products. Third-party hardware products may be warranted in accordance with the third-party warranty statement accompanying the product.
Index A aspi8u2.sys, 42 aspicd.sys, 42 autoexec.bat, 42 B Backup, 50 Bit mask options, 46, 47 C CD-ROM, 42, 50 Command line options, 44, 45 config.
Index S Scatter-gather, 22, 34 Support, 70 Synchronous negotiation, 22 T Tagged commands, 46 Tagged queuing, 21, 34, 46 Tape backup, 50 Troubleshooting NetWare, 52–53 Windows NT, 26–30 W Warranty hardware accessories limited, 69 Windows NT adpu160m.