Thunderbolt Add-in Card Installation Printed in 753804-001 753804-001 © 2013 Hewlett-Packard Development Company, L.P.
Table of contents Thunderbolt Add-in Card Installation .................................................................................................................... 1 Introduction ........................................................................................................................................... 1 Kit contents ........................................................................................................................................... 1 Warnings and cautions .....
iv
Thunderbolt Add-in Card Installation Introduction This installation guide explains how to install the Thunderbolt™ add-in card into HP workstations. Kit contents ● HP Thunderbolt Add-in Card ● GPIO (General-Purpose Input/Output) cable ● DisplayPort cable ● Extra bulkhead ● Installation instructions (this document) ● Warranty information IMPORTANT: Use of the Thunderbolt add-in card requires installation of a PCI Express graphics card.
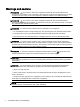
Warnings and cautions WARNING! Any surface or area of the equipment marked with this symbol indicates the presence of a hot surface or hot component. If this surface is contacted, the potential for injury exists. To reduce the risk of injury from a hot component, enable the surface to cool before touching. WARNING! Any surface or area of the equipment marked with this symbol indicates the presence of an electrical shock hazard.
Step 1—Preparing for component installation Accessing the internal components of the computer 1. If you need help preparing the workstation for this installation, consult the removal and replacement procedures in the HP Customer Self Repair Services Media Library at http://www.hp.com/go/sml. 2. Load the correct BIOS onto the workstation, as follows:. a. Go to http://www.hp.com/drivers. b. Enter the product number (such as z820, z620, z420, z230). c. Select the model.
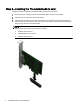
Step 2—Installing the Thunderbolt add-in card Follow these steps to install the Thunderbolt add-in card into the workstation. 1. Ground yourself, and then remove the Thunderbolt add-in card from the package. 2. Place the unit on a flat, clean, static-free surface. 3. Install the add-in card into the correct PCIe socket in the workstation by sliding the bracket on the end of the card down into the slot on the back of the chassis, and then press the card down firmly into the socket on the system board.
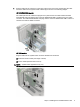
4. Plug the cable into the connector on the upper right corner of the card, and then plug the other end of the cable into the system board connector(s) as shown in the following images: HP Z420/Z620/Z820 models: The cable splits into two cables that plug into the system board. The cable header with three wires labeled C26 plugs into the blue connector labeled P26 USB 2.0 DASH next to the yellow connector. The cable header labeled C25 plugs into the connector labeled P25 USB 2.
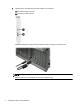
5. The back of the Thunderbolt add-in card includes two connectors: (1): Thunderbolt cable connector (2): DisplayPort cable connector Attach the DisplayPort cable and the Thunderbolt cable to the back of the add-in card. NOTE: Plug the other end of the Thunderbolt cable into a Thunderbolt device. Plug the other end of the DisplayPort cable into a graphics card.
Step 3—Reassembling the computer 1. Close the chassis. 2. Reconnect external devices and power cord. 3. Restore power to the workstation and all external devices. Step 4—Loading the Thunderbolt add-in card driver 1. Go to http://www.hp.com/support. 2. Select the correct language. 3. Select Drivers & Downloads. 4. Type your workstation model number and click Go. 5. Select your workstation. 6. Select the correct operating system. 7. Select Driver – Controller. 8.
8 Thunderbolt Add-in Card Installation