Getting Started
Copyright and License The only warranties for Hewlett-Packard products and services are set forth in the express statements accompanying such products and services. Nothing herein should be construed as constituting an additional warranty. HP shall not be liable for technical or editorial errors or omissions contained herein. HP assumes no responsibility for the use or reliability of its software on equipment that is not furnished by HP.
Table of contents 1 Getting information ..................................................................................................... 1 2 Features ....................................................................................................................... 4 3 Setting up your computer .......................................................................................... 5 Connecting your computer ..............................................................................
Display (screen) ............................................................................................ 29 Keyboard and mouse (with cable) ................................................................ 29 Keyboard and mouse (wireless) ................................................................... 31 Speakers and sound ..................................................................................... 32 Internet access ..........................................................................
1 Getting information Type of information Where to find ● Set up your computer. Setup documentation included with your computer. ● See how-to videos about Visit www.hp.com/supportvideos (English only) using the features of your Tap the Tutorial icon (select models only) in the carousel within the HP computer. TouchSmart application. ● Use the computer. Getting Started (this guide) ● Connect to the Internet. ● Recover factory settings.
Type of information Where to find ● Limited Warranty and Support Guide or the Warranty and Support Information included with your computer. Find computer warranty information. ● Get technical support. ● Get up-to-date information www.hp.com/support/consumer-forum and help from the Windows community. ● Connect to a TV. Setup documentation included with your computer. Watching and Recording TV Tap the Start button, tap All Programs, and then tap User Guides.
WARNING! Disconnect power from the equipment by unplugging the power cord from the electrical outlet. WARNING! The power supply is preset for the country/region in which you purchased your computer. If you move, check the voltage requirements for your new location before plugging the computer into an AC power outlet. WARNING! To prevent direct exposure to a laser beam, do not try to open the enclosure of the CD or DVD drives.
2 Features Features vary by model. The HP TouchSmart PC is a touch-enabled high-performance computer built into a high-definition widescreen display. The slim computer offers select features, that vary by model, such as an adjustable webcam, a CD/DVD and Blu-ray player and burner, Bluetooth capability, USB ports, a media card reader, Wireless 802.11n networking, full support for Beats Audio™ devices (sold separately), and high quality speakers.
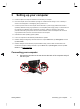
3 ❑ ❑ Setting up your computer Follow the steps in the setup documentation included with your computer. Place the computer so that all ventilation openings are unobstructed and cabling is not in a walkway or where it can be stepped on or damaged by placing furniture on it. ❑ Connect all power cords from the computer and accessories to a power surge protection device that is specifically labeled as having surge protection, an uninterruptible power supply (UPS), or a similar device.
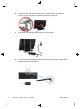
2. Reach into the rear cavity framed by the computer stand, and plug the power cord into the power connection at the top right corner. Sub in 6 IR out LAN 3. Plug the three-pronged power plug into a power outlet. 4. On both the wireless keyboard and the wireless mouse pull the white tabs in the direction of the red arrows.
5. Press the Power button. Protecting your computer Computer risk Computer feature Unauthorized use of the User password computer or user account A password is a group of characters that you choose to secure computer information.
Computer risk Computer feature Unauthorized access to data Firewall software and ongoing threats to the ● Windows 7 includes firewall software preinstalled on the computer. ● The antivirus software, which is preinstalled on the computer, includes computer firewall software. Computer security Windows 7 critical security updates Microsoft continually updates the Windows 7 operating system. NOTE: Security solutions can deter theft, mishandling, and software attacks, but cannot prevent them.
◦ For a wired network connection, connect an Ethernet cable to the computer and to a network router or LAN device. ◦ For a wireless network connection, use a wireless router with the computer to connect to a WLAN with an Internet connection. 2. Get Internet service. ◦ Sign up with an Internet service provider (ISP). If you already have an account with an ISP, skip this step and follow the instructions provided by the ISP.
NOTE: Online Services provides a list of ISPs; however, you might choose another ISP or transfer an existing account to this computer. To transfer existing accounts, follow the instructions provided by the ISP. 3. Using your Internet connection through your ISP, open a Web browser and browse the Internet. NOTE: If you have issues connecting to the Internet, see Internet access on page 32.
Computer orientation Your HP TouchSmart PC is designed to be operated in several orientations. The computer can be swiveled to the right and left (1). The computer can be tilted from the stand, within the range of –5 degrees to 30 degrees (2). With the stand tilted, the computer can move on the rails from an upright position to an almost horizontal position (4). Be sure to position your hands on either side of the computer (3) when making adjustments.
HP My Display TouchSmart Edition allows you to adjust the screen display using the touch feature. ● You can adjust sound, brightness, and contrast. ● Viewing mode can be set to the factory default, or optimized for movie, text, or gaming. ● Status indicators let you know if the on-screen keyboard scroll lock, number lock, or caps lock are set. ● A settings screen lets you adjust color with the touch of a button.
Locate the HP TouchSmart PC in the room to minimize glare from the screen. You can also reduce glare by tilting the screen. The HP TouchSmart screen can be used as an input device; therefore, the computer should be placed so that your shoulders and neck are comfortable. The computer might need to be moved close to your body to keep your shoulders relaxed while you are touching the screen. Keep your shoulders low and your upper arm close to your body when you touch the screen.
4 Using HP 3D Cinema Technology The following sections are included in this chapter: 14 ● 3D safety information ● What are stereoscopic vision and 3D? ● What is HP 3D Cinema Technology? ● Using the HP 3D Active Shutter Glasses ● Using 3D Cinema Technology ● Understanding 3D formats ● Using CyberLink PowerDVD ● Playing 3D games ● Caring for the 3D glasses ● Set-up requirements for 3D webcam ● Synching issues Chapter 4 Using HP 3D Cinema Technology Getting Started
3D safety information Carefully read all of the following safety precautions before using the 3D glasses and 3D Cinema Technology. WARNING! If you cannot see 3D content after you set up 3D Cinema Technology, HP recommends that you discontinue use. Consult a physician if you suspect a physical problem seeing stereoscopic 3D.
WARNING! The lenses in the 3D glasses contain glass. To prevent damage to the lenses, use caution when using the glasses and properly store them when not in use. Do not use the glasses if there is any sign of damage or cracking in the lenses. WARNING! The 3D glasses are not prescription eyewear, sunglasses, or protective goggles. To prevent personal injury, do not use the glasses for any general eyewear purposes.
What are stereoscopic vision and 3D? When you see the world through both eyes, you are actually looking at two pictures merged into one. Your right eye and your left eye each deliver a separate image to your brain, which meshes these two images into one threedimensional picture. Most movies in the past were only able to provide one image on the screen, and 3D effects had to be simulated by other means.
If the display is not displaying in 3D mode, the 3D glasses go into sleep mode. If the display is displaying in 3D mode, the 3D glasses will remain active and will cause the battery to drain more quickly.
Using the HP 3D Active Shutter Glasses Your 3D experience begins with active 3D content and the 3D glasses. The 3D glasses are battery powered and linked wirelessly to the infrared (IR) emitters in your 3D computer. WARNING! Before using the 3D glasses, read the 3D safety information. NOTE: For optimal 3D viewing, you should be no more than approximately 1.5 meters (5 feet) from the computer display. Depending on the viewing angle, the operational distance from the display can vary.
Component (1) Battery compartment NOTE: The battery is preinstalled and may have a protective tab. If the tab is attached, pull the tab to remove it. (2) Nose pieces (3) NOTE: There are 3 nose pieces in different sizes. One nose piece is installed on the glasses at the factory and two additional nose pieces ship with the glasses. Turning the 3D glasses on and off Your 3D glasses are easy to use: ● The 3D glasses turn on and off automatically. There is no on or off switch.
● Double-click the 3D demo icon on the computer desktop and select a 3D clip from the menu. ● Insert a Blu-ray 3D movie (purchased separately) into the slot-load optical drive on the computer and follow the on-screen instructions. NOTE: Insert the disc into the optical drive until it clicks into place. To eject the disc, press the optical drive eject key located at the top right of the keyboard. 2. Put on your 3D glasses. If needed, adjust the glasses using the nose pieces provided. 3.
Understanding 3D formats Your computer supports the following 3D formats: ● Blu-ray 3D movies ● Stereoscopic 3D games ● 3D MPEG 4 MVC files for 3D video playback ● 3D H.264 MVC and Fujifilm AVI dual-stream video file formats for 3D video playback ● 3D Fujifilm MPO for 3D photo viewing Using CyberLink PowerDVD CyberLink PowerDVD supports the playback of 3D Blu-ray discs, DVDs, 3D video files, and native 3D photos.
Caring for the 3D glasses Using the nose pieces The 3D glasses come with 3 nose pieces in different sizes. One nose piece is installed at the factory and two additional nose pieces ship with the glasses. Try on the glasses, and change the nose piece if needed to find a comfortable fit. You can also wear the glasses without a nose piece if needed. NOTE: The 3D glasses are designed to fit over most standard prescription glasses. ▲ To add a nose piece, insert the nose piece onto the glasses.
Replacing the battery The battery in the 3D glasses ships preinstalled in the battery compartment and provides approximately 150 hours of 3D viewing time. HP recommends that the battery be replaced once a year. The glasses can stay in Standby mode for up to one year. The 3D glasses use a basic CR2032 type battery. These batteries can easily be replaced and can be purchased anywhere batteries are sold. WARNING! Replace the battery with only a CR2032 type battery.
Cleaning the 3D glasses To remove smudges and lint, clean the 3D glasses with a soft, damp, lint-free cloth as needed. The cloth can be dampened with mild cleaning agents with less than 10% alcohol. CAUTION: To prevent permanent damage to the 3D glasses: Do not use paper-based towels, because they can scratch the lenses. Do not spray cleaning fluids or chemicals directly on the lenses. Do not use ammonia-based cleaning products.
Handling the glasses The 3D glasses are durable but sensitive to physical pressure, and need to be handled with care. The 3D glasses should be held by the frame in order to avoid getting fingerprints on the lenses. When you are not using the 3D glasses, store them in the protective pouch. CAUTION: glasses. To prevent the lenses from cracking, never twist or rotate the 3D Set-up requirements for 3D webcam For optimal 3D experience, objects should remain within 0.3 to 1.
5 Troubleshooting, maintenance, and frequently asked questions Refer to the documentation provided by the product manufacturer for information about peripheral-specific problems, such as issues with a printer. The following sections present some issues you might encounter while installing, starting up, or using your computer and possible solutions. For more information or for additional troubleshooting options, see Getting information on page 1.
Symptom Possible solution Computer seems Use the Windows Task Manager to close any programs not responding, or restart the to be locked up computer: and is not responding. 1. Press the Ctrl+Alt+Delete keys on the keyboard simultaneously. 2. Tap Start Task Manager. 3. Tap the program that is not responding, and then tap End Task. If closing programs does not work, restart the computer: 1. 2. Press the Ctrl+Alt+Delete keys on the keyboard simultaneously.
Display (screen) Symptom Possible solution Screen is blank. Reconnect the power plug to the back of the computer and to the wall outlet. Press the Power button to turn on the computer. Press the space bar on the keyboard or move the mouse to make the screen display visible again. Press the Sleep button (select models only), or the Esc key on the keyboard, to resume from Sleep mode. Images on the Adjust the display resolution setting in Windows 7: screen are too 1.
Symptom Possible solution Cursor does not Use the keyboard to save changes in all open programs, and then restart your computer: respond to mouse 1. Press the Alt+Tab keys simultaneously to navigate to an open program. 2. Press the Ctrl + S key simultaneously to save your changes in the selected program movement. (Ctrl + S is the keyboard shortcut for Save on most—not all—programs). 3. Repeat step 1 and step 2 to save changes in all open programs. 4.
Keyboard and mouse (wireless) Symptom Possible solution Wireless ● during initial setup or for re-synchronization. mouse does not work or is Ensure that you are using the wireless keyboard or wireless mouse within range of the receiver, approximately 10 meters (32 feet) for normal use, and within 30 cm (12 inches) keyboard or ● not detected. Ensure that the mouse is not in Suspend mode, which occurs after 20 minutes of inactivity. Tap the left mouse button to reactivate it.
Speakers and sound Symptom Possible solution Volume is very Ensure that you connected the speakers to the Audio Out connector on the back of the low or computer. (Additional audio connectors are used for multiple-channel speakers.) Detached unsatisfactory. non-powered speakers (speakers without a separate power source, such as batteries or a power cord) do not produce satisfactory sound. Replace the non-powered speakers with powered speakers. No sound is For Windows 7: produced. 1.
Symptom Possible solution Cannot connect to For Windows 7: the Internet. 1. Tap the Start button, tap Control Panel, tap Action Center, and then tap Troubleshooting. 2. Under Network and Internet, tap Connect to the Internet. Verify that you are using the proper cables for your Internet connection type. Your computer might have an Ethernet network adapter (also called a network interface card, or NIC). The network adapter uses a network cable, to connect to a local area network (LAN).
Memory Symptom Possible Solution Computer beeps Make sure the memory modules are added in the correct order. The first and second after being memory modules go into the black slots (1, 2), and the third and fourth memory modules powered on. go into the white slots (3, 4). Check to make sure that there is a least one memory module in your computer, and that it is in a black slot.
To repair software problems, try these methods: ● Turn the computer off completely, and then turn it on again. Sometimes this is the easiest way to fix a problem. ● Update the drivers (see Updating drivers on page 35). ● Use Microsoft System Restore (see Microsoft System Restore on page 36) — Restore your computer to ● Reinstall the software program or hardware driver. (See Software program and hardware driver a configuration that was in use before the software was installed.
Microsoft System Restore If you have a problem that might be due to software that was installed on your computer, use System Restore to return the computer to a previous restore point. You can also set restore points manually. NOTE: Always use this System Restore procedure before you use the System Recovery program. NOTE: Some features might not be available on systems that are shipped without a version of Microsoft Windows. To start a System Restore: 1. Close all open programs. 2.
To check the list of installable programs in the Recovery Manager: 1. Tap the Start button, tap All Programs, tap Recovery Manager, and then tap Recovery Manager. If prompted, tap Yes to allow the program to continue. 2. Under I need help immediately, tap Software Program Reinstallation. 3. Tap Next at the Welcome screen. A list of programs opens. Check whether your program is there. To uninstall a program: 1. Close all software programs and folders. 2. Uninstall the damaged program: a.
3D Cinema Technology troubleshooting Question Answer Why can't I see 3D If you are watching in 3D mode and cannot see 3D content, HP recommends that you content? not use the 3D glasses. See the information below and 3D safety information on page 15. Consult a physician if you suspect a physical problem seeing stereoscopic 3D. ● You may be trying to watch 3D content in 2D mode. ● The clear protective film on both sides of the glasses lenses (select models only) may need to be removed.
Question Answer How do I clean my 3D Use a soft, damp, lint-free cloth to clean your 3D glasses. For more information, see glasses? Caring for the 3D glasses on page 23. How close do I need to The effective range of the integrated IR emitters is approximately 1.5 meters (5 feet) be to the computer to from the computer display. Depending on the viewing angle, the operational distance view 3D content? from the display can vary.
Defragmentation Run Disk Defragmenter to keep your hard disk in good condition and improve system performance. Frequently performing this task does not harm your system. Virus scan Perform a full virus scan every week to catch viruses that might have slipped through unnoticed. Most antivirus products have a scheduling feature to keep track of this automatically. Monthly Hardware cleanup Thoroughly clean the outside of your computer.
Cleaning the computer Air vents keep the computer cool. Keep these vents clean by using a small, vents battery-powered vacuum cleaner. (A battery-powered vacuum cleaner eliminates the risk of electric shock.) 1. Vacuum the vents on the computer case. 2. Remove any debris that has accumulated in and around the computer connectors (for example, the Ethernet and USB connectors).
System Recovery System Recovery completely erases and reformats the hard disk drive, deleting all data files you have created, and then reinstalls the operating system, programs, and drivers. However, you must reinstall any software that was not installed on the computer at the factory. This includes software that came on media included in the computer accessory box, and any software programs you installed after purchase.
If the computer is working and Windows 7 is responding, use these steps to perform a System Recovery. 1. Turn off the computer. 2. Disconnect all peripheral devices from the computer except the keyboard and mouse. 3. Turn on the computer. 4. Tap the Start button, tap All Programs, tap Recovery Manager, and then tap Recovery Manager. If prompted, tap Yes to allow the program to continue. 5. 6. Under I need help immediately, tap System Recovery. Tap Yes, and then tap Next. Your computer restarts.
If Windows 7 is not responding, but the computer is working, follow these steps to perform a System Recovery. 1. Turn off the computer. If necessary, press and hold the Power button until the computer turns off. 2. Disconnect all peripheral devices from the computer, except the keyboard and mouse. 3. Press the Power button to turn on the computer. 4.
To perform a System Recovery using recovery media: 1. If the computer is working, create a backup DVD, or backup USB flash drive, containing all the data files you want to save, and then remove the backup media from the computer. 2. Insert recovery disc #1 into the DVD drive tray, and close the tray; or if using a recovery USB flash drive, insert it into a USB port. 3. If the computer works, tap the Start button, and then tap Shut Down.
Choosing recovery media ● To create recovery discs, your computer must have a DVD writer, and you must use only high-quality blank DVD+R or DVD-R discs. NOTE: You cannot use CDs or DVD+RW, DVD-RW, DVD+RW DL, DVD-RW DL, DVD+R DL, or DVD-R DL discs to create recovery discs. ● ● You have the option of creating a recovery USB flash drive instead, using a high-quality blank USB drive. If you are creating recovery discs, be sure to use high-quality discs.
Index Symbols/Numerics 3D Active Shutter Glasses battery compartment 20 caring 23 cleaning 25 handling 26 identifying 19 nose pieces 20, 23 replacing the battery 24 turning on and off 20 using 19 3D Cinema Technology 3D games 38 application displays an error 39 application does not start 39 definition 17 effective range 39 flickering 39 frequently asked questions 38 safety information 15 using 20 watching content 22 3D formats available 22 supported 38 3D games playing 22 stereoscopic 38 3D glasses battery
speakers and sound issues supported 3D formats 38 synching issues 26 Power troubleshooting 28 protecting computer 7 R Recovery media choosing 46 creating 46 overview 45 reinstallation software program and hardware driver 32 U updating drivers 35 36 S safety information, 3D 15 software installing 8 reinstalling programs 36 troubleshooting 34 sound 32 speakers 32 stereoscopic vision 17 synching issues 26 System Recovery 42 at system startup 43 options 42 using recovery media 44 using Windows 7 Start Menu
The power to make a change Thank you for your purchase. HP is dedicated to producing the highest quality, best performing, and easiest to use computers in the world. HP also designed this product with the environment in mind. But to reduce its impact even further, we need your help. LetÊs work together to make a change. How you can help What we do Recycle your old computer. We design with the environment in mind. Disposing of electronic waste responsibly has been an HP priority for more than 20 years.