
Getting Started (For 3D Models Only)


●
Double-click the 3D demo icon on the computer desktop and select a
3D clip from the menu.
●
Insert a Blu-ray 3D movie (purchased separately) into the slot-load
optical drive on the computer and follow the on-screen instructions.
NOTE: Insert the disc into the optical drive until it clicks into place. To
eject the disc, press the optical drive eject key located at the top right
of the keyboard.
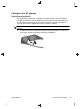
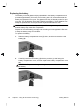
2. Put on your 3D glasses. If needed, adjust the glasses using the nose pieces
provided.
3. The 3D glasses turn on automatically when the 3D content begins to play
and the infrared (IR) signal is detected. Your lenses may darken, or you may
see flickering while the glasses start operation.
If you can see clearly in 3D, the setup is complete and you can begin
viewing 3D cinema content!
WARNING! If you still cannot see 3D content, remove the 3D glasses and
stop using 3D Cinema Technology. See the
3D safety information
on page 15 and consult a physician if you suspect a physical problem
seeing stereoscopic 3D.
NOTE: Differences in the frequencies at which the lighting in your room
and 3D Cinema Technology operate may cause flickering or interfere with
the operation of the glasses. This can be avoided by dimming or turning off
the lights.
NOTE: 3D Cinema Technology does not support more than one active 3D
application at a time. If you launch a second (or subsequent ) 3D application
while another is active or enabled, the second application may display an
error message or will not launch. Ensure one only 3D application is running
at one time.
Getting Started
Using 3D Cinema Technology
21