
HP R3000v ERM User Manual

INSTALLATION
HP R3000v ERM User Guide S 164201732 Rev 1
7
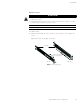
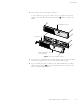
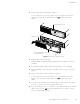
11. Slide the cabinet(s) into the rack.
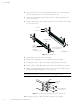
12. Secure the front of the ERM to the rack using two M6
×16 pan-head screws and two
M6 cage nuts on each side (see Figure 4). Install the bottom screw on each side
through the bottom hole of the mounting bracket and the bottom hole of the rail.
Repeat for any additional ERMs.
M6×16 Pan-Head
Screws (4 places)
M6 Cage Nuts
(4 places)
Figure 4 Securing the Front of the Cabinet
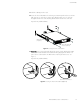
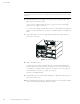
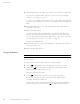
13. Optional. Insert a rear stop bracket through the inside of each rail behind the ERM.
Rotate each bracket and slide the bracket until it fits tightly against the ERM’s rear
panel. Secure each bracket to the ERM with one M3
×8 pan-head screw. See
Figure 5.
Repeat for any additional ERMs.
Rear Stop Bracket
M3
×8 Pan-Head Screw
Figure 5 Securing the Back of the Cabinet (Optional)