
HP R3000v ERM User Manual

MAINTENANCE
HP R3000v ERM User Guide S 164201732 Rev 1
13
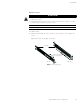
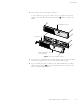
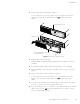
2. Remove the front bezel of each ERM. See Figure 11.
To remove the bezel, loosen the two captive screws on the right side of the bezel.
Grasp the sides of the bezel. Slide the bezel to the left and then away from the
cabinet.
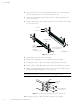
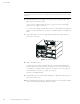
Bottom ERM Cable Knockout
(underneath bezel)
Top ERM Cable Knockout
ERM Bezel Hook
Figure 11 Removing the ERM Front Bezel
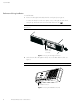
3. Unplug the ERM cable from the UPS.
If additional ERMs are installed, unplug the ERM cable from the battery connector on
each ERM.
4. If not already installed, install the supplied mounting brackets on the new ERM(s).
5. Replace the ERM(s). See “Recycling the Used Battery or UPS” on page 15 for proper
disposal.
6. Remove the front bezel of each new ERM. See Figure 11.
To remove the bezel, loosen the two captive screws on the right side of the bezel.
Grasp the sides of the bezel. Slide the bezel to the left and then away from the
cabinet.
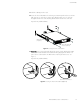
7. For the bottom (or only) ERM, remove the ERM cable knockout on the top of the bezel.
See Figure 11 for the location of the top ERM cable knockout.
8. If you are installing more than one new ERM, for each additional ERM remove the ERM
cable knockout on the top and bottom of the ERM front bezel. See Figure 11 for the
location of the ERM cable knockouts.