
HP R3000v UPS User Manual


UPS MAINTENANCE
HP R3000v UPS User Guide S 164201731 Rev 1
29
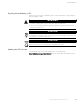
3. Grasp an edge of the battery cover plate and pull it forward gently. Remove and retain
the battery cover plate.
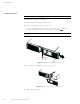
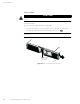
4. Carefully pull the handle on the battery tray and slide the battery package slowly out
onto a flat, stable surface; use two hands to support the battery package. See
“Recycling the Used Battery or UPS” on page 33 for proper disposal.
NOTE: Verify that the replacement batteries have the same rating as the batteries being
replaced.
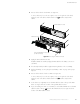
5. Slide the new battery package into the cabinet. Push the battery package in firmly.
6. Replace the battery cover plate onto the screw mounts, threading the battery connector
through the access slot.
NOTE: A small amount of arcing may occur when connecting the internal batteries. This is
normal and will not harm personnel. Connect the cables quickly and firmly.
7. Reconnect the internal battery connector.
Connect red to red, and black to black. Press the two parts tightly together to ensure a
proper connection.
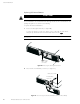
8. Replace the UPS right front bezel.
To replace the bezel, verify that the ribbon cable is protected and (if ERMs are
installed) the ERM cable is routed through the knockout on the bottom of the bezel.
Slide the bezel to the left until it aligns with the left front bezel. Tighten the two captive
screws on the right side of the bezel.
9. Continue to “Testing New Batteries” on page 32.