
HP Value UPS Manager User Manual


29
denotes the Power On action, and the blue dot denotes the self test action. Click the “Add Test” button to
setup the special time and monthly UPS self-test task in the popped up screen. The added self-test will be
entered the schedule.
If you select one of the UPS self-test tasks in the task list, you may modify the task that has been
set in the popped up screen by clicking the “Modify” button. If you select one of the UPS self-test tasks in
the task list, you may remove this task by clicking “Remove” button.
Note: If the “OK”, “Add Test”, “Modify” and “Remove” buttons are invalid conditions, which means
that your access right to the current Agent is read only and you cannot carry out setup, you may log in as a
super user via the “Act as Administrator” menu.
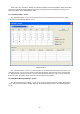
12) "UPS On/Off Manager" Screen
“UPS On/Off Manager” screen can be opened from the “UPS On/Off Schedule” menu item on
“Device” menu. Refer to the following diagram 3-2-12:
Diagram 3-2-12
The “UPS OnOff Manager” screen is used to display and set up UPS On/Off tasks. The UPS On/Off
tasks that can be set include “Once” and “Weekly”. The UPS Power Off time range (from shutdown to
turning on next time) is 1-9999 minutes, i.e. the longest Power Off time is 6 days 22 hours and 39 minutes.
The input range for the year is 2002-2035. “UPS OnOff Manager” screen consists of task list and calendar.
All of the UPS self test and UPS OnOff tasks are shown in the calendar. A red dot is used to denote the
Power Off action, a green dot to denote the Power On action, and a blue dot to denote self-test action in
the calendar. Users can setup weekly and special time’s in the UPS Power On/Off tasks in the popped up
screen by clicking “Add UPS shutdown” button.
Note: In terms of time, the new added task cannot conflict with the UPS self test task and UPS
Power On/Off tasks which have been set. If you select one of the UPS self test tasks in the task list, you
may modify the setup task in the popped up screen by clicking the “Modify” button. You may also remove
this task by clicking “Remove” button.