
HP Wireless Lan Access Point (P1981A) , Installation Guide


6 English
Wall Mounting the Wireless LAN Access Point
The information in this section is only applicable if you want to mount the HP
Wireless LAN Access Point to the wall.
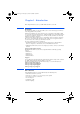
To mount the Wireless LAN Access Point to the wall:
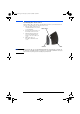
1 Pierce the three rear screw
holes with a sharp pointed
object.
2 Decide where and how you
want to place the HP Wireless
LAN Access Point (you may
consider mounting the device
upside-down on high spots, to
be able to see the LEDs).
3 Place the rear cover against
the wall, and put three marks
on the wall to indicate the
screw positions.
4 Use the screws and the plugs
that came with your kit to fix
the rear cover to the wall.
Attaching the Rear Cover
Once the cables have been successfully connected and the placement decided, you
can attach the rear cover to the Wireless LAN Access Point. To attach the rear cover:
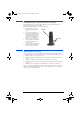
1 Bring the device close to the rear cover.
2 Guide the cable(s) coming from the device through the cable entrance of the rear
cover.
3 Insert the small hook at the bottom of the unit in the rear cover slot.
4 Turn the unit to the rear cover. Press in both release latches to insert them in the
rear cover.
5 Push the rear cover against the unit until the release latches lock into place.
If you want to place the HP Wireless LAN Access Point on a flat surface you have to
guide the cable(s) through the cable entrance at the back of the rear cover. By doing
this, the device can stand upright.
rear cover
screw holes
ap-us.book Page 6 Thursday, November 16, 2000 10:36 AM