
Installing HP-UX 11.0 and Updating HP-UX 10.x to 11.0 HP 9000 Computers Edition 1


170 Chapter 6
HP-UX System Recovery
“Expert” Recovery Using the Core Media
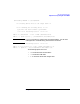
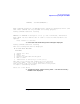
FILE SYSTEM CHECK
MENU
The file system check '/sbin/fs/hfs/fsck -y /dev/rdsk/c1t1d0'
will now be run.
Select one of the following:
a. Run fsck -y .
b. Prompt for the fsck run string on c1t1d0.
m. Return to the 'HP-UX Recovery MENU.'
Selection:
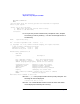
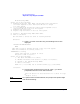
9. Select a to run fsck -y to check your file system for corruption. You
will see a display similar to the following:
** /dev/rdsk/c1t1d0
** Last Mounted on /ROOT
** Phase 1 - Check Blocks and Sizes
** Phase 2 - Check Pathnames
** Phase 3 - Check Connectivity
** Phase 4 - Check Reference Counts
** Phase 5 - Check Cyl groups
6256 files, 0 icont, 149423 used, 1563824 free (928 frags, 195362 blocks)
Mounting c1t1d0 to the CORE media /ROOT directory...
<Press return to continue>
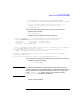
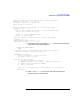
10.Assuming your file system is not corrupted, and you wish to continue
with the system recovery, press return to mount your root file system
under the CORE media /ROOT directory; something similar to the
following will be displayed:
***** Downloading files to the target disk *****
x ./sbin/lvchange, 528384 bytes, 1032 tape blocks
./sbin/lvcreate linked to ./sbin/lvchange
./sbin/lvdisplay linked to ./sbin/lvchange
./sbin/lvextend linked to ./sbin/lvchange
...
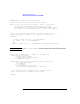
Filesystem kbytes used avail %cap iused ifree iused Mounted on
/ROOT 1713247 149426 1392496 10% 6261 275339 2% ?
Should the existing kernel be
'left', 'overwritten', or 'moved'?[overwritten]
11.To overwrite the existing kernel with your new file system, enter
overwritten or over at the prompt. The following will be displayed: