
NetWare Client for DOS and MS Windows User Guide


9-12
Setting Up Client Workstation Printing
Using NetWare Utilities to Set Up Network Printing
6 Choose the “Print Manager” icon.
7 From the “Print Manager” window, select “Options.”
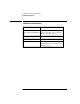
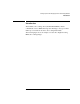
8 From the “Options” menu, choose “Network Settings.”
The “Network Options” dialog appears.
Figure 9-4 “Network Options” Dialog
9 Mark the “Print Net Jobs Direct” checkbox.
With this option marked, MS Windows bypasses the Print Manager and prints
directly to the network print queue, giving you optimal printing performance.
10 Exit the “Network Options” dialog box by choosing “OK.”
If you are running applications that print to a port, such as LPT1, see the
manufacturer’s documentation for information about print drivers.
Using a Local Printer on the Network
To access a parallel or serial printer through the network that is cabled to a
workstation running MS Windows 3.0 or 3.1, do only one of the following:
• Configure the printers to use polled mode instead of a specific interrupt number.
• Set the workstation to use a specific interrupt.
Add the following lines to the SYSTEM.INI file under the [386Enh] section:
lpt1autoassign=0
lpt1irq=-1
Replace lpt1 with the port that the printer is cabled to (LPT2, COM1, COM2,
etc.).
Setting the Number of Available Printer Connections
1 Open the Netware Client configuration (NET.CFG) file in an ASCII text editor.
Direct print jobs
to a network
print queue.