A7011A & A7012A PCI-X 2-Port Gigabit Ethernet Card Installation Guide HP-UX & OpenVMS Networking Manufacturing Part Number: 5971-4261 E0305 Printed in the US © Copyright 2004-2005 Hewlett-Packard Development Company, L.P.
Legal Notices The information in this document is subject to change without notice. Hewlett-Packard makes no warranty of any kind with regard to this manual, including, but not limited to, the implied warranties of merchantability and fitness for a particular purpose. Hewlett-Packard shall not be held liable for errors contained herein or direct, indirect, special, incidental or consequential damages in connection with the furnishing, performance, or use of this material.
Contents 1. HP-UX Installation Hardware and Software Installation Procedure . . . . . . . . . . . . . . . . . . . . . . . . . . . . . . . . . . . . . . . . . . . . Step 1: Access the system card bay . . . . . . . . . . . . . . . . . . . . . . . . . . . . . . . . . . . . . . . . . . . . . . . . . . . . . Step 2: Install the card . . . . . . . . . . . . . . . . . . . . . . . . . . . . . . . . . . . . . . . . . . . . . . . . . . . . . . . . . . . . . . Step 3: Connect the card to the network . . . . . . . . .
Contents 4
1 HP-UX Installation This chapter contains the following sections that describe how to install the A7011A or A7012A PCI-X 2-Port Gigabit Ethernet adapters on an HP-UX system: • “Hardware and Software Installation Procedure” • “Network Card Configuration Worksheet” Thank you for purchasing HP I/O Cards If you are installing an HP I/O card as an add-in device, please review this document before installation.
HP-UX Installation Hardware and Software Installation Procedure • Select an empty PCI or PCI-X slot and remove the slot cover. The card can operate in PCI as well as PCI-X mode. Step 2: Install the card • Check the latest support matrix to see the systems that support this card, how many cards per system, and if any software updates are needed, The support matrix is available on the web at http://docs.hp.com under “Networking and Communications.” • Observe the antistatic precautions.
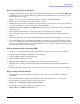
HP-UX Installation Hardware and Software Installation Procedure Step 5: Install the latest software • Load the software media into the appropriate drive. The Gigabit Ethernet software bundle (IEther-00) for HP-UX 11i v 1.0 is on the December 2003 application CD; for HP-UX 11i v 2.0, the driver is on the March 2004 application CD. • Run the swinstall program to install the software using the command: swinstall. • Change the host name after “Source Host Name,” if necessary.
HP-UX Installation Hardware and Software Installation Procedure • Installation is complete when you have successfully run linkloop, ping and netstat. To configure remote systems, see the Ethernet Support Guide available on the web at http://docs.hp.com. Do this step only if remote systems have not been previously configured.
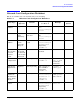
HP-UX Installation Network Card Configuration Worksheet Network Card Configuration Worksheet Fill out one worksheet for each network card you are installing. Table 1-1 Data Type Ethernet Card Configuration Worksheet Required/ Optional Default How to Configure (see Note 1) Example Internet Address Required 0.0.0.0 SAM or ifconfig or edit /etc/rc.config.d/ netconf 196.6.20.2 Subnet mask Required if using subnetting Subnet mask not used SAM or ifconfig or edit /etc/rc.config.d/ netconf 255.255.
HP-UX Installation Network Card Configuration Worksheet Note 1: To configure values permanently, edit the configuration files. Using lanadmin will not preserve your settings across reboots. Note 2: The speed configuration of the card can be 10, 100, or 1000Mbps and is determined by the speed setting of the hub or switch port to which the card is connected. The card automatically senses this speed. The Base-T card only runs at one speed at a time. To verify the speed selection, run lanadmin -x ppa#.
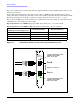
HP-UX Installation Network Card Configuration Worksheet Figure 1-2 A7012A PCI-X Copper-based 2-Port Gigabit Ethernet Card PCI-X Dual-Port 1000Base-T Port B Activity/Link LEDs Flashing = Data traffic Solid = Active link } RJ-45 Connectors Port A Speed LEDs Off = 10 Mbit/s Green = 100 Mbit/s Yellow = 1000 Mbit/s Chapter 1 11
HP-UX Installation Network Card Configuration Worksheet 12 Chapter 1
2 OpenVMS Installation This chapter contains the following sections that describe how to install the A7011A or A7012A adapters on an OpenVMS system: • “Preparing for Installation” • “Installing the Adapter” Thank you for purchasing HP I/O Cards If you are installing an HP I/O card as an add-in device, please review this document before attempting installation. HP welcomes your input. Please email us at: netinfo_feedback@cup.hp.com with comments or suggestions on HP I/O Cards or related documentation.
OpenVMS Installation Installing the Adapter Check the latest support matrix for systems that support these adapters. The support matrix is available at http://docs.hp.com under “Networking and Communications.” Installing the Adapter This section contains information on installing the A7011A or A7012A adapter in an OpenVMS system.
OpenVMS Installation Installing the Adapter The LAN device characteristics that can be set include speed, duplex mode, flow control, and whether jumbo frames are enabled. The MC LANCP SET DEVICE and LANCP DEFINE DEVICE commands modify these settings. 2. Set the desired characteristics according to the Network Configuration worksheet (see Table 2-1).
OpenVMS Installation Installing the Adapter 16 Chapter 2
A Regulatory Information This appendix contains regulatory statements for the United States, Canada, Australia/New Zealand, Japan, and the European community. Card Physical and Environmental Specifications Following are the product physical and environmental specifications of the PCI-X 2-Port Gigabit Ethernet Card. Physical Dimensions: 4.75 in by 6.6 in Electrical Power consumption: 1A at +5VDC Environmental Temperature, Degrees F = (1.
Regulatory Information Canada Operation of this equipment in a residential area is likely to cause interference, in which case the user at his own expense will be required to take whatever measures may be required to correct the interference. Hewlett-Packard’s system certification tests were conducted with HP-supported peripheral devices and cables, such as those received with your system.
Regulatory Information EMI Statement (European Community) EMI Statement (European Community) NOTE This is a Class A product. In a domestic environment, this product may cause radio interference, in which case you may be required to take adequate measures. Laser Safety Statements Laser Safety Statements - U.S. FDA/CDRH - Optical (laser) Transceiver CAUTION The optical transceiver provided on the network interface card contains a laser system and is classified as a “Class-I Laser Product” under a U.S.
Regulatory Information A7011A & A7012A Declaration of Conformance A7011A & A7012A Declaration of Conformance 20 Appendix A