
AB291A Fabric Clustering System Support Guide (12-port Switch), April 2004
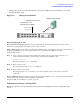
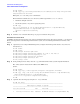
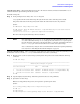
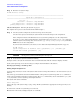
Table Of Contents
- About This Document
- 1 Introduction to Technology
- 2 Hardware Overview
- 3 Installation Planning
- 4 Installing HP Fabric Clustering System
- 5 Administration and Management
- HP-UX Host Administration and Management
- Switch Administration and Management
- CLI Overview
- Using the CLI
- Advanced Switch Setup
- Configuration, Image, and Log Files
- Configuration, Image, and Log File Overview
- File Management
- Listing Configuration, Image, and Log Files
- Viewing Configuration Files
- Viewing Log Files
- Saving Configuration Files
- Saving for System Reboot
- Saving the Backup Configuration
- Specifying the Configuration to Use at
- Saving and Copying Files
- Downloading Files to the System
- Deleting Configuration, Image, and Log Files
- Managing Log Files
- Understanding the Log Format
- Uploading Log Files
- Administering the System
- 6 Monitoring and Troubleshooting
- A Specifications
- B HP 12-Port 4X Fabric Copper Switch Commands
- Show Commands
- show arp ethernet
- show arp IB
- show authentication
- show backplane
- show boot-config
- show card
- show card-inventory
- show clock
- show config
- show fan
- show host
- show ib
- show ib sm configuration
- show ib sm multicast
- show ib sm neighbor
- show ib sm node subnet-prefix
- show ib sm partition
- show ib sm port
- show ib sm service
- show ib sm switch
- show ib-agent channel-adapter
- show ib-agent summary
- show ib-agent switch
- show ib-agent switch linear-frd-info
- show ib-agent switch all mcast-info lid
- show ib-agent switch all node-info
- show ib-agent switch all pkey-info
- show ib-agent switch port-info
- show ib-agent switch sl-vl-map
- show ib-agent switch switch-info
- show interface ib
- show interface ib sm
- show interface ib sm statistics
- show interface mgmt-ethernet
- show interface mgmt-ib
- show interface mgmt-serial
- show ip
- show location
- show logging
- show ntp
- show power-supply
- show running-status
- show sensor
- show snmp
- show system-services
- show terminal
- show trace
- show user
- show version
- IP Commands
- HP Fabric Clustering System Commands
- Administrative Commands
- action
- boot-config
- broadcast
- card
- clock
- configure
- copy
- delete
- dir
- disable
- enable
- exec
- exit
- ftp-server enable
- gateway
- help
- history
- hostname
- install
- interface
- interface mgmt-ethernet
- interface mgmt-ib
- ip
- location
- login
- logging
- logout
- more
- ntp
- ping
- radius-server
- reload
- shutdown
- snmp-server
- telnet
- terminal length
- terminal time-out
- trace
- type
- username
- who
- write
- Show Commands
- C How to Use Windows HyperTerminal
- Glossary

Chapter 5
Administration and Management
Switch Administration and Management
77
4. Install a New Image After downloading the image file to the chassis controller, it must be installed. The install
command installs the specified image file into the system.
To install an image file:
Step 1. In the privileged-execute mode, enter install image:file.
image specifies the file resides in the image file-system. file is the name of the image file to install.
Image files must reside in the image file-system and the file name must have the .img extension.
Syntax:
HP-IB#install image:image-file-name
HP-IB# install image:HP-AB291A-Release-1.1.3hp-build020.img Proceed with install?
[yes(default) | no]
************************* operation completed successfully
The name of the image file will change after it is installed.
NOTE Only cards with an oper-status of “up”are updated. If a card is down when you run install,
or a card is added after running install, bring up the card and run install again. Specify
the same image file. If the image is already installed on a card, that card is skipped. Be sure to
run boot-config again so that all cards know to boot off the same system-image.
View a card’s status by using the show card command. For information regarding installing a
new card, refer to “Installing the Host Channel Adapter” on page 28.
5. Specify a New Boot Image After a system-image is installed on the system chassis, specify the system-image to use
the next time it reboots. Use the boot-config command with the name of the system-image.
Step 1. Find the name of your new system image by listing all the image files on the chassis. Enter the dir image
command.
HP-IB# dir image
================================================================================
Existing Boot-Images on System
================================================================================
slot date-created size file-name
--------------------------------------------------------------------------------
1 Tue Jan 13 10:24:35 2004 18905824 HP-AB291A-Release-1.1.3hp-build023.img
1 Sun Feb 22 10:24:44 2004 18932637 HP-AB291A-Release-1.1.3hp-build025.img
1 Sun Feb 22 10:29:45 2004 13085184 Release-1.1.3hp/build025
HP-IB#
Step 2. Copy the displayed system-image (this will be pasted into the boot-config command).
Step 3. Specify the new boot image.
Enter boot-config primary-image-source, then paste the copied image file name.
Syntax:
boot-config primary-image-source image-directory-name
HP-IB# con
HP-IB(config)#
HP-IB(config)# boot-config primary-image-source Release-1.1.3hp/build025