
AB379B Fibre Channel Mass Storage Adapter Installation Guide, February 2007


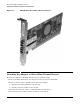
Table Of Contents
- AB379B Fibre Channel Mass Storage Adapter Installation Guide
- 1 Fibre Channel Adapter Installation for HP-UX
- Prerequisites
- Important Patches and Updates
- Installing Driver Software
- Installing Adapter Hardware
- Attaching the Adapter to Other Fibre Channel Devices
- Verifying the Fibre Channel Adapter Installation
- LED Interpretation
- Obtaining Card Information after Installation
- Verifying Connectivity
- Interpreting Legacy Hardware Paths (HP-UX 11i v1 and 11i v2)
- Interpreting Lunpath Hardware Paths (HP-UX 11i v3)
- Components of Lunpath Hardware Paths
- Fibre Channel
- 2 Fibre Channel Adapter Installation for OpenVMS
- Prerequisites
- Installing Driver Software
- Installing Adapter Hardware
- Attaching the Adapter to Other Fibre Channel Devices
- Verifying the Fibre Channel Adapter Installation
- Additional Configuration Information
- LED Interpretation
- A Technical Specifications and Regulatory Information
- AB379B Technical Specifications
- FCC Statement (For U.S.A.)
- Canada
- EMI (Australia and New Zealand)
- VCCI (Japan) (PCI Card Only)
- EMI Statement (European Community)
- Laser Safety Statements
- AB379B Declaration of Conformity
 Fibre Channel Adapter Installation for HP-UXInstalling Driver SoftwareChapter 17Install all driver software and dependency patches before you install the adapter. See the FibrChanl-01 (fcd)Fibre Channel Mass Storage Driver Release Notes available at: http://docs.hp.com for details.To load the driver from a CD-ROM, do the following:Step 1. Log in to the system as root.Step 2. Insert the CD into the CD drive.Step 3. Mount the CD using the following command:mount /dev/dsk/<cd_rom_dev_file>/<tmp_mnt>Step 4. Run swinstall to install the software. Enter the following command:/usr/sbin/swinstallThe Software Selection window and the Specify Source window open.Step 5. In the Specify Source window, change the Source Host Name if necessary. Enter the mount point ofthe drive in the Source Depot Path field and click OK to return to the Software Selection window.Click Help to get more information.Step 6. Select the appropriate software bundle for your adapter.Step 7. Select Mark for Install from the Actions menu.Step 8. Select Install from the Actions menu. Installation begins and the Install Analysis window opens.Step 9. Click OK in the Install Analysis window to confirm that you want to install the software. TheInstall window opens.View the Install window to read processing data while the software installs. When the Statusfield indicates Ready, the Confirmation window opens.Step 10. Click OK. A second Confirmation window opens.Step 11. Click OK again. The Install window opens.Step 12. Click Done. The Note window opens.Step 13. Click OK in the Note window to reboot. The user interface disappears and the system reboots.Step 14. Once the system comes back up, log in as root and open the following files to see any error orwarning messages that may have occurred during the installation:/var/adm/sw/swagent.log/var/adm/sw/swinstall.logStep 15. Install OnlineDiag, which is available at http://www.software.hp.com. OnlineDiag is also availablefrom the HP Support PLUS CD. Installation instructions are available at:http://docs.hp.com/hpux/onlinedocs/diag/st/st_inst.htm
- A Technical Specifications and Regulatory Information
- Interpreting Lunpath Hardware Paths (HP-UX 11i v3)