
HP A7143A RAID160 SA Controller Support Guide


Installing the RAID160 SA Controller
Online Installation of the RAID160 SA Controller
Chapter 4 61
Online Installation of the RAID160 SA
Controller
If your system has one or more slots that support OLAR—and you want
to use OLAR to install the controller in one of those slots—follow these
steps:
Step 1. Be sure version B.11.11.01 or later of the ciss driver (RAID160 SA
software) is installed on your system. See “Locating Software for the
RAID160 SA Controller” on page 52.
Step 2. Install the RAID160 SA controller in your HP-UX system according to
the procedure described in the Managing PCI Cards with OLAR, which
is the 2nd chapter of the Configuring HP-UX for Peripherals book, Part
Number B2355-90698. This document can be viewed or downloaded at
http://www.docs.hp.com, or a hard copy can be ordered from HP.
TIP To improve performance, install the RAID160 SA controller in a
non-shared PCI slot running at PCI 2X speed or greater.
IMPORTANT When using OLAR to add or replace a RAID160 SA controller, it is
important to pay attention to the warning messages that will be
displayed.
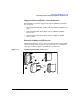
It is necessary to remove the SCSI cables from a RAID160 SA controller
that is about to be online replaced, before the PCI slot is powered off.
It is necessary to wait until power has been restored to the PCI slot,
before the SCSI cables are connected to an add-in or replacement
RAID160 SA controller.
If the SCSI cables are removed, or connected, to the RAID160 SA
controller while the PCI slot is powered off, the OLAR procedure will
have to be repeated. See “RAID160 SA Controller OLAR Error Recovery”
on page 62.