HP A9891A Smart Array 6404 Controller Installation Guide HP-UX, Open VMS Manufacturing Part Number: A9891-96010 February 2007 United States © Copyright 2007 Hewlett-Packard Development Company L.P..
Legal Notices The information in this document is subject to change without notice. Hewlett-Packard makes no warranty of any kind with regard to this manual, including, but not limited to, the implied warranties of merchantability and fitness for a particular purpose. Hewlett-Packard shall not be held liable for errors contained herein or direct, indirect, special, incidental or consequential damages in connection with the furnishing, performance, or use of this material.
Contents 1. Smart Array 6404 Controller HP-UX Installation Smart Array 6404 Controller Components. . . . . . . . . . . . . . . . . . . . . . . . . . . . . . . . . . . . . . . . . . . . . . . . . 6 Smart Array 6404 HP-UX Installation Prerequisites . . . . . . . . . . . . . . . . . . . . . . . . . . . . . . . . . . . . . . . . 7 Preparing for the Smart Array 6404 Controller Installation . . . . . . . . . . . . . . . . . . . . . . . . . . . . . . . . . .
Contents 4
1 Smart Array 6404 Controller HP-UX Installation Chapter 1 5
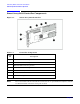
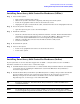
Smart Array 6404 Controller HP-UX Installation Smart Array 6404 Controller Components Smart Array 6404 Controller Components Figure 1-1 Smart Array 6404 Controller Table 1-1 Controller Components Item ID Description 1 Internal SCSI connector, port A1* 2 Internal SCSI connector, port A2* 3 External SCSI connector, port A1* 4 External SCSI connector, port A2* 5 Controller battery 6 Battery-backed cache module 7 Connector for expansion board NOTE 6 Do not use both the internal and extern
Smart Array 6404 Controller HP-UX Installation Smart Array 6404 HP-UX Installation Prerequisites Smart Array 6404 HP-UX Installation Prerequisites Before installing the Smart Array 6404 controller, ensure that the following hardware and software prerequisites are met: • Check the RAID-01 (ciss) HP Smart Array Controller Driver Release Notes for your HP-UX version for known problems or other information needed for installation.
Smart Array 6404 Controller HP-UX Installation Preparing for the Smart Array 6404 Controller Installation Preparing for the Smart Array 6404 Controller Installation WARNING Before installing a Smart Array 6404 Controller in a server, backup all data. This step is mandatory if the disks were not previously configured on a Smart Array Controller, because the data format will not be recognized and the existing data will not be preserved.
Smart Array 6404 Controller HP-UX Installation Installing Smart Array 6404 Controller Hardware (Offline) Installing Smart Array 6404 Controller Hardware (Offline) Step 1. Power off the system. • • • • If the system is running, shut it down. Wait for the system to shut down completely, and then power off the system. Power off any peripheral devices that are attached to the server. Unplug the AC power cord(s) from the outlet, and then from the server and peripheral devices. Step 2.
Smart Array 6404 Controller HP-UX Installation Smart Array 6404 HP-UX Software Installation Smart Array 6404 HP-UX Software Installation Locating Software for the Smart Array 6404 Controller The driver, utilities and manpages for the Smart Array 6404 controller are located at the HP Software Depot. • Go to http://www.software.hp.com • Search for “A9891A”. • Click Receive for Free. • Select the HP-UX version that your system is running, and fill-out the customer information form. Then click Next.
Smart Array 6404 Controller HP-UX Installation Smart Array 6404 HP-UX Software Installation Step 3. Mount the CD-ROM drive by using the System Administration Manager (SAM). • Run SAM using the following command: $ sam NOTE System Administration Manager (SAM) is deprecated in HP-UX 11i v3, and replaced by System Management Homepage (SMH). When you start SAM, the SMH command is automatically called. For more information, see the smh(1M) man page.
Smart Array 6404 Controller HP-UX Installation Verifying the Installation Verifying the Installation After the system reboots, verify that the installation was successful by following these steps: Step 1. Issue the swlist command: swlist If the Smart Array Controller is installed correctly, the generated output will look similar to the following: When running HP-UX 11i v1 the generated output will look like this: RAID-01 B.11.11.
Smart Array 6404 Controller HP-UX Installation Setting up a Smart Array 6404 Controller As a Boot Device Setting up a Smart Array 6404 Controller As a Boot Device The Smart Array 6404 Controller can be set up as a boot device. NOTE For PA-RISC systems, use Ignite/UX and saconfig to create the logical drives. For Integrity systems, use the Option ROM Configuration for Arrays (ORCA) to create the logical drives.
Smart Array 6404 Controller HP-UX Installation Setting up a Smart Array 6404 Controller As a Boot Device unlimited inodes, largefiles not supported 15625 data blocks, 14529 free data blocks 1 allocation units of 32768 blocks, 32768 data blocks last allocation unit has 15625 data blocks * Loading mount to mount/dev/ram1 file system... * Mounting /dev/ram1 file system succeeded! * Copying /dev.old files back to /dev succeeds! * Loading insf to create disk device files... * Creating disk device files...
Smart Array 6404 Controller HP-UX Installation Setting up a Smart Array 6404 Controller As a Boot Device Step 10. Select the kind of installation (Guided or Advanced) you want to do. The installation starts, and the Ignite-UX graphical interface (GUI) appears. Step 11. Under the “Basic” tab, select the configuration to use according to the HP-UX system you are using. Step 12.
Smart Array 6404 Controller HP-UX Installation Setting up a Smart Array 6404 Controller As a Boot Device 16 Chapter 1
2 Smart Array 6404 Controller OpenVMS Installation Chapter 2 17
Smart Array 6404 Controller OpenVMS Installation Smart Array 6402 Controller Components Smart Array 6402 Controller Components Figure 2-1 Smart Array 6402 Controller Table 2-1 Controller Components Item ID Description 1 Internal SCSI connector, port A1* 2 Internal SCSI connector, port A2* 3 External SCSI connector, port A1* 4 External SCSI connector, port A2* 5 Controller battery 6 Battery-backed cache module 7 Connector for expansion board NOTE 18 Do not use both the internal and ext
Smart Array 6404 Controller OpenVMS Installation Smart Array 6404 OpenVMS Installation Prerequisites Smart Array 6404 OpenVMS Installation Prerequisites Before installing the Smart Array 6404 controller, ensure that you have the following software and firmware: • OpenVMS Version V8.2-1 (or later) for Integrity servers. • TCP/IP Version 5.5 or later. • Smart Array firmware Version 2.58 or later. Refer to the http://www.hp.com website to download Version 2.58 firmware.
Smart Array 6404 Controller OpenVMS Installation Smart Array 6404 OpenVMS Quick Installation Smart Array 6404 OpenVMS Quick Installation Before installing a Smart Array 6404 Controller in a server, backup all data. This step is mandatory if the disks were not previously configured on a Smart Array Controller, because the data format will not be recognized and the existing data will not be preserved.
Smart Array 6404 Controller OpenVMS Installation Smart Array 6404 OpenVMS Quick Installation Step 1. Access the system controller bay • If the system is running, shut it down. • Wait for the system to shut down completely, and then power off the system. • Open the system to gain access to the PCI backplane. • For better performance, insert the controller into the fastest performance PCI slot available. Step 2.
Smart Array 6404 Controller OpenVMS Installation Smart Array 6404 OpenVMS Software Installation Smart Array 6404 OpenVMS Software Installation Installing the Smart Array Controller to a System Running OpenVMS Step 1. Install the controller according to the instructions in the section titled Install Smart Array 6400 Controller. Step 2. Make sure your Smart Array firmware is Version 2.58 or later. Refer to the http://www.hp.com website to download Version 2.58 firmware.
Smart Array 6404 Controller OpenVMS Installation Smart Array 6404 OpenVMS Software Installation Step 7. Once you are at the Boot menu, you are ready to install OpenVMS. Refer to the HP OpenVMS Upgrade and Installation manual for complete instructions on installing OpenVMS Version 8.2-1. The drivers for the smart array 6404 and 6404 controllers are included in the OpenVMS Version 8.2-1 software. Step 8. After installing OpenVMS, install HP TCP/IP Version 5.5 or later, which is included on your OpenVMS media.
Smart Array 6404 Controller OpenVMS Installation Using ORCA Using ORCA This section describes how to use ORCA, a simple ROM-based configuration utility that runs on all operating systems. ORCA Limitations For the most efficient use of drive space, do not mix drives of different capacities within the same array. The configuration utility treats all physical drives in an array as if they have the same capacity as the smallest drive in the array.
Smart Array 6404 Controller OpenVMS Installation Issues and Restrictions Issues and Restrictions Issues and Restrictions Awareness • In order to use the smart array controllers, A9890A and A9891A, with OpenVMS, you must ensure that your smart array controllers are running Version 2.58 firmware. Refer to the http://www.hp.com website to download Version 2.58 firmware. From the HP website, choose Software and Driver Downloads.
Smart Array 6404 Controller OpenVMS Installation Issues and Restrictions 26 Chapter 2
A Declaration of Conformance Appendix A 27
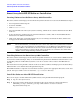
Declaration of Conformance Figure A-1 28 6400 Series Declaration of Conformance Appendix A
Declaration of Conformance Figure A-2 Appendix A 6402 Declaration of Conformance 29
Declaration of Conformance 30 Appendix A