
HP PCIe 2 port 10Gb Ethernet-SR, LR, and CR Adapter Installation Guide, Edition 2


The AM233A uses direct-attach copper cables that plug directly into the SFP+ module cages and
do not require additional SFP+ modules.
• Each AM225A and AM232A ships with two SFP+ modules.
• Each SFP+ module has a tab that can be flipped down into the Open position (parallel to the
length of the module) or flipped up into the Closed position (perpendicular to the length of the
module).
• With the tab in the Closed position, slide the SFP+ module all the way into the SFP+ module
cage until it clicks into place.
• If the SFP+ modules need to be removed or replaced, flip the tab down into the Open position
and pull the SFP+ module straight out.
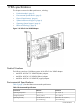
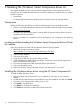
Installing the HBA
Use the following procedure for installing the HBA into a computer.
CAUTION: Be sure to observe the ESD precautions for this procedure as described in “Regulatory
Compliance and Safety” (page 11).
1. Ensure the computer is powered off.
2. Remove the screws on the computer's cover and remove the cover to expose the PCIe I/O
card slots.
3. Wearing a properly grounded anti-static wrist strap, remove the blank bulkhead panel from
an empty x4, x8, or x16 PCIe bus slot. See the following section on ESD for more details:
“Electrostatic Discharge” (page 13).
4. Insert the HBA into the empty PCIe slot. Press firmly until the HBA is seated.
NOTE: In some HP server models only PCle HBAs can be inserted in the optional PCIe riser
cards or cages. For instructions on installing the riser card or cage, see your server
documentation.
5. Secure the HBA's mounting bracket to the chassis with the bulkhead's fastener.
6. Replace the computer cover and secure with the cover screws.
7. Attach the media:
a. Connect one end of the LAN cable to a selected port on the target HBA.
b. Connect the other end of the LAN cable to a selected switch device.
NOTE: The HBA does not allow normal data transmission on an optical link unless the
link is connected to a similar or compatible laser product. Both products must be multimode.
8. Follow these substeps to apply the power:
a. Verify that the HBA is securely installed in the computer.
b. Verify that the correct media is attached.
c. Reconnect power and turn on the computer.
Ethernet Configuration and Verification
Follow these steps to configure and verify any type of HP-UX 11i v3–based Ethernet cards, including
10Gb Ethernet, Gigabit Ethernet, and Fast Ethernet.
1. Install LAN card and attach cables to it according to instructions in your system's hardware
support guide.
2. Plug LAN cable (or cables) into LAN card and into appropriate switch ports using fiber or
direct-attach copper LAN cable.
3. Boot the system.
8 Installing HBAs