
HP-UX vPars and Integrity VM V6.3 Administrator Guide
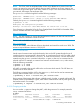
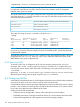

lan1 UP 0x00306E4A92EF iexgbe 10GBASE-KR
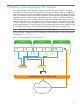
# hpvmnet
Name Number State Mode NamePPA MAC Address IP Address
======== ====== ======= ========= ======== ============== ===============
localnet 1 Up Shared N/A N/A
hostnet 296 Up Shared lan0 0x00306e4a93e6
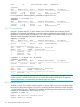
If lan0 goes down, enter the following command to swap to use lan1:
# hpvmnet -C -S hostnet -n 1
# hpvmnet
Name Number State Mode NamePPA MAC Address IP Address
======== ====== ======= ========= ======== ============== ===============
localnet 1 Up Shared N/A N/A
hostnet 296 Up Shared lan1 0x00306e4a92ef
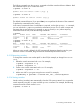
8.2.1.3 Cloning vswitches
Using the -N option with the -C option creates a new vswitch based on the changed vswitch
information. For example, the following command sequence displays the current vswitch (vmvlan),
modifies the vswitch to specify connection to lan1, and creates a new vswitch named clnvlan.
The final command displays information about the new vswitch.
#hpvmnet -S vmvlan
Name Number State Mode NamePPA MAC Address IP Address
======== ====== ======= ========= ======== ============== ===============
vmvlan 13 Up Shared lan900 0x00306e4bc7bf
[Port Configuration Details]
Port Port Untagged Number of Active VM
Number state VLANID Reserved VMs
======= ============ ======== ============ ============
1 Reserved none 1
2 Reserved 20 1
3 Reserved none 1
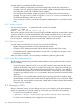
# hpvmnet -C -S vmvlan -n 1 -N clnvlan
# hpvmnet -S clnvlan
Name Number State Mode NamePPA MAC Address IP Address
======== ====== ======= ========= ======== ============== ===============
clnvlan 320 Down Shared lan1
[Port Configuration Details]
Port Port Untagged Number of Active VM
Number state VLANID Reserved VMs
======= ============ ======== ============ ============
2 Available 20 0
NOTE: Only the configured VLAN port identification data is copied to the new vswitch. You can
use the hpvmnet command when you have a vswitch with numerous VLAN ports. This process
makes it unnecessary to re-enter all the port data for each new vswitch.
8.2.1.4 Deleting vswitches
To delete a vswitch, first, stop the vswitch using the -h option with the hpvmnet command. Delete
the vNIC from the guests using the hpvmmodify command and then, delete the vswitch using the
-d option with the hpvmnet command. For example, the following command shows the error that
prevents you from deleting an active vswitch (clan1):
# hpvmnet -S clan1 -d
hpvmnet: The vswitch is currently active
hpvmnet: Unable to continue
116 Creating virtual and direct I/O networks