
HP-UX 11i v3 Installation and Update Guide, February 2007 (Initial Release)
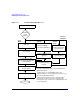


Cold-Installing HP-UX 11i v3
Cold-installing HP-UX 11i v3
Chapter 584
Before You Begin
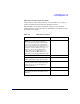
Before you cold-install HP-UX 11i v3, you need to collect information
about your existing system. This section contains tables where you can
record information. Then, when you are installing HP-UX 11i v3, you use
information from the Miscellaneous Data and Network Data collection
tables when needed.
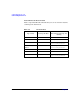
Use the collection tables:
• If you chose the Guided Installation, the HP-UX Install Wizard
prompts you for the data in these tables at various stages during the
install.
• If you chose the Advanced Installation, an interface gives you the
opportunity to enter all of this data at the beginning of the install.
The Advanced Installation also gives you more control over file
system configuration. The interface is a tabbed file-folder and
character-based.
• If you choose to network-enable your system, you must designate a
unique host name, host Internet Protocol (IP) address, and other
network information for your server.
Contact your site network administrator for the details to include in
these tables.
NOTE During an installation, Ignite-UX configures the root, dump, and swap
devices with the new HP-UX 11i v3 mass storage stack agile addressing
representation. This means that, after installing, the commands that
display the boot, dump, and swap devices will show them using the agile
form. During a cold-install of HP-UX 11i v3, both legacy and persistent
DSFs are automatically created. By default, the installation process will
configure system devices like the boot, root, swap, and dump devices to
use persistent DSFs. For more information on the new mass storage
stack, see the white paper called, “The Next Generation Mass Storage
Stack: HP-UX 11i v3” at: http://docs.hp.com/