
Internet Express for Tru64 UNIX Version 6.10 Administration Guide (5900-1418, March 2011)

For captive Internet Express users, group assignment is optional. You can select up to four groups
to associate with an Internet Express user account. The Administration utility automatically assigns
IASS_Usr (or Lkr_Usr_, if it exists from a previously installed version of Internet Express) as the
primary group to Internet Express captive accounts.
Note:
If the Enable Group Attributes field is checked in the LDAP Module for System Authentication —
Configure Group Attributes, and the LDAP Module for System Authentication is enabled (see
Section : Configuring LDAP Group Attributes), then the LDAP secondary groups will appear on the
Create System User Account, Create Named User Account, and Create Generic User Accounts
pages.
For noncaptive Tru64 UNIX system users, you must assign the user to at least a primary group.
This group becomes the login group for the account. The Administration utility sets the default
primary group for noncaptive accounts to users; if the users group does not exist, the default
primary group is IASS_Usr (or Lkr_Usr_, if it exists from a previously installed version of Internet
Express).
Note:
If you need to change an account's primary group, you must use Tru64 UNIX commands at the
shell prompt.
After a set of Internet Express accounts is associated with a group, you can use that group to make
modifications to the set of accounts. For example, if you assign a set of captive accounts to the
group finance, you can later modify or delete the group. All accounts associated with the
finance group will be modified or deleted in that one action. Also, if you select Display User
Accounts and specify a group, information on all users in that group is displayed.
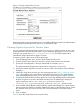
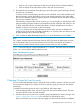
Creating Captive Accounts for Named Users
To create a named captive account, follow these steps:
1. From the Manage Users menu, choose Create Captive User Accounts.
2. From the Create Captive User Accounts menu, choose Create Named User Account.
3. Specify the user (login) name for the account in the Login Name field (see Section : Specifying
User Names).
4. Optionally, specify a password in the Password field. To verify the password, enter it again
in the Verify Password field. (The system will generate a password if you do not specify one.)
5. To specify the parent directory for these generic accounts, enter the full pathname of the parent
directory (excluding the login name) in the Parent Directory field. The default login directory
for generic captive accounts is /data/IASS_Usr/login_name (or
/data/Lkr_Usr_/login_name, if the /data/Lkr_Usr_ directory exists from a previously
installed version of Internet Express).
6. Optionally, specify the account name. (This is usually the full given name of the person for
whom you are creating the account.)
7. Optionally, assign the account to up to four existing groups (see Section : Assigning Users to
Groups) by selecting the groups from the Secondary Groups list box. (The Administration utility
automatically assigns captive user accounts to the IASS_Usr group as the primary group.)
8. If you installed and enabled the LDAP Module for System Authentication, the Create Named
Captive Account form displays a checkbox labeled Store Users in LDAP Directory Server.
Check this checkbox when you want to store this user account information in the LDAP directory
server.
9. Click on Submit.
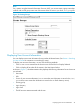
Figure 7 shows the Create Named User Account form.
42 User Administration