
User Guide


Connecting the Cables
NOTE: Place the printer on a level surface and position it in a location that allows access to cables,
room to open the cover and away from traffic areas to limit the chance of being bumped or damaged.
CAUTION: Connect cables to the printer before turning on power to the POS computer. The POS
computer should always be turned off before connecting the communication cable.
1. Turn off the POS computer.
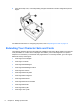
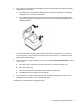
2. Open the connector cover on the rear of the printer to locate the connectors.
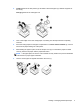
3. For printers with a USB power connector, plug the printer end of the USB power cable into the
USB power connector (1) on the printer. Plug the other end of the USB power cable into the 24V
powered USB connector on the POS computer.
For printers with serial, USB, and power connectors:
a. Plug the printer end of the USB cable into the USB connector (1) or the serial cable into the
serial connector (2) on the printer. Plug the other end of the cable to the appropriate
connector on the POS computer.
NOTE: You can use either the USB cable or the serial cable as the data interface with the
POS computer. Do not use both.
If using the serial interface, then a 9-pin female to 9-pin female null modem serial cable
must be used between the printer and POS computer.
b. Plug the printer end of the power cable from the power adapter into the power connector (3)
on the printer. If the printer comes without a power adapter and with a separate power
cable, plug the cable into the power connector (3) on the printer. Plug the other end of the
power cable into the 24V powered USB connector on the POS computer.
c. Route the USB cable from the printer through the strain relief tab on the connector cover of
the printer.
6 Chapter 2 Setting Up the Printer