
User Guide

3 Operating the Printer
Configuring the Printer
The configuration menu allows you to set general printer parameters. The test prints the diagnostics
form, which details settings for all functions. The printer will partially cut the paper between each
variation.
The test ends with a partial cut of the paper. A complete test printout may require the use of several
feet of paper.
Since the printer is usually shipped pre-configured, most users do not need to change the
configuration of the printer. If you make adjustments to the configuration, be careful not to
inadvertently change settings that may affect the printer’s performance. HP does not recommend that
users change the printer configuration.
NOTE: The printer is shipped with a test printout that includes the preset configuration. If you run
into problems after changing the printer configuration, use the settings as a default.
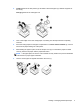
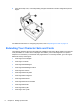
Entering the Configuration Mode
1. Turn off power to the printer.
2. Open the rear connector cover.
3. Set DIP switch 1 to the ON position (down). DIP switch 2 should be in the OFF position (up).
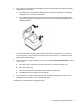
4. Be sure the receipt paper (1) is loaded in the printer before proceeding (for instructions on
loading the receipt paper, refer to
Setting Up the Printer on page 4).
5. Close the receipt cover (2).
10 Chapter 3 Operating the Printer