
User Guide
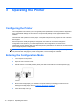

6. Turn on power to the printer and immediately press and hold the paper feed button (3) until the
configuration printout begins.
●
The printer beeps, then prints the diagnostics form and prints instructions for entering the
configuration menu. Follow the instructions.
●
The printer pauses and waits for a main menu selection to be made (see sample printout
on the following page in this chapter; short clicks are used, except when answering Yes or
validating selection).
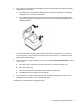
7. To communicate with the printer, press the paper feed button using either short or long clicks.
Use a long click for “yes” (more than one second) and a short click for “no.” Follow the printed
instructions to make selections.
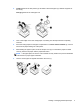
8. Continue through your menu selections until you are prompted, Save New Parameters?. Select
“Yes” or “No.”
a. If you wish to save, select Yes, then return DIP Switch 1 to the OFF position (up).
b. Open the receipt cover.
c. Press and hold the paper feed button while closing the receipt cover.
d. The diagnostic printout verifies your new settings.
9. If you would like to continue configuring the printer, select No. The printer then returns to the
configuration menu, where you can set parameters again.
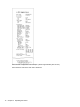
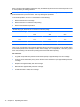
The following is a sample printer configuration menu.
Entering the Configuration Mode 11