
HP Virtual Connect 1Gb Ethernet Cookbook

Scenario 1 – Simple vNet with Active/Standby Uplinks and Optional Link Aggregation 802.3ad (LACP) - Windows 18
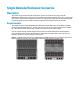
Note: By connecting TWO Uplinks from this vNet we have provided a redundant path to the
network. As each uplink originates from a different VC module, one uplink will be Active and the
second will be in Standby. This configuration provides the ability to lose an uplink cable, network
switch or depending on how the NICs are configured at the server (teamed or un-teamed), even a VC
module.
Note: In this configuration Smartlink should NOT be enabled. Smartlink is used to turn off downlink
ports within Virtual Connect, if ALL available uplinks to a vNet or SUS are down. We will use
Smartlink in a later scenario.
Defining a new vNet via CLI
The following command(s) can be copied and pasted into an SSH based CLI session with Virtual
Connect
# Create the vNet "vNet-PROD" and configure uplinks as discussed above
add Network vNet-PROD
add uplinkport enc0:1:1 Network=vNet-PROD speed=auto
add uplinkport enc0:2:1 Network=vNet-PROD speed=auto
set network vNet-PROD SmartLink=Disabled
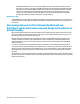
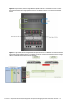
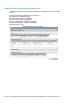
Figure 8 - Define Ethernet Network (vNet-PROD).
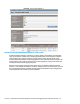
Note: The Port Status and Connected To information. If the connected switch supports LLDP, the
connected to information should be displayed as below, which also provides a hyperlink to
additional information about the connect switch.
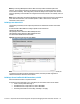
Defining a Server Profile with NIC Connections, via GUI
Each server NIC will connect to a specific network.
On the Virtual Connect Manager screen, click Define, Server Profile to create a Server Profile
Create a server profile called “App-1”
In the Network Port 1 drop down box, select “vNet-PROD”
In the Network Port 2 drop down box, select “vNet-PROD”
In the Assign the Profile to a Server Bay, select Bay 1 and apply