
HP Virtual Connect for c-Class BladeSystem Version 4.01 User Guide
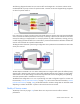
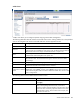


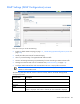
Table Of Contents
- HP Virtual Connect for c-Class BladeSystem Version 4.01 User Guide
- Abstract
- Notice
- Contents
- Introduction
- HP Virtual Connect Manager
- Virtual Connect domains
- Understanding Virtual Connect domains
- Managing domains
- Managing SNMP
- Viewing the system log
- Managing SSL configuration
- HP BladeSystem c-Class enclosures
- Virtual Connect users and roles
- Understanding VC administrative roles
- Managing users
- Local Users screen
- Configuring LDAP, RADIUS, and TACACS+
- Minimum requirements
- LDAP Server Settings (LDAP Server) screen
- LDAP Server Settings (LDAP Groups) screen
- LDAP Server Settings (LDAP Certificate) screen
- RADIUS Settings (RADIUS Server) screen
- RADIUS Settings (RADIUS Groups) screen
- TACACS+ Settings screen
- Role Management (Role Authentication Order) screen
- Role Management (Role Operations) screen
- Virtual Connect networks
- Understanding networks and shared uplink sets
- Managing networks
- Network Access Groups screen
- Define Network Access Group screen
- Ethernet Settings (Port Monitoring) screen
- Ethernet Settings (Advanced Settings) screen
- Quality of Service
- IGMP Settings (IGMP Configuration) screen
- IGMP Settings (Multicast Filter Set) screen
- Define Ethernet Network screen
- Ethernet Networks (External Connections) screen
- Ethernet Networks (Server Connections) screen
- Managing shared uplink sets
- Virtual Connect fabrics
- Virtual Connect server profiles
- Understanding server profiles
- Managing MAC, WWN, and server virtual ID settings
- Managing server profiles
- Define Server Profile screen
- Creating FCoE HBA connections for a BL890c i4
- Limited Ethernet connections when using HP Virtual Connect Flex-10/10D modules
- Creating iSCSI connections
- Flex-10 iSCSI connections
- Define Server Profile screen (multiple enclosures)
- Multiple network connections for a server port
- Defining server VLAN mappings
- Fibre Channel boot parameters
- Server Profiles screen
- Edit Server Profile screen
- Assigning a server profile with FCoE connections to an HP ProLiant BL680c G7 Server Blade
- Unassigning a server profile with FCoE connections to an HP ProLiant BL680c G7 Server Blade and deleting the SAN fabric
- General requirements for adding FC or FCoE connections
- Define Server Profile screen
- Virtual Connect and Insight Control Server Deployment
- Virtual Connect modules
- Firmware updates
- Stacking Links screen
- Throughput Statistics screen
- Enclosure Information screen
- Enclosure Status screen
- Interconnect Bays Status and Summary screen
- Causes for INCOMPATIBLE status
- Ethernet Bay Summary (General Information) screen
- Ethernet Bay Summary (Uplink Port Information) screen
- Ethernet Bay Summary (Server Port Information) screen
- Ethernet Bay Summary (MAC Address Table) screen
- Ethernet Bay Summary (IGMP Multicast Groups) screen
- Ethernet Bay Summary (Name Server) screen
- Ethernet Port Detailed Statistics screen
- FC Port Detailed Statistics screen
- FC Bay Summary screen
- Interconnect Bay Overall Status icon definitions
- Interconnect Bay OA Reported Status icon definitions
- Interconnect Bay VC Status icon definitions
- Interconnect Bay OA Communication Status icon definitions
- Server Bays Summary screen
- Server Bay Status screen
- Port status conditions
- Interconnect module removal and replacement
- Virtual Connect modules
- Upgrading to an HP Virtual Connect 8Gb 24-Port FC Module
- Upgrading to an HP Virtual Connect 8Gb 20-Port FC Module
- Upgrading or removing an HP Virtual Connect Flex-10, HP Virtual Connect FlexFabric, or HP Virtual Connect Flex-10/10D module
- Upgrading to an HP Virtual Connect FlexFabric module from a VC-FC module
- Onboard Administrator modules
- Maintenance and troubleshooting
- Appendix: Using Virtual Connect with nPartitions
- Support and other resources
- Acronyms and abbreviations
- Documentation feedback
- Index

Virtual Connect networks 101
Task Action
Enable/disable
Select (enable) or clear (disable) the Enable Throughput Statistics checkbox.
Change sampling rate
Select a sampling rate from the Configuration list. Supported sampling rates
include:
•
Sample rate of 1 minute, collecting up to 5 hours of samples.
•
Sample rate of 2 minutes, collecting up to 10 hours of samples.
•
Sample rate of 3 minutes, collecting up to 15 hours of samples.
•
Sample rate of 4 minutes, collecting up to 20 hours of samples.
•
Sample rate of 5 minutes, collecting up to 25 hours of samples.
•
Sample rate of 1 hour, collecting up to 12.5 days of samples.
LACP timer configuration
Virtual Connect provides two options for configuring uplink redundancy (Auto and Failover). When the
connection mode is set to "Auto", VC uses Link Aggregation Control Protocol to aggregate uplink ports from
a Network or Shared Uplink Set into Link Aggregation Groups. As part of the LACP negotiation to form a
LAG, the remote switch sends a request for the frequency of the control packets (LACPDU). This frequency can
be "short" or "long." Short is every 1 second with a 3 second timeout. Long is every 30 seconds with a 90
second timeout.
Prior to VC 4.01 this setting defaulted to short. Starting with VC v4.01 this setting can be set to short or long.
The domain-wide setting can be changed on the Ethernet Settings (Advanced Settings) screen. Additionally,
each Network or Shared Uplink Set also has a LACP timer setting. There are three possible values:
Domain-Default, Short, or Long. The domain default option sets the LACP timer to the domain-wide default
value that is specified on the Advanced Ethernet Settings screen.
This setting specifies the domain-wide default LACP timer. VCM uses this value to set the duration of the LACP
timeout and to request the rate at which LACP control packets are to be received on LACP-supported
interfaces. Changes to the domain-wide setting are immediately applied to all existing networks and shared
uplink sets.
Using the "long" setting can help prevent loss of LAGs while performing in-service upgrades on upstream
switch firmware.
Quality of Service
QoS is used to provide different priorities for designated networking traffic flows and guarantee a certain
level of performance through resource reservation. QoS is important for reasons such as:
• Providing Service Level Agreements for network traffic and to optimize network utilization.
• Different traffic types such as management, back up, and voice having different requirements for
throughput, jitter, delays and packet loss.
• IP-TV, VOIP and expansion of internet is creating additional traffic and latency requirements.
• In some cases, capacity cannot be increased. Even when possible, increasing capacity may still
encounter issues if traffic needs to be re-routed due to a failure.
Traffic must be categorized and then classified. Once classified, traffic is given priorities and scheduled for
transmission. For end to end QoS, all hops along the way must be configured with similar QoS policies of
classification and traffic management. VC manages and guarantees its own QoS settings as one of the hops
within the networking infrastructure.