
HP Virtual Connect for c-Class BladeSystem Setup and Install Guide


HP Virtual Connect Manager 59
networks, server profiles, and user accounts that simplify the setup and administration of server connections.
Establishing a Virtual Connect domain enables you to upgrade, replace, or move servers within your
enclosures without changes being visible to the external LAN/SAN environments.
Beginning with VC 4.10, an auto-deployment feature allows for the configuration of a VC domain from a
centralized location using DHCP and TFTP to access the configuration script. Auto-deployment is supported
only for single-enclosure domains. For more information on auto-deployment, see the HP Virtual Connect for
c-Class BladeSystem User Guide on the HP website (http://www.hp.com/go/vc/manuals).
Plan your interconnect module usage carefully before running the Virtual Connect Domain Setup Wizard.
After an interconnect bay is configured for use with a VC module, it remains configured for that module type
until the module is removed or the overall VC domain is deleted. Virtual Connect reports failures for any VC
module that is removed from the domain.
Before getting started, perform the following tasks:
• Verify that the HP Onboard Administrator is running the latest firmware. HP recommends using the latest
version available. Using IPv6 requires OA 4.01 or higher.
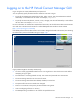
• Note the following information from the Default Network Settings label attached to the primary module:
o DNS name
o User name
o Password
• Connect any Ethernet module stacking cables ("Recommended stacking connections" on page 23).
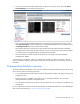
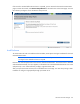
After logging in for the first time, the Virtual Connect Domain Setup Wizard appears. This wizard walks you
through the following tasks:
• Importing the enclosure (creating the domain)
• Naming the domain
• Administrating local users